
ESP32 - DRV8833 DC Motor Driver
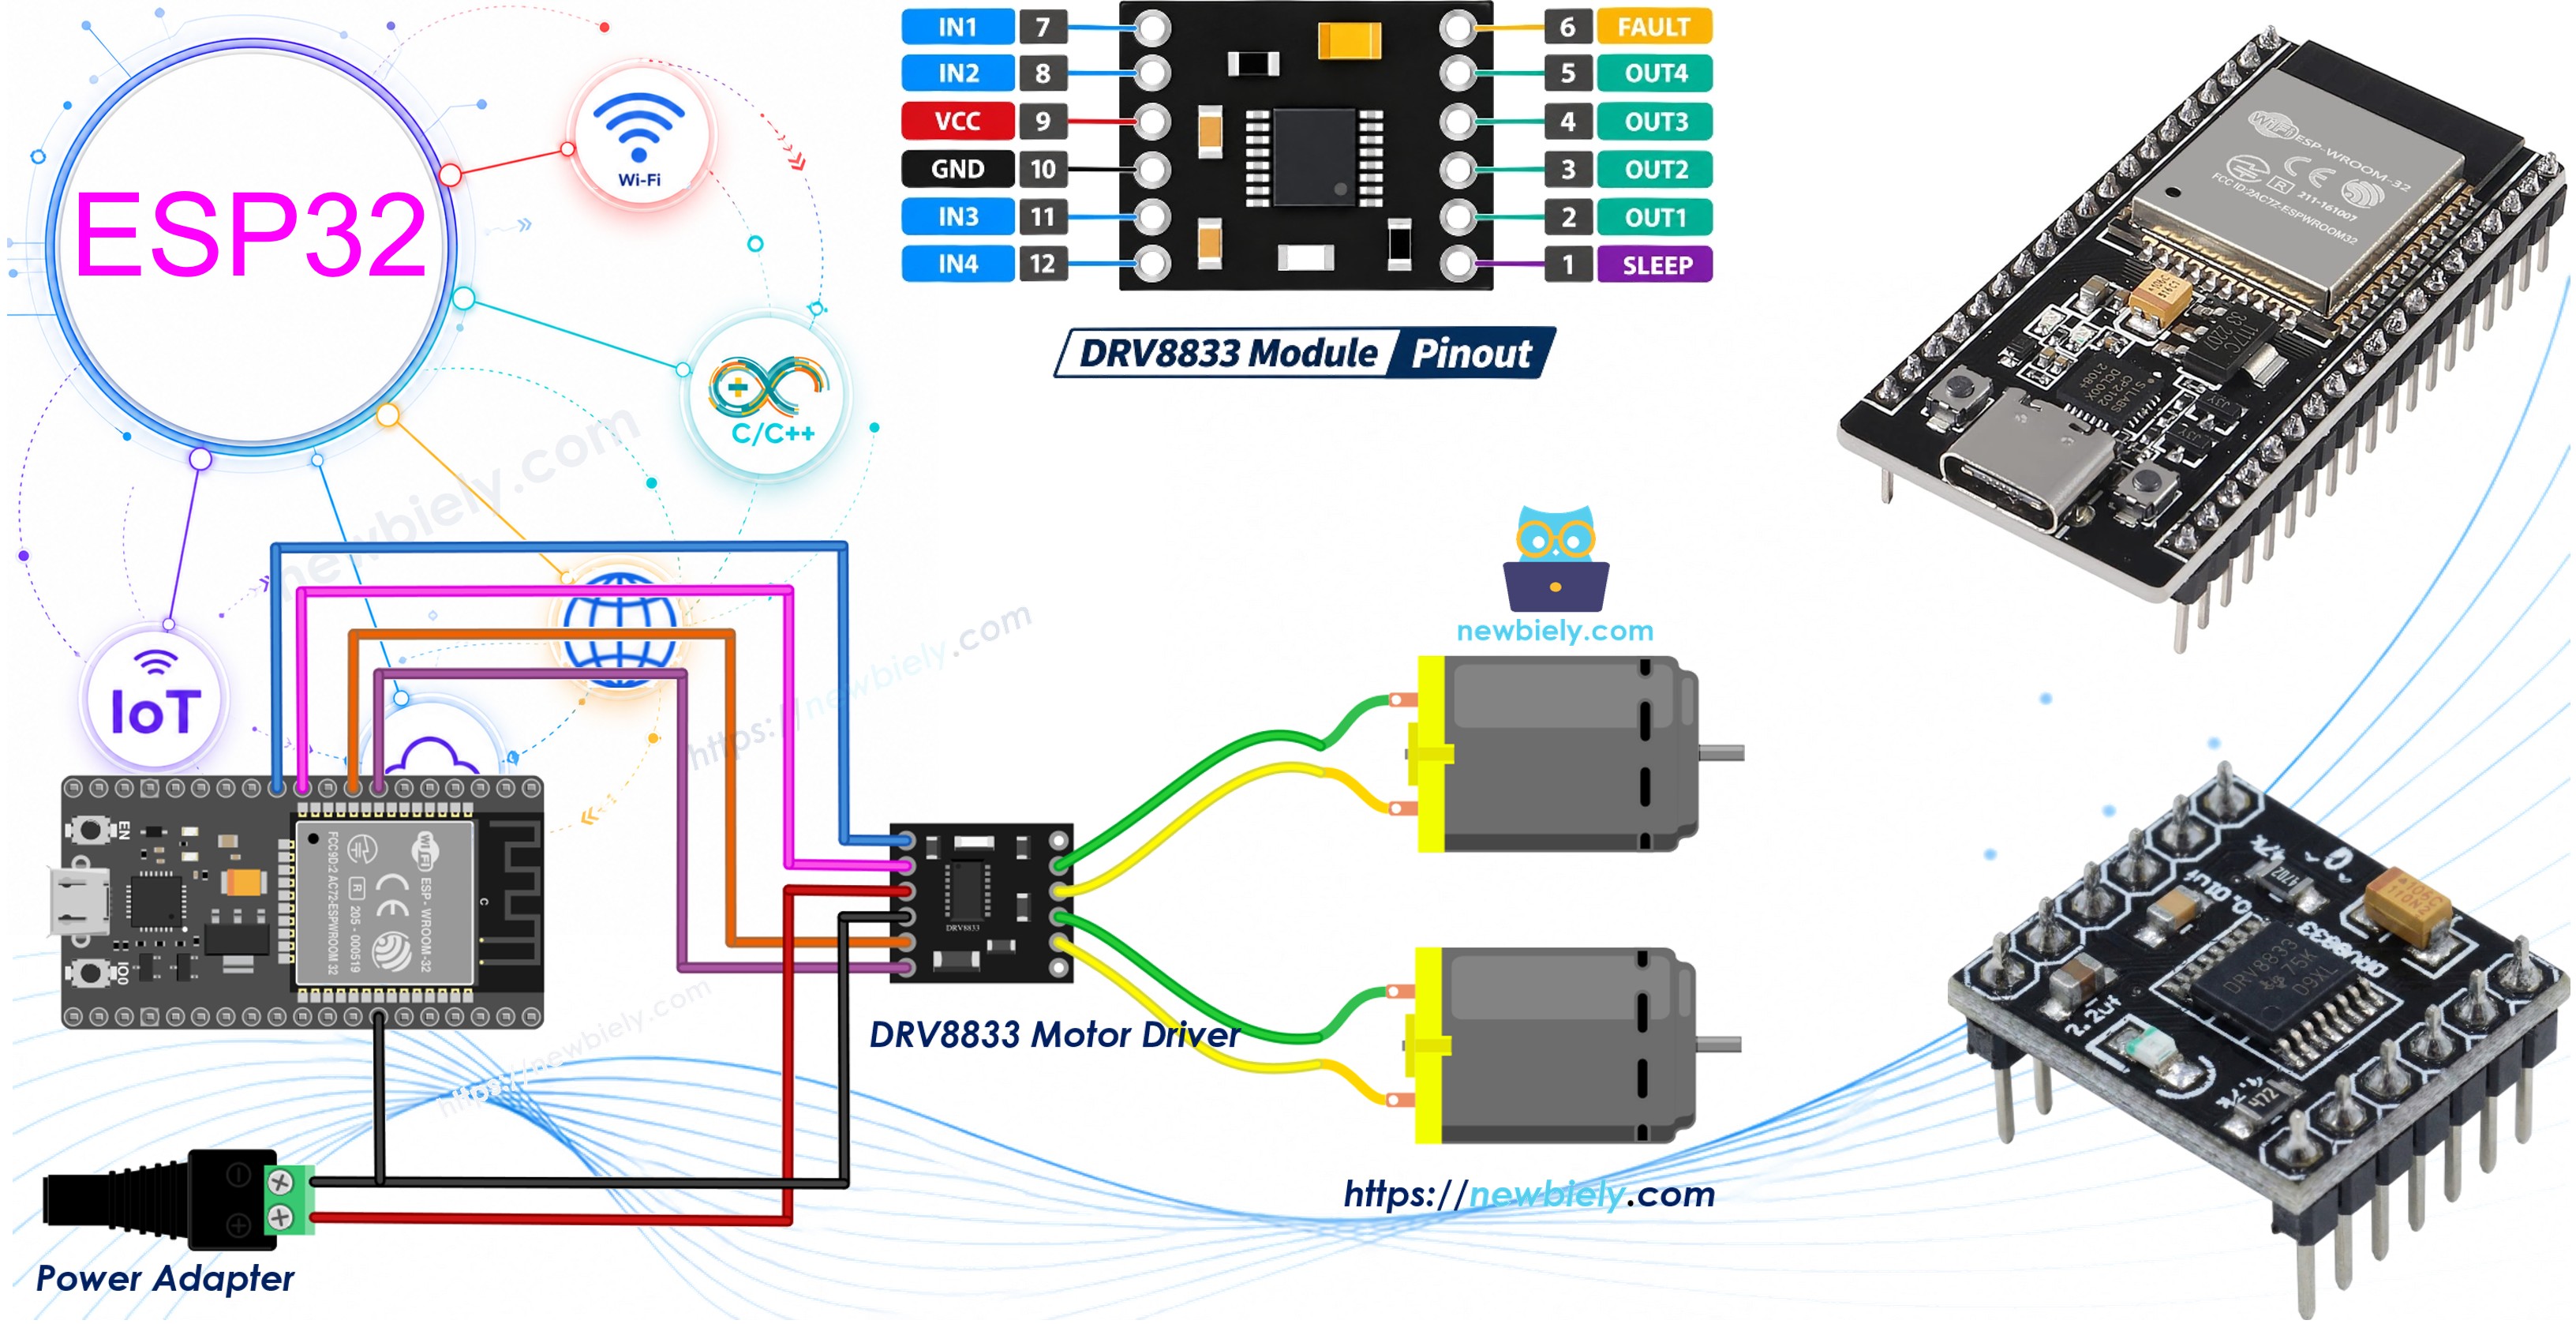
This tutorial instructs you how to use ESP32 to spin DC motors through the small DRV8833 motor driver board. We start with a single motor (speed up, slow down, change direction, coast and brake), and then we hook up a second motor so the ESP32 can drive both wheels of a little robot car.
If you already own the bigger L298N board, the ESP32 - DC Motor tutorial covers that one. The DRV8833 is the smaller and cooler-running option, and it fits battery-powered projects very well.
This tutorial shows how to program the ESP32 using the Arduino language (C/C++) via the Arduino IDE. If you’d like to learn how to program the ESP32 with MicroPython, visit this ESP32 MicroPython - DRV8833 DC Motor Driver tutorial.
Hardware Used In This Tutorial
Or you can buy the following kits:
| 1 | × | DIYables ESP32 Starter Kit (ESP32 included) | |
| 1 | × | DIYables ESP32 S3 Starter Kit (ESP32 S3 included) | |
| 1 | × | DIYables Sensor Kit (18 sensors/displays) |
The first part only needs one DC motor. The second motor is for the two-motor part.
Introduction to DRV8833 Motor Driver
The DRV8833 is a dual H-bridge chip made by Texas Instruments. One chip has two channels, so one module can run two brushed DC motors in both directions (or one small bipolar stepper motor, which is not covered here). The outputs are MOSFETs with a low resistance of about 360 mΩ, so very little voltage is lost inside the driver. With the L298N, a good part of a 6V battery is wasted as heat. With the DRV8833, almost all of it reaches the motor.
| DRV8833 | |
|---|---|
| The motor supply voltage (VCC/VM) | 2.7V to 10.8V |
| The output current per channel | about 1.5A RMS, 2A peak (with good cooling) |
| The control logic | 3.3V and 5V signals both work |
| The PWM frequency | up to 50kHz |
| The protection | under-voltage lockout, over-current, thermal shutdown |
The chip makes its own internal logic voltage from the motor supply, so the module has no separate logic power pin. This is why the 3.3V GPIO pins of the ESP32 can control it directly. If you need more current for one big motor, the two channels can be connected in parallel for about 3A, but we will not do that here.
DRV8833 Pinout
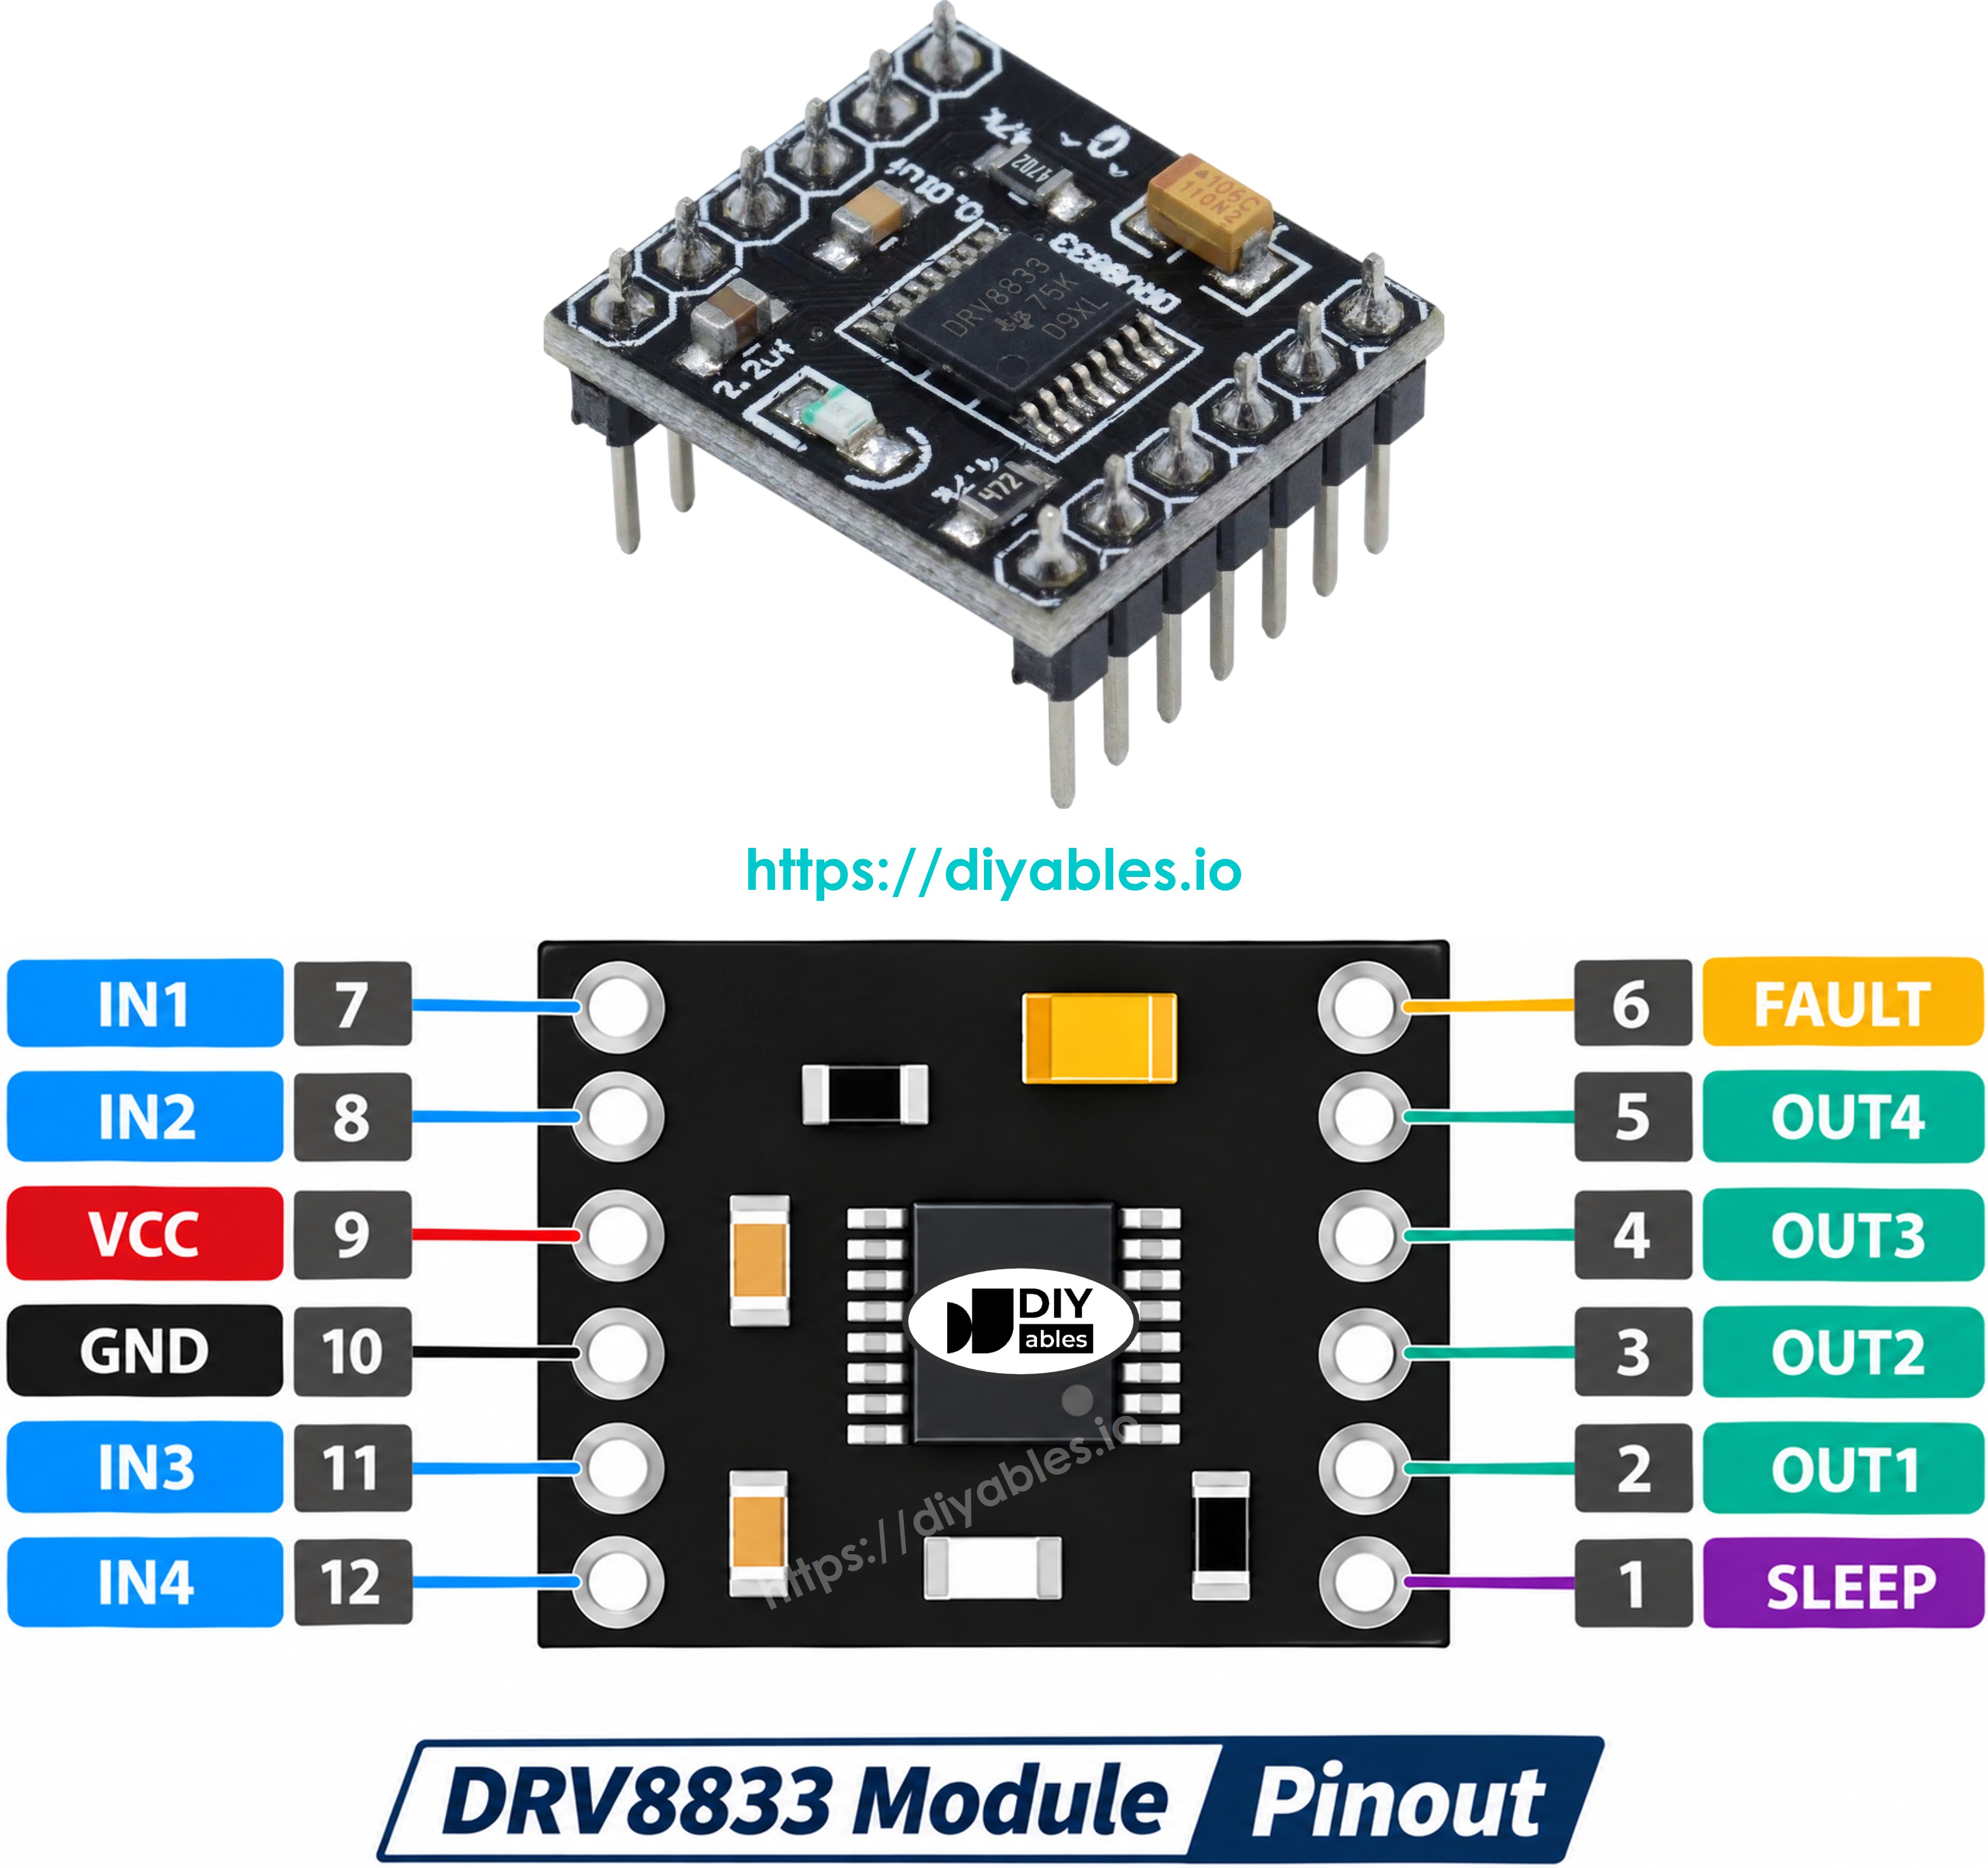
The common red/blue DRV8833 breakout board has these pins. The labels vary between makers: some boards print AIN1/AIN2/BIN1/BIN2, AOUT1/AOUT2/BOUT1/BOUT2, SLP and FLT instead.
- IN1, IN2 pins: connect these pins to two PWM-capable ESP32 GPIO pins. They control motor A.
- IN3, IN4 pins: connect these pins to two other PWM-capable ESP32 GPIO pins. They control motor B.
- OUT1, OUT2 pins: connect these pins to the two wires of motor A.
- OUT3, OUT4 pins: connect these pins to the two wires of motor B.
- VCC pin: connect this pin to the positive of the motor power supply (2.7V to 10.8V).
- GND pin: connect this pin to the negative of the motor power supply AND to a GND pin of the ESP32.
- EEP pin (nSLEEP): connect this pin to the 3.3V pin of the ESP32 (or to a GPIO set HIGH). When it is LOW, the chip sleeps and the motors do not move.
- ULT pin (nFAULT): an open-drain output that goes LOW when the chip detects a fault. It is optional, you can leave it unconnected.
How DRV8833 Controls Speed and Direction
Unlike the L298N, the DRV8833 has no ENA/ENB speed pin. Each channel is controlled only by its two input pins. The table below is for motor A. Motor B works the same way with IN3 and IN4.
| IN1 | IN2 | Motor A |
|---|---|---|
| LOW | LOW | Coast (the motor spins freely until it stops) |
| HIGH | LOW | Forward |
| LOW | HIGH | Reverse |
| HIGH | HIGH | Brake (the motor stops quickly) |
To set the speed, the ESP32 sends a PWM signal to one input and keeps the other one LOW:
- To go forward at a chosen speed: PWM on IN1, IN2 LOW
- To go in reverse at a chosen speed: IN1 LOW, PWM on IN2
This means both input pins of each channel must support PWM. On the ESP32 this is easy, because almost every output GPIO can make PWM. The code in this tutorial uses analogWrite() with a value from 0 (stop) to 255 (full speed), the same function the other ESP32 tutorials on this site use.
How to Control One DC Motor using DRV8833
Wiring Diagram
The motor runs on an external 5V adapter, not on the ESP32. Never take motor power from the 5V or 3.3V pin of the ESP32 board. The only shared link between the two power sides is the ground wire.
- How to connect ESP32 and the DRV8833 module with jumper wires
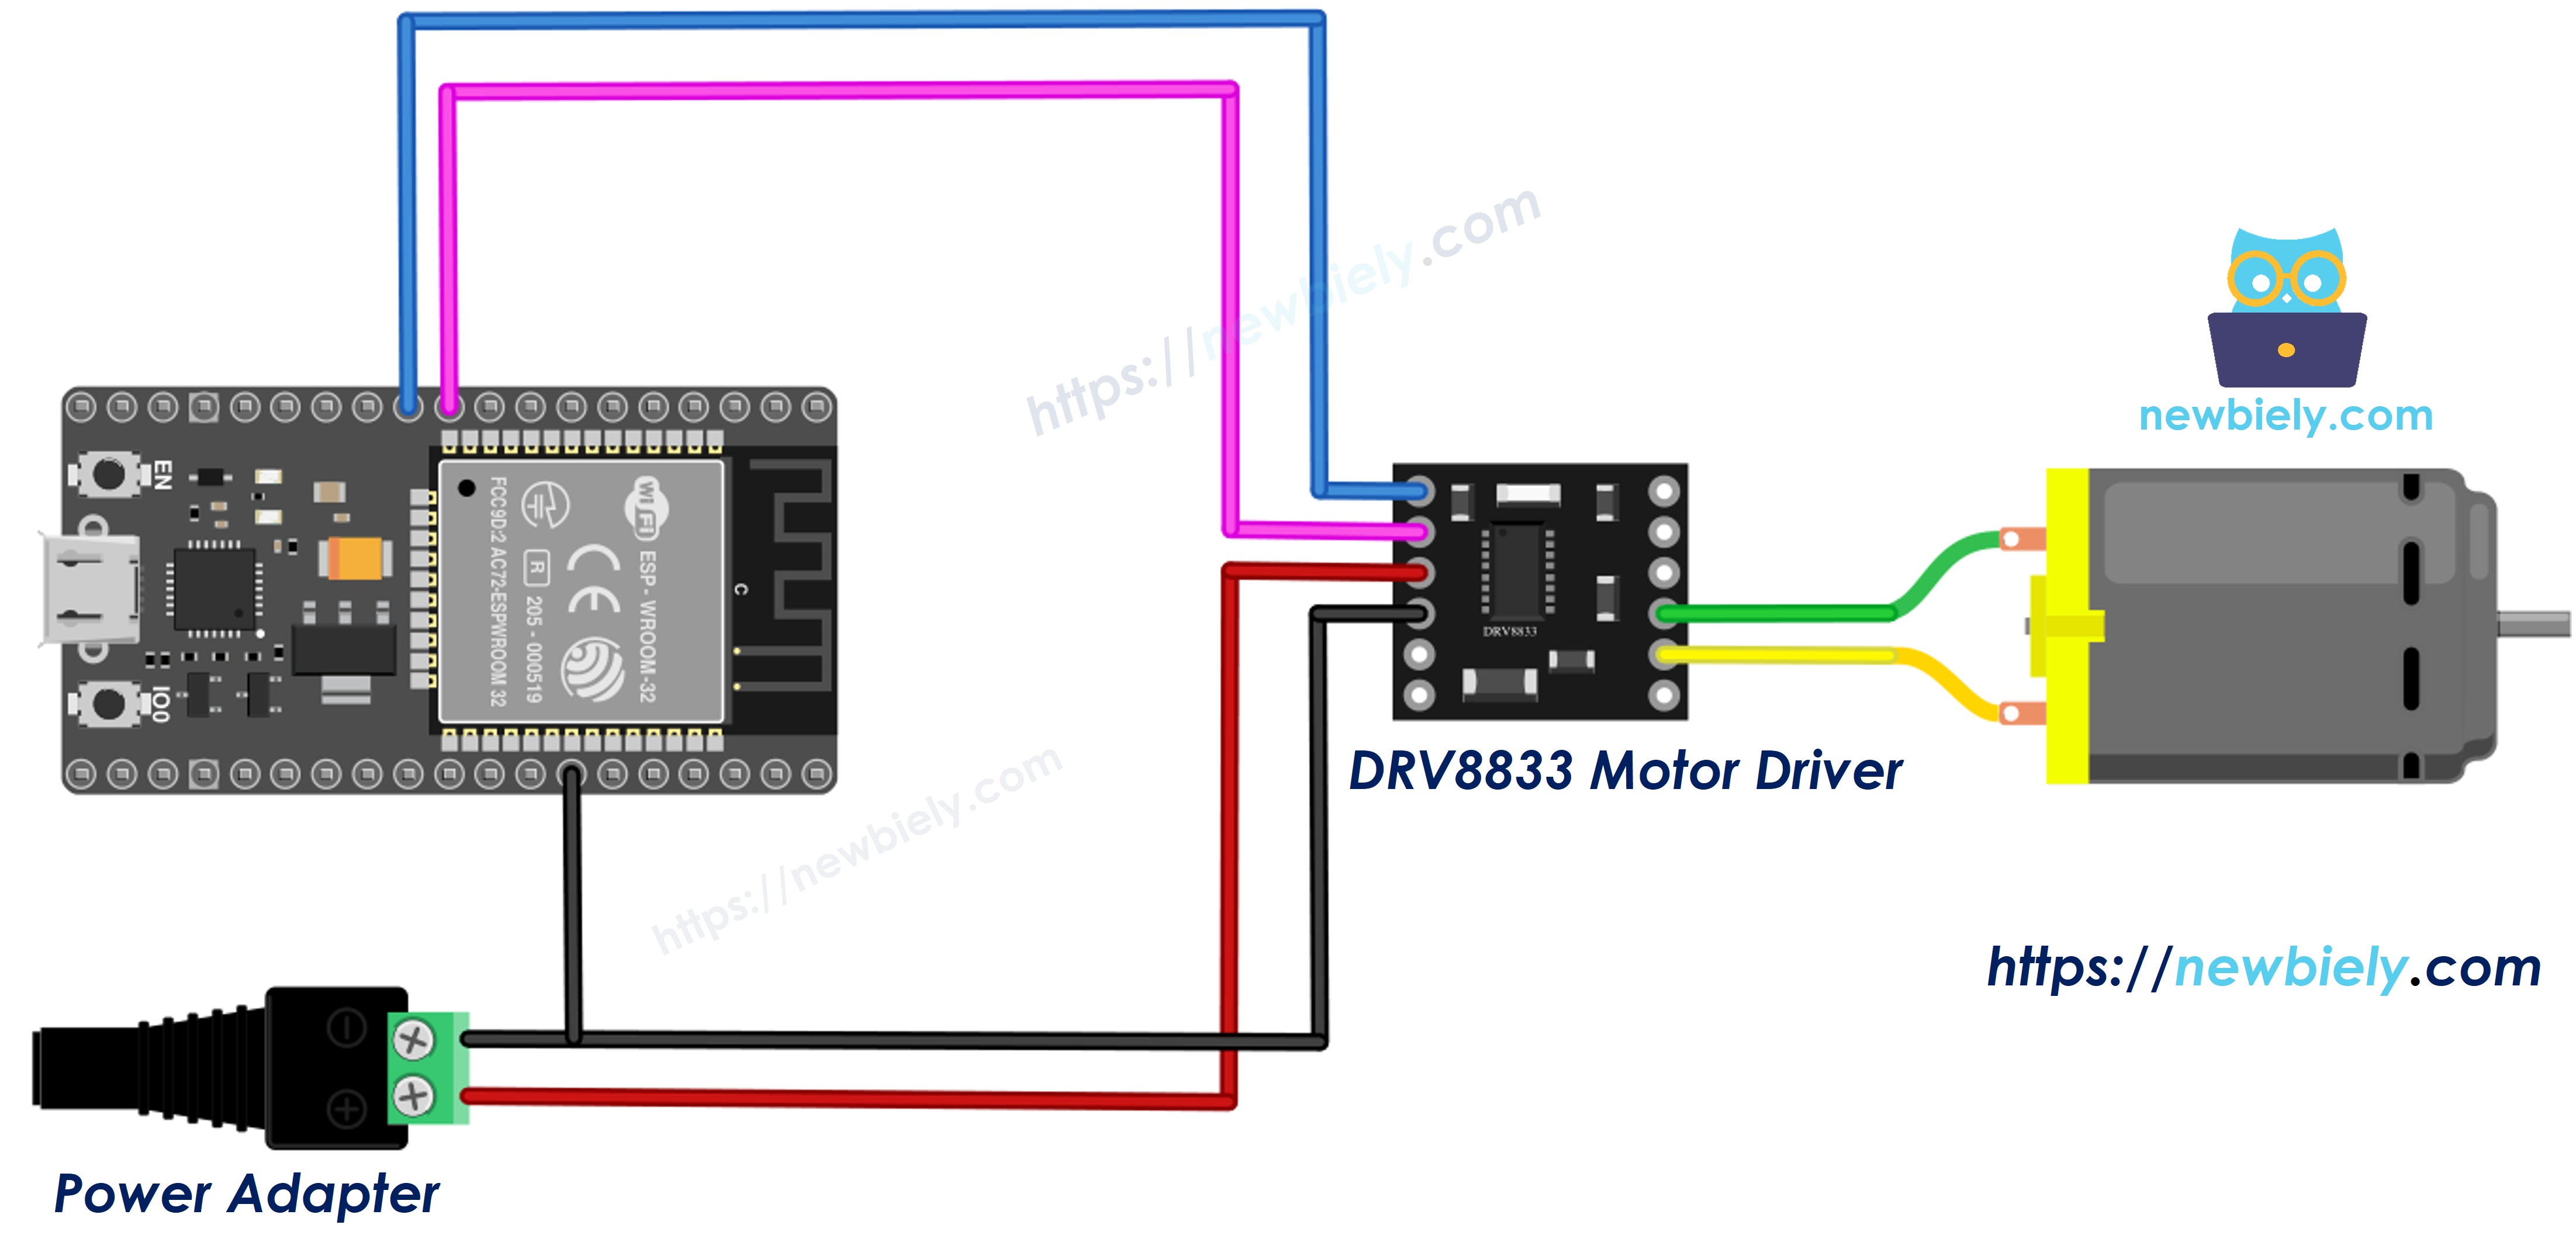
This image is created using Fritzing. Click to enlarge image
- How to connect ESP32 and the DRV8833 module using screw terminal block breakout board
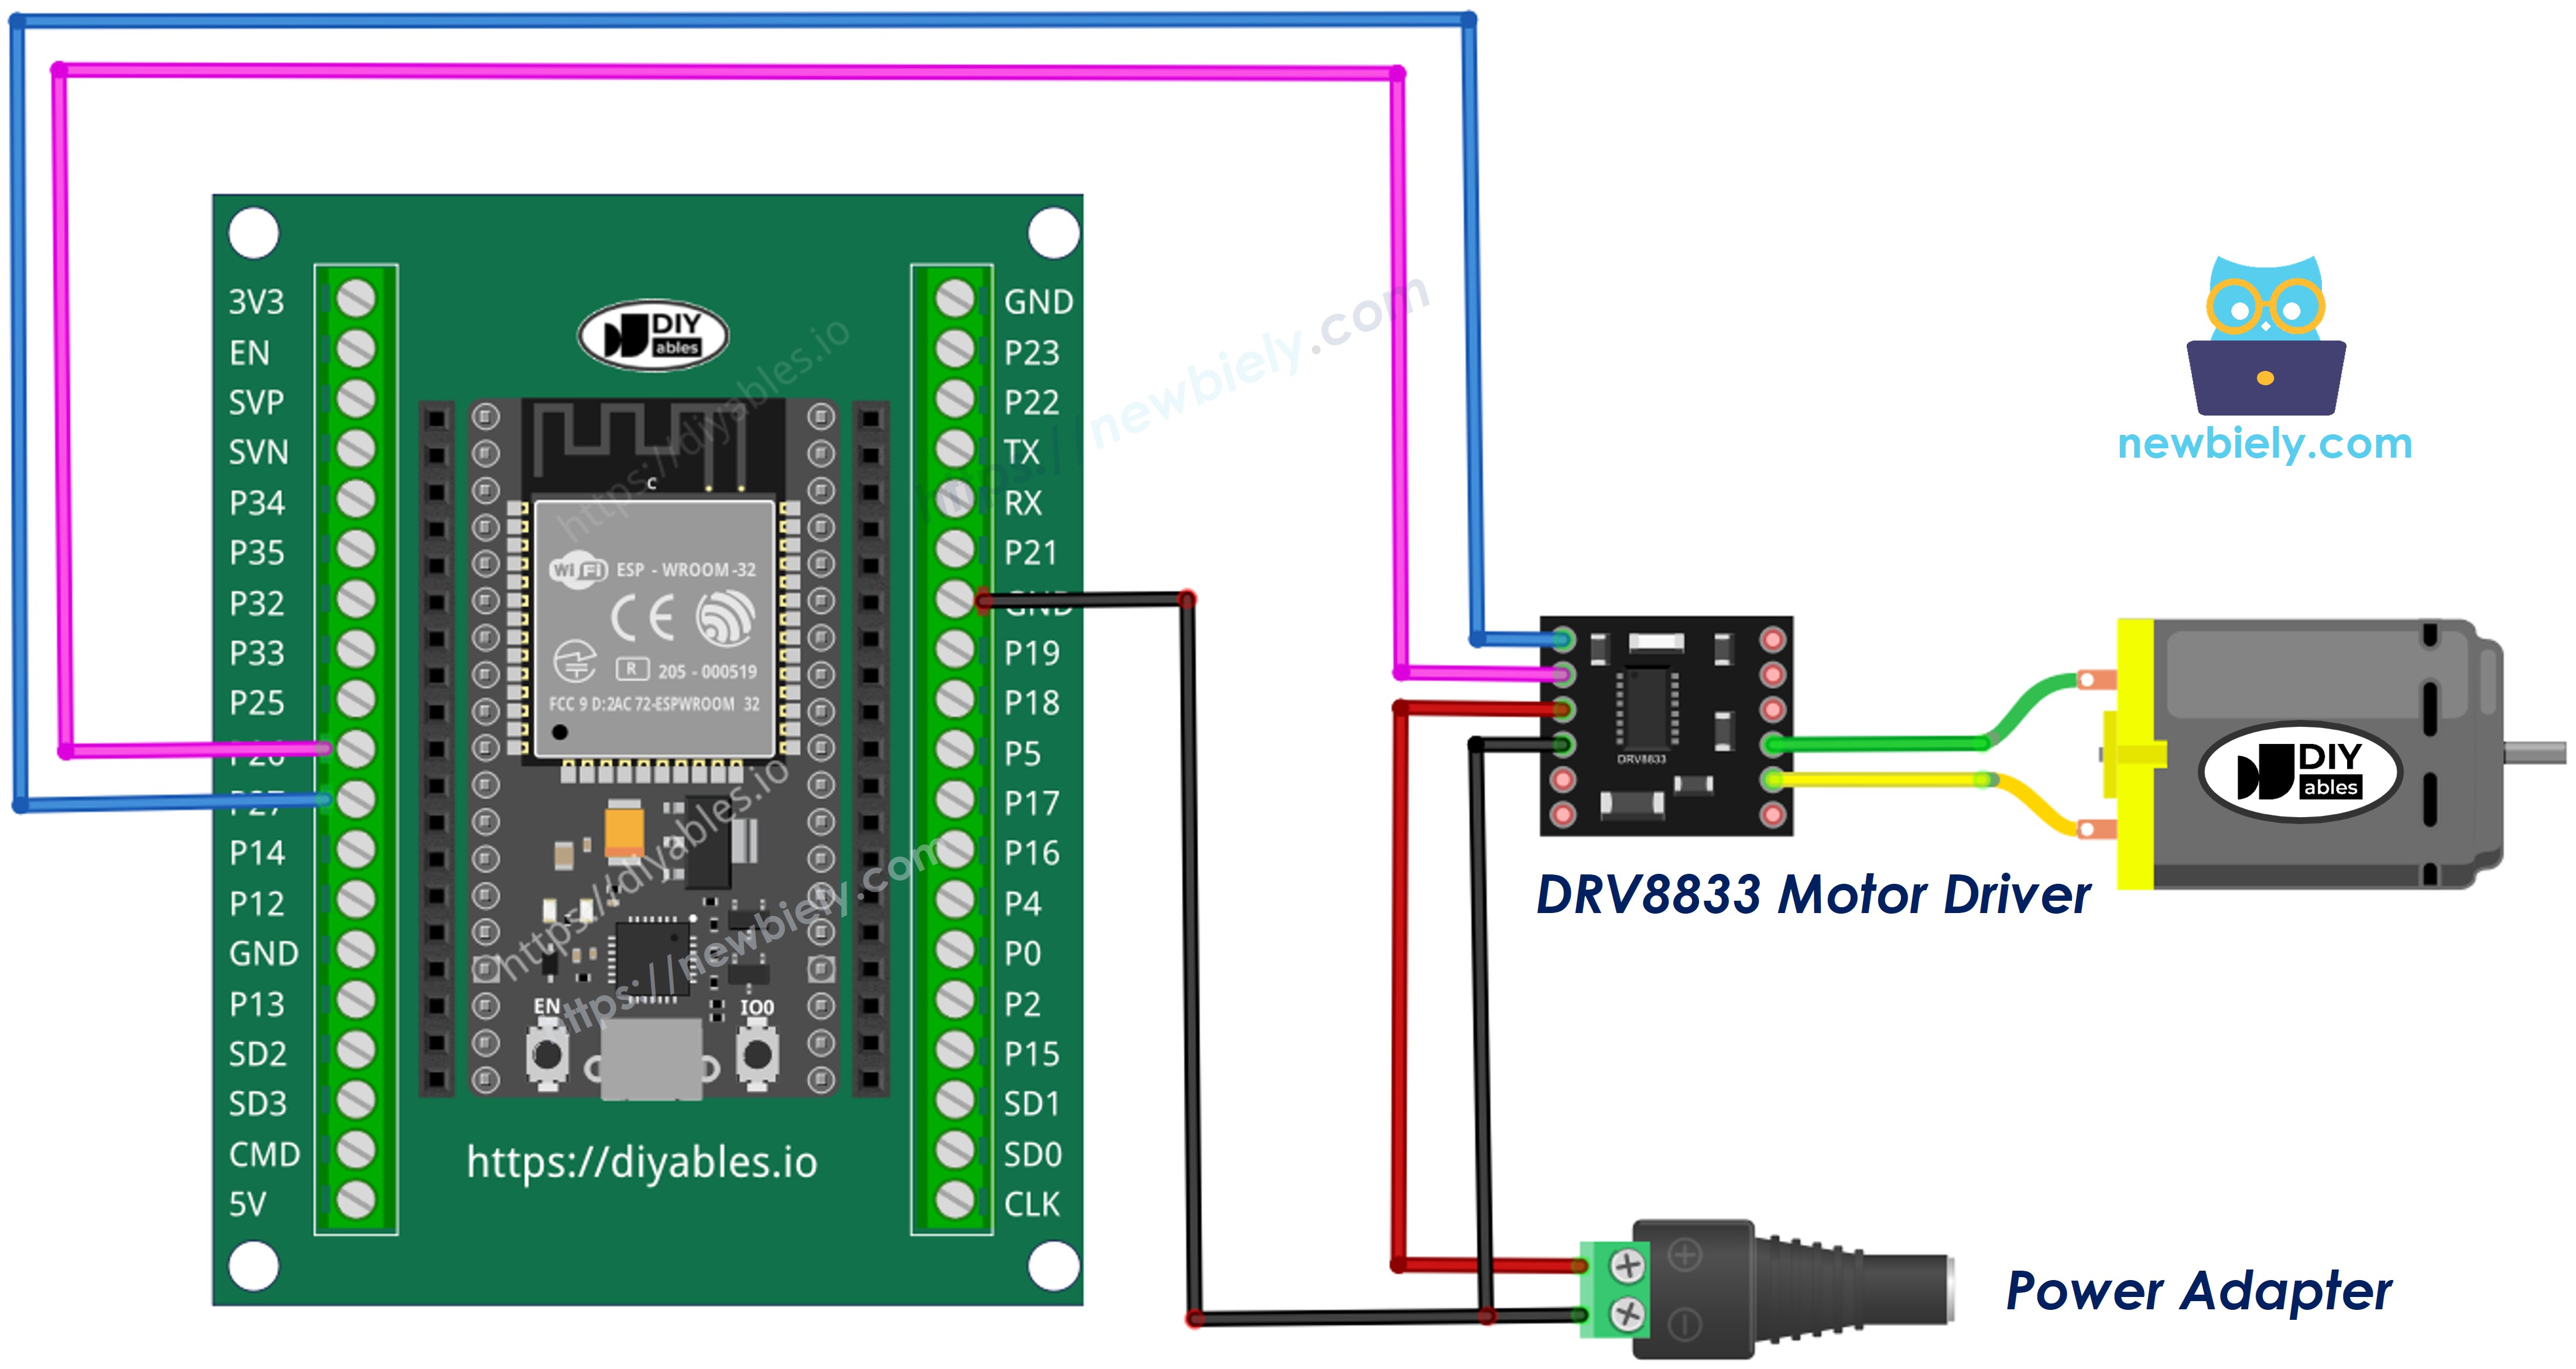
This image is created using Fritzing. Click to enlarge image
| DRV8833 Module | ESP32 / Other |
|---|---|
| IN1 | → GPIO27 |
| IN2 | → GPIO26 |
| EEP | → 3.3V |
| GND | → GND of ESP32 and negative (-) of the 5V adapter |
| VCC | → positive (+) of the 5V adapter |
| OUT1, OUT2 | → the two wires of the DC motor |
How To Program
- Set both input pins as outputs:
- Spin forward at a speed from 0 to 255:
- Spin in reverse at a speed from 0 to 255:
- Let the motor coast to a stop:
- Brake the motor hard:
ESP32 Code - One DC Motor
The code below repeats this cycle: it speeds the motor up in the forward direction, holds full speed, lets it coast, runs it in reverse at about 70% speed, and then brakes. Each step is printed to the Serial Monitor.
Quick Instructions
- If this is the first time you use ESP32, see how to setup environment for ESP32 on Arduino IDE.
- Do the wiring as above image. Leave the 5V adapter unplugged for now.
- Connect the ESP32 board to your PC via a USB Type-C cable.
- Open Arduino IDE on your PC.
- Select the right ESP32 board (e.g. ESP32 Dev Module) and COM port.
- Copy the above code and open with Arduino IDE. No extra library is needed.
- Compile and upload code to ESP32 board by clicking Upload button on Arduino IDE.
- Plug in the 5V adapter to power the motor.
- Open the Serial Monitor and watch the motor at the same time.
※ NOTE THAT:
If the motor turns the "wrong" way when the Serial Monitor says Forward, just swap the two motor wires on OUT1 and OUT2. If the motor does not move at all, check that the EEP pin is connected to 3.3V.
If you're unfamiliar with how to supply power to the ESP32 and other components, you can find guidance in the following tutorial: The best way to Power ESP32 and sensors/displays.
How to Control Two DC Motors using DRV8833
Wiring Diagram
Now add the second motor to OUT3/OUT4 and connect IN3/IN4 to two more ESP32 pins. Think of motor A as the left wheel and motor B as the right wheel of a small car.
- How to connect ESP32 and the DRV8833 module with jumper wires
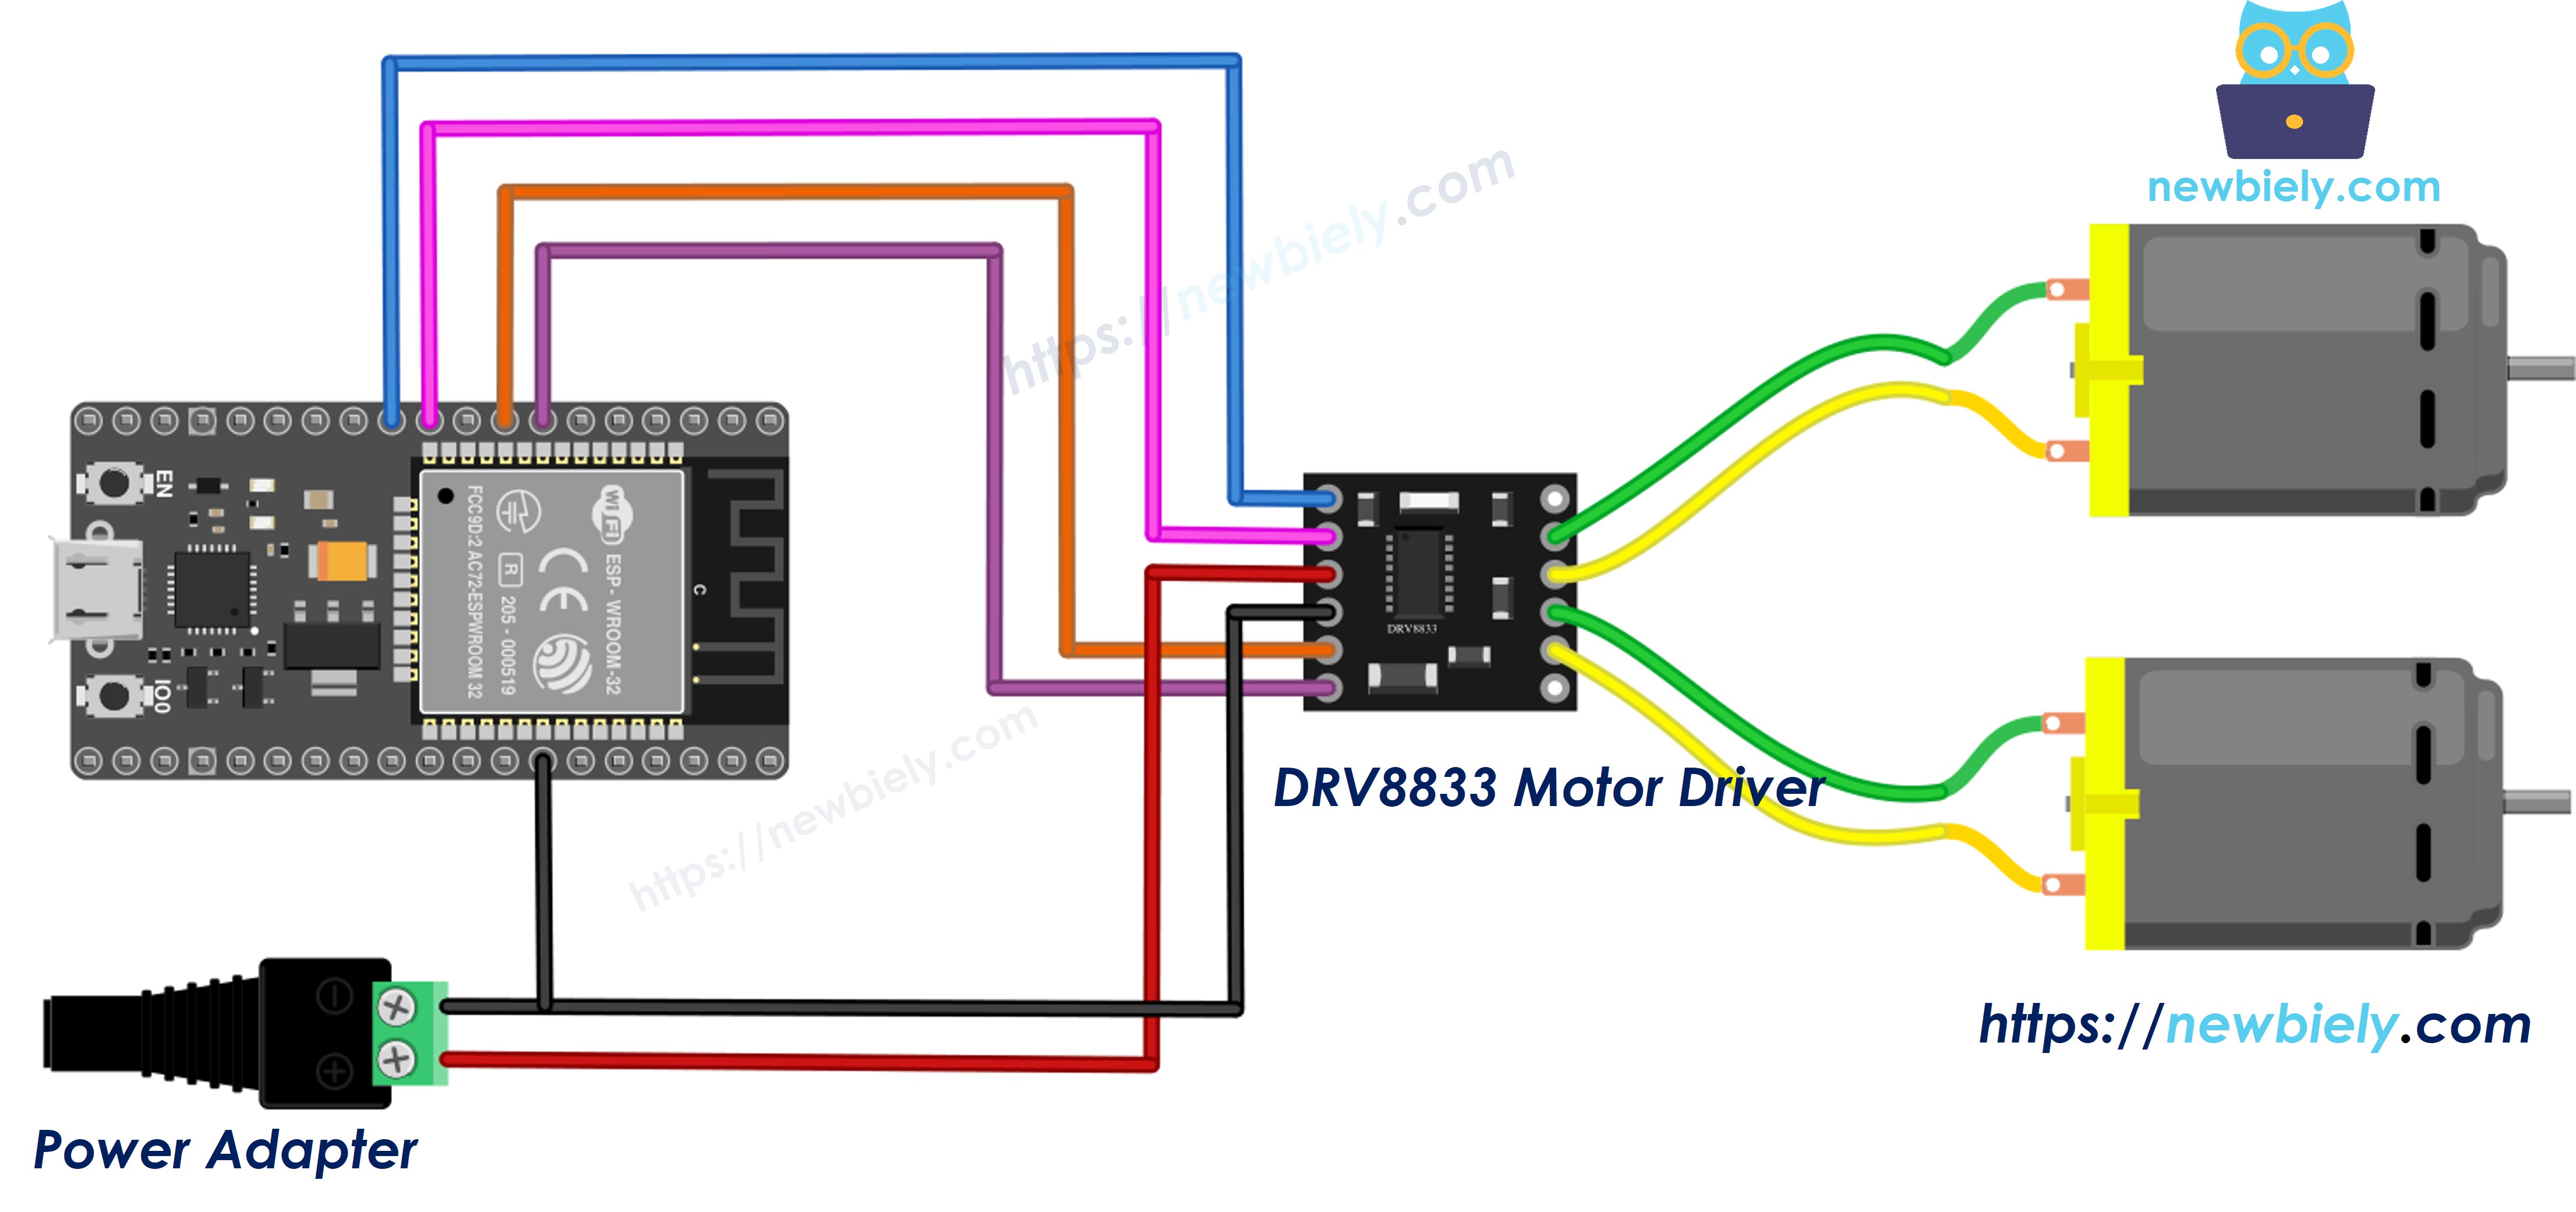
This image is created using Fritzing. Click to enlarge image
- How to connect ESP32 and the DRV8833 module using screw terminal block breakout board
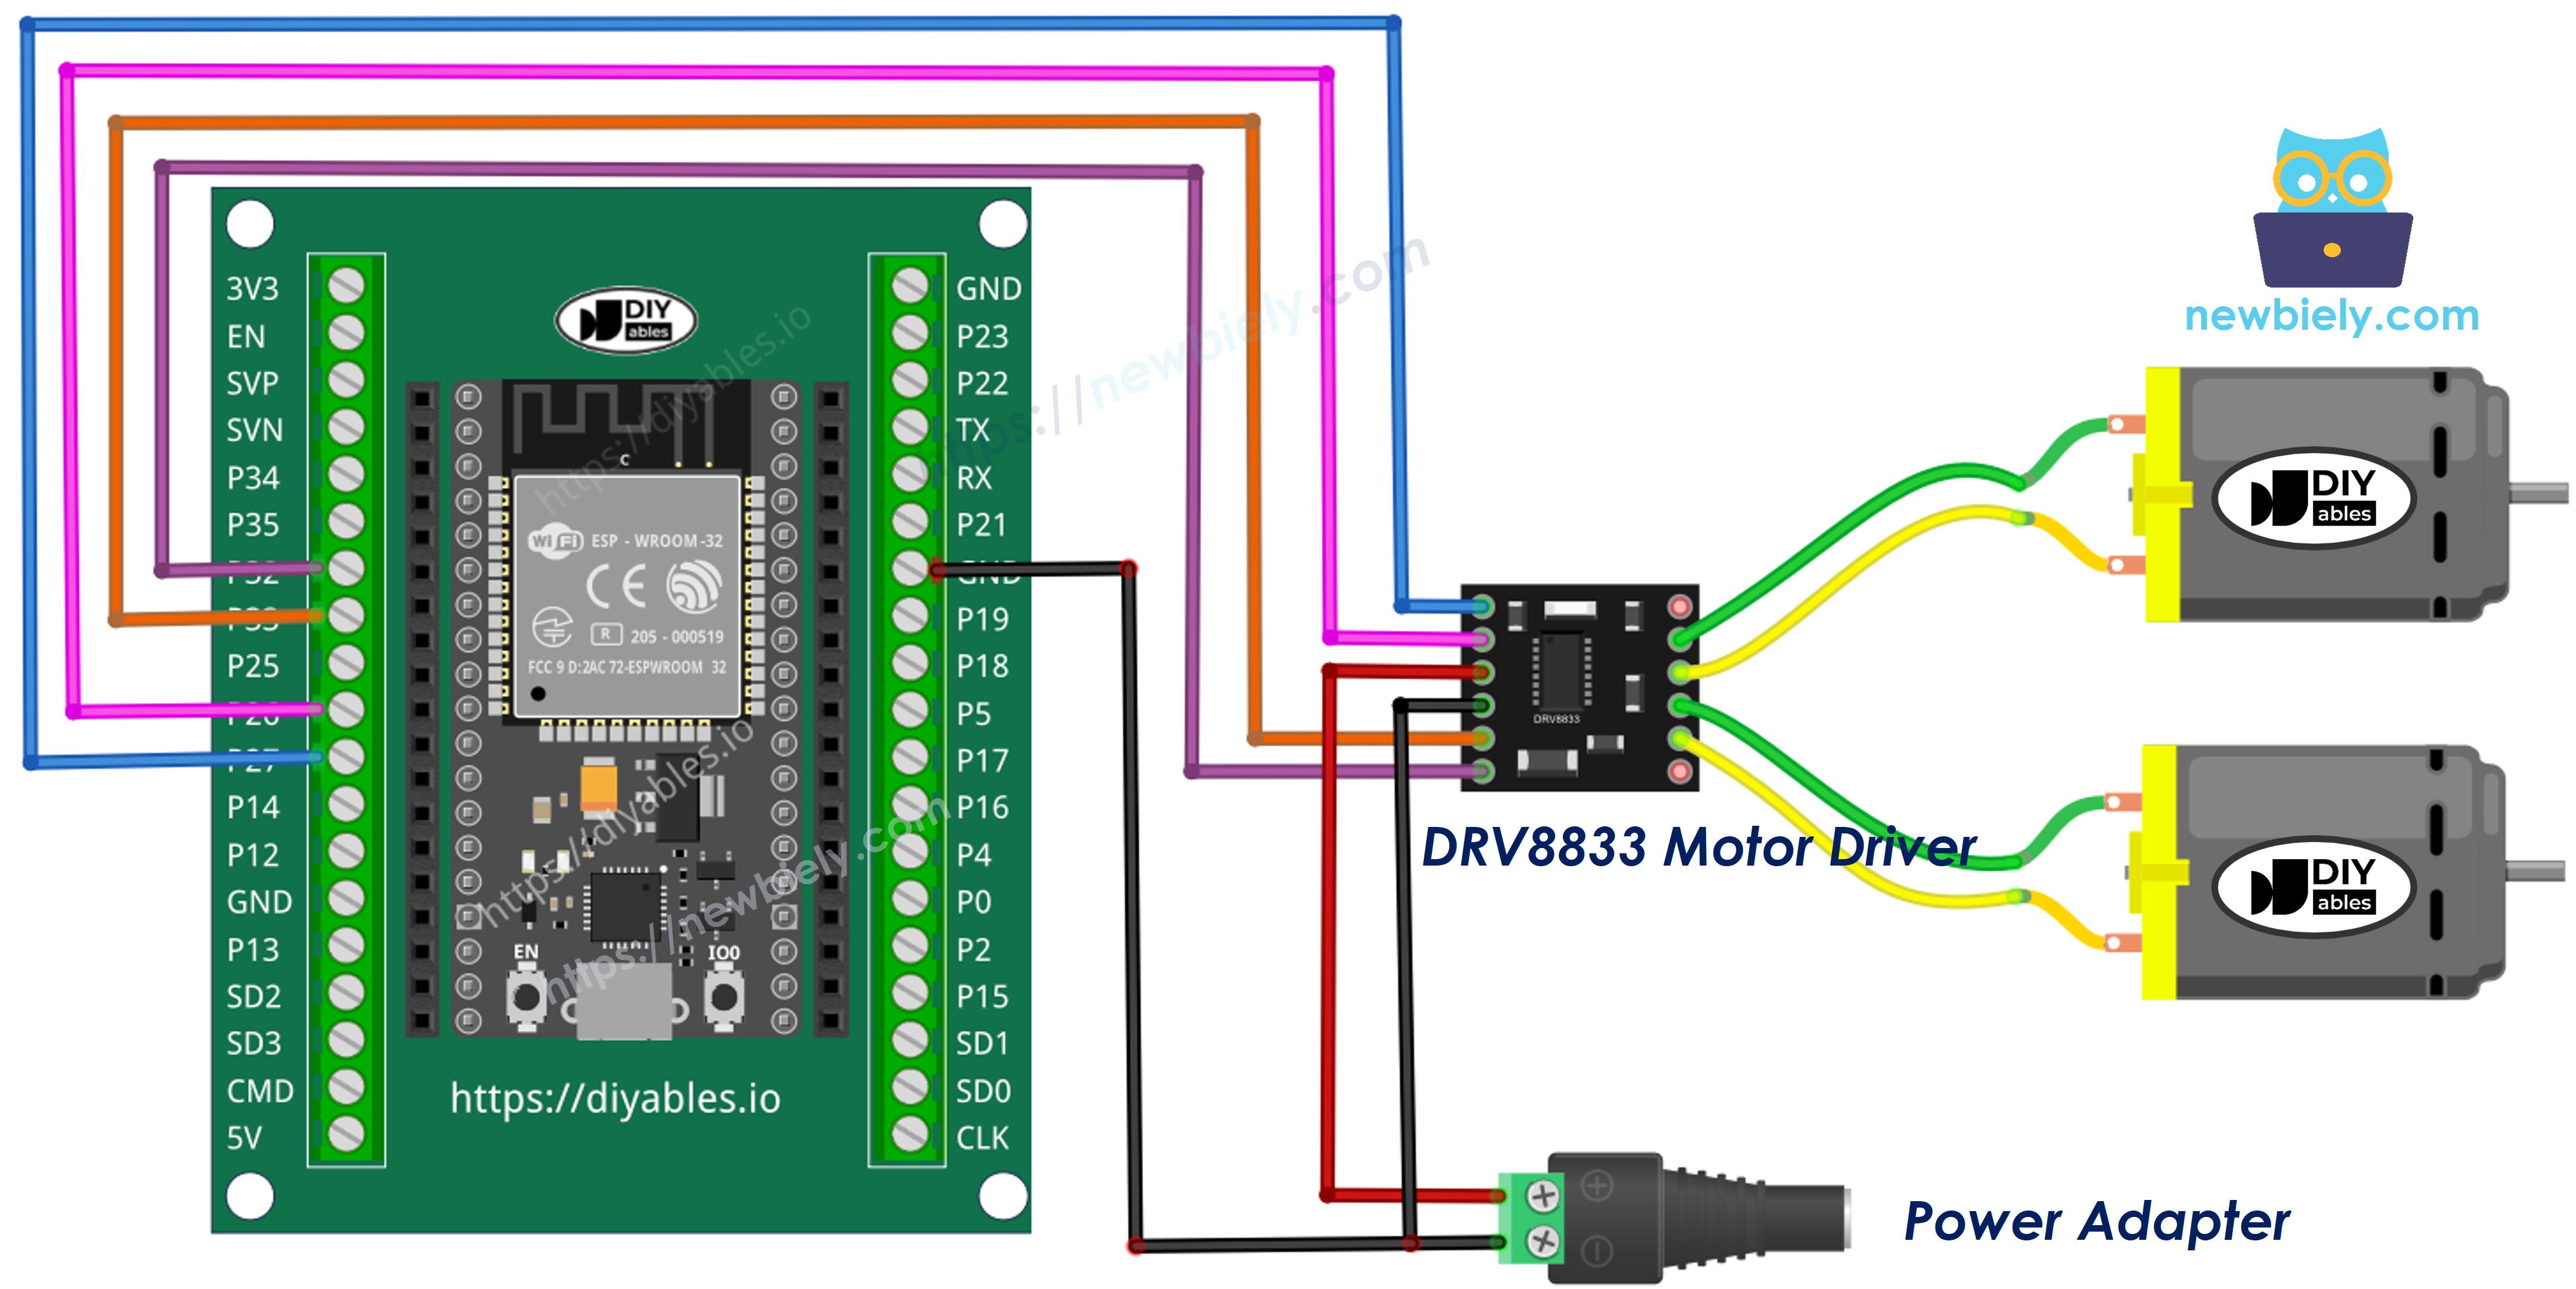
This image is created using Fritzing. Click to enlarge image
| DRV8833 Module | ESP32 / Other |
|---|---|
| IN1 | → GPIO27 |
| IN2 | → GPIO26 |
| IN3 | → GPIO33 |
| IN4 | → GPIO32 |
| EEP | → 3.3V |
| GND | → GND of ESP32 and negative (-) of the 5V adapter |
| VCC | → positive (+) of the 5V adapter |
| OUT1, OUT2 | → motor A (left) |
| OUT3, OUT4 | → motor B (right) |
ESP32 Code - Two DC Motors
To keep loop() short, the code has two helper functions, motorA(speed) and motorB(speed). The speed is a signed number from -255 to 255: a positive value spins forward, a negative value spins in reverse, and 0 lets the motor coast. With these two helpers, each car move needs only two lines.
Quick Instructions
- Do the wiring for two motors as above image.
- Copy the above code and open with Arduino IDE.
- Click Upload button on Arduino IDE to upload code to ESP32.
- Power the motors with the 5V adapter. If you test on a table, lift the wheels off the table first.
- See the result on Serial Monitor and on the motors:
When turning left, motor A (left) runs backward and motor B (right) runs forward, so the car spins on the spot. Turning right is the opposite. If one wheel goes the wrong way, swap the two wires of that motor only.
※ NOTE THAT:
This tutorial controls the speed in a relative way (a PWM value from 0 to 255). To control the exact speed in rounds per minute, you need a motor with an encoder and a PID control loop.
Video Tutorial
Making video is a time-consuming work. If the video tutorial is necessary for your learning, please let us know by subscribing to our YouTube channel , If the demand for video is high, we will make the video tutorial.