Disclosure: Some of the links in this section are Amazon affiliate links, meaning we may earn a commission at no additional cost to you if you make a purchase through them. Additionally, some links direct you to products from our own brand, DIYables .
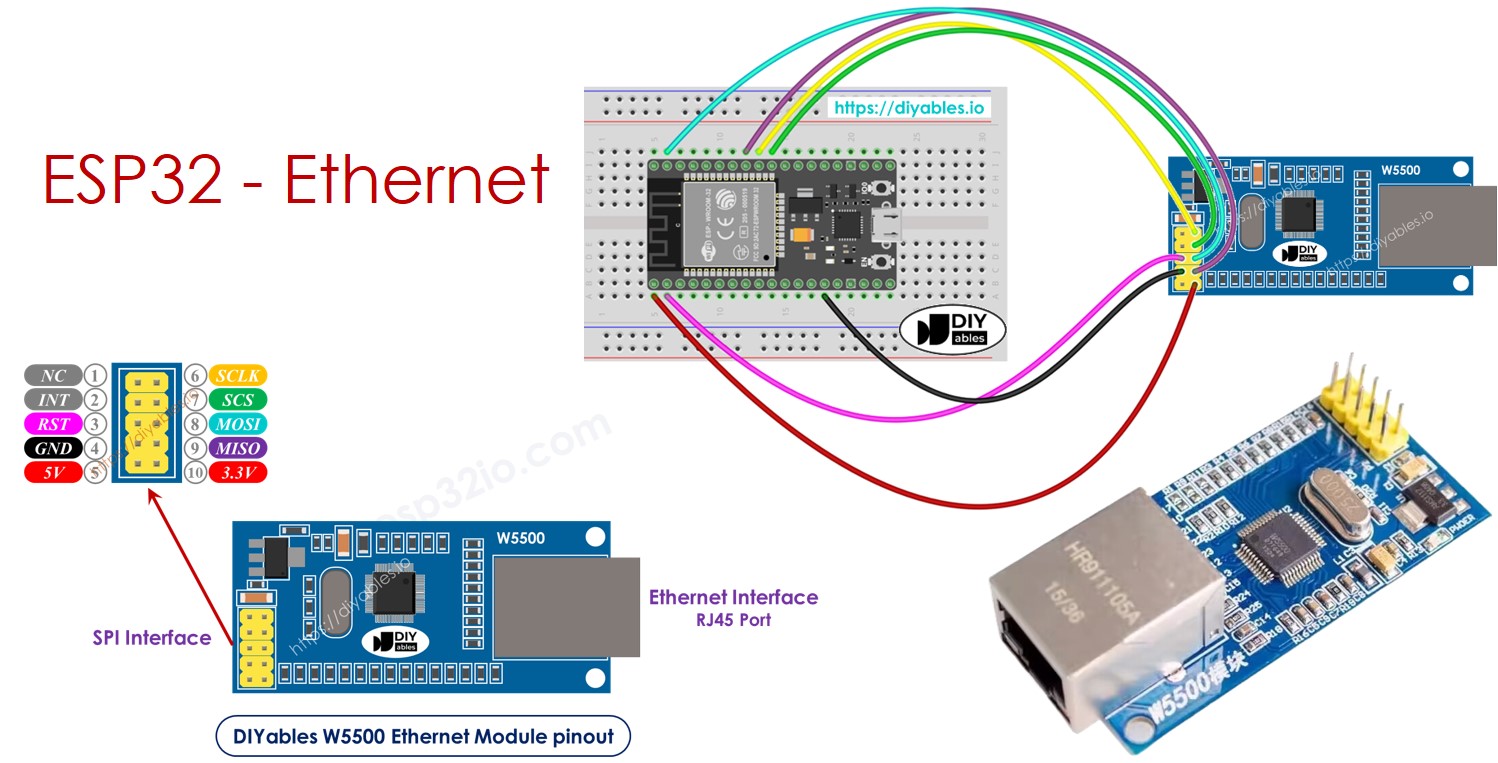
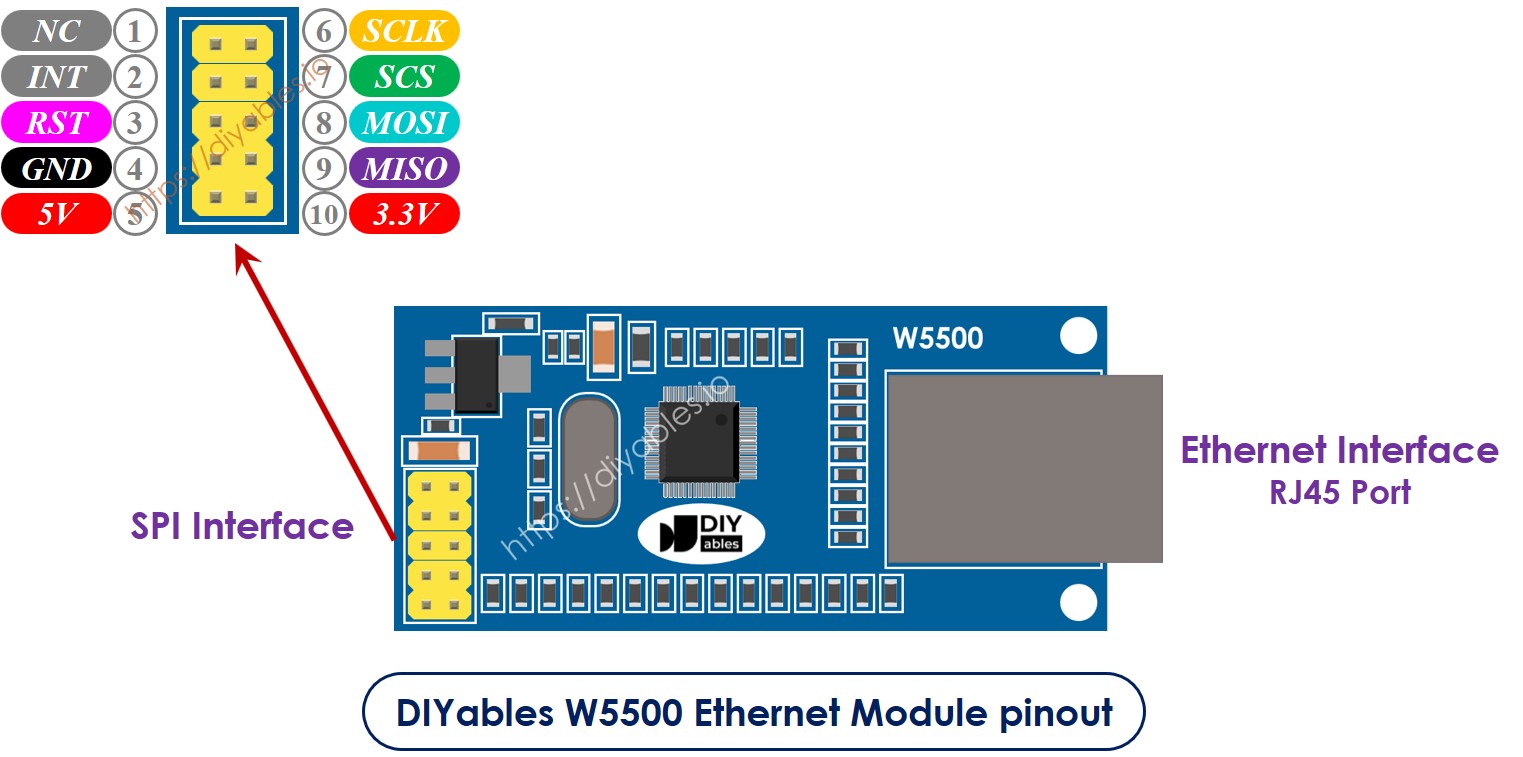
Introduction to W5500 Ethernet module
The W5500 Ethernet module has two interfaces:
RJ45 interface: to connect to router/switch via Ethernet cable
SPI interface: to connect to ESP32 board, including 10 pins:
NC pin: let this pin unconnected.
INT pin: let this pin unconnected.
RST pin: reset pin, connect this pin to the EN pin of ESP32.
GND pin: connect this pin to the ESP32's GND pin.
5V pin: let this pin unconnected.
3.3V pin: connect this pin to the ESP32's 3.3V pin.
MISO pin: connect this pin to the ESP32's SPI MISO pin.
MOSI pin: connect this pin to the ESP32's SPI MOSI pin.
SCS pin: connect this pin to the ESP32's SPI CS pin.
SCLK pin: connect this pin to the ESP32's SPI SCK pin.
image source: diyables.io
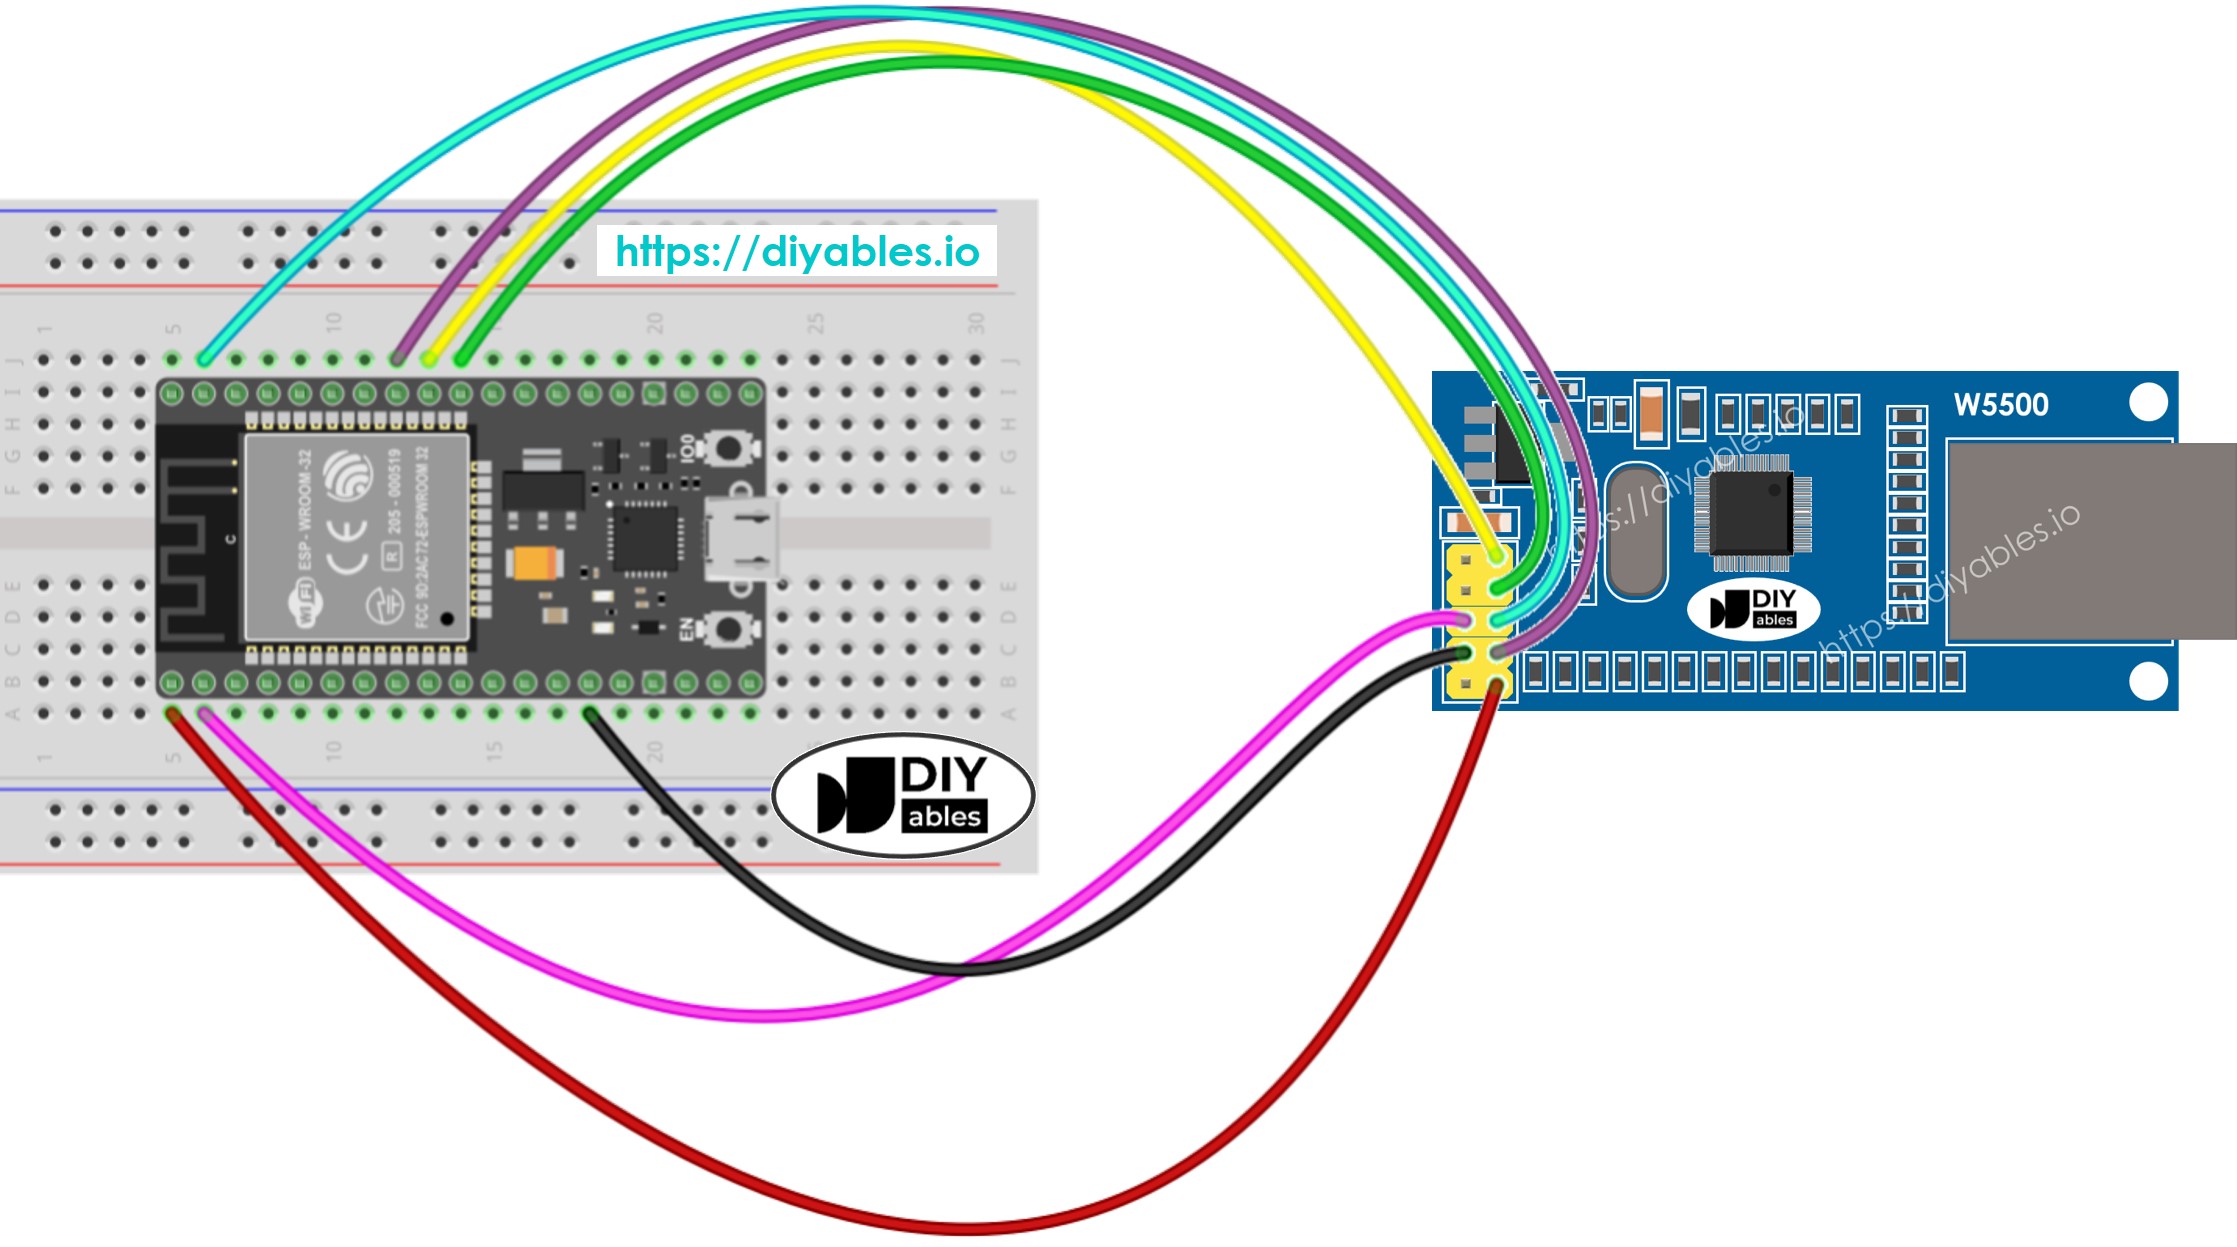
Wiring Diagram between ESP32 and W5500 Ethernet module
This image is created using Fritzing. Click to enlarge image
ESP32 code for Ethernet Module - Making HTTP request via Ethernet
The following code functions as a web client, making HTTP requests to the web server at http://example.com/.
/* * This ESP32 code is created by esp32io.com * * This ESP32 code is released in the public domain * * For more detail (instruction and wiring diagram), visit https://esp32io.com/tutorials/esp32-ethernet */#include <SPI.h>#include <Ethernet.h>// replace the MAC address below by the MAC address printed on a sticker on the Arduino Shield 2byte mac[] = { 0xDE, 0xAD, 0xBE, 0xEF, 0xFE, 0xEF };EthernetClient client;int HTTP_PORT = 80;String HTTP_METHOD = "GET"; // or POSTchar HOST_NAME[] = "example.com";String PATH_NAME = "/";voidsetup() {Serial.begin(9600);delay(1000);Serial.println("ESP32 - Ethernet Tutorial");// initialize the Ethernet shield using DHCP:if (Ethernet.begin(mac) == 0) {Serial.println("Failed to obtaining an IP address");// check for Ethernet hardware presentif (Ethernet.hardwareStatus() == EthernetNoHardware)Serial.println("Ethernet shield was not found");// check for Ethernet cableif (Ethernet.linkStatus() == LinkOFF)Serial.println("Ethernet cable is not connected.");while (true) ; }// connect to web server on port 80:if (client.connect(HOST_NAME, HTTP_PORT)) {// if connected:Serial.println("Connected to server");// make a HTTP request:// send HTTP header client.println(HTTP_METHOD + " " + PATH_NAME + " HTTP/1.1"); client.println("Host: " + String(HOST_NAME)); client.println("Connection: close"); client.println(); // end HTTP headerwhile (client.connected()) {if (client.available()) {// read an incoming byte from the server and print it to serial monitor:char c = client.read();Serial.print(c); } }// the server's disconnected, stop the client: client.stop();Serial.println();Serial.println("disconnected"); } else { // if not connected:Serial.println("connection failed"); }}voidloop() {}
Do the wiring between the Ethernet module and ESP32 as the above wiring diagram
Connect the ESP32 to PC via an USB cable
Connect the Ethernet module to your router/switch via an Ethernet cable
Open Arduino IDE on your PC.
Select the right ESP32 board (e.g. ESP32 Dev Module) and COM port.
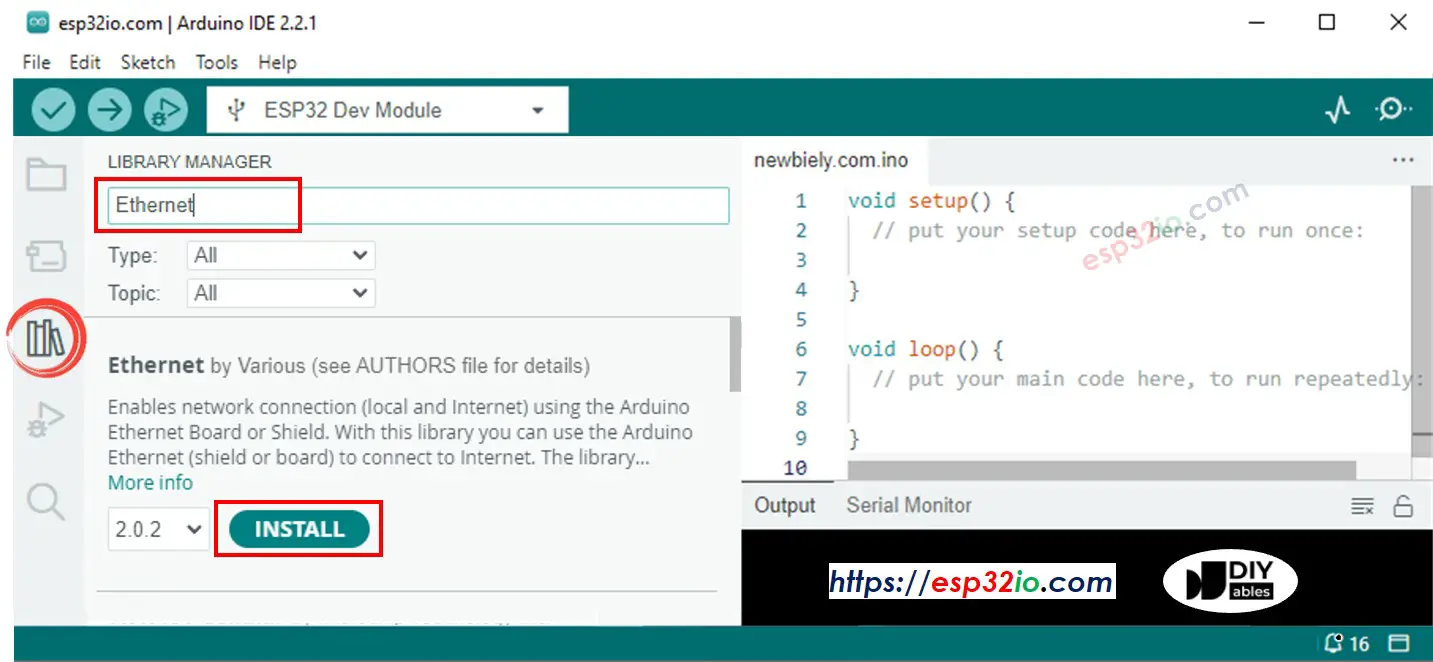
Click to the Libraries icon on the left bar of the Arduino IDE.
Search “Ethernet”, then find the Ethernet library by Various
Click Install button to install Ethernet library.
Open Serial On Arduino IDE
Copy the above code and paste it to Arduino IDE
Click Upload button on Arduino IDE to upload code to ESP32
Check out the result on Serial Monitor, it looks like below:
Newbiely | Arduino IDE 2.3.8
──
☐
✕
File
Edit
Sketch
Tools
Help
ESP32 Dev Module
Newbiely.ino
···
8Serial.println("Hello World!");
Output
Serial Monitor
Message (Enter to send message to 'ESP32 Dev Module' on 'COM15')
New Line
9600 baud
ESP32 - Ethernet Tutorial
Connected to server
HTTP/1.1 200 OK
Accept-Ranges: bytes
Age: 208425
Cache-Control: max-age=604800
Content-Type: text/html; charset=UTF-8
Date: Fri, 12 Jul 2024 07:08:42 GMT
Etag: "3147526947"
Expires: Fri, 19 Jul 2024 07:08:42 GMT
Last-Modified: Thu, 17 Oct 2019 07:18:26 GMT
Server: ECAcc (lac/55B8)
Vary: Accept-Encoding
X-Cache: HIT
Content-Length: 1256
Connection: close
<!doctype html>
<html>
<head>
<title>Example Domain</title>
<meta charset="utf-8" />
<meta http-equiv="Content-type" content="text/html; charset=utf-8" />
<meta name="viewport" content="width=device-width, initial-scale=1" />
</head>
<body>
<div>
<h1>Example Domain</h1>
<p>This domain is for use in illustrative examples in documents. You may use this
domain in literature without prior coordination or asking for permission.</p>
<p><a href="https://www.iana.org/domains/example">More information...</a></p>
</div>
</body>
</html>
disconnected
Ln 11, Col 1
ESP32 Dev Module on COM15
2
※ NOTE THAT:
If there is another device on the same local network with the same MAC address, it might not work.
ESP32 code for Ethernet Module - Web Server
The following code transforms the ESP32 into a web server that responds to web browsers with a simple webpage.
/* * This ESP32 code is created by esp32io.com * * This ESP32 code is released in the public domain * * For more detail (instruction and wiring diagram), visit https://esp32io.com/tutorials/esp32-ethernet */#include <SPI.h>#include <Ethernet.h>// replace the MAC address below by the MAC address printed on a sticker on the Arduino Shield 2byte mac[] = { 0xDE, 0xAD, 0xBE, 0xEF, 0xFE, 0xEF };EthernetServer server(80);voidsetup() {Serial.begin(9600);delay(1000);Serial.println("ESP32 - Ethernet Tutorial");// initialize the Ethernet shield using DHCP:if (Ethernet.begin(mac) == 0) {Serial.println("Failed to obtaining an IP address");// check for Ethernet hardware presentif (Ethernet.hardwareStatus() == EthernetNoHardware)Serial.println("Ethernet shield was not found");// check for Ethernet cableif (Ethernet.linkStatus() == LinkOFF)Serial.println("Ethernet cable is not connected.");while (true) ; } server.begin();Serial.print("ESP32 - Web Server IP Address: ");Serial.println(Ethernet.localIP());}voidloop() {// listen for incoming clientsEthernetClient client = server.available();if (client) {Serial.println("new client");// an HTTP request ends with a blank linebool currentLineIsBlank = true;while (client.connected()) {if (client.available()) {char c = client.read();Serial.write(c);// if you've gotten to the end of the line (received a newline// character) and the line is blank, the HTTP request has ended,// so you can send a replyif (c == '\n' && currentLineIsBlank) {// send a standard HTTP response header client.println("HTTP/1.1 200 OK"); client.println("Content-Type: text/html"); client.println("Connection: close"); // the connection will be closed after completion of the response client.println(); client.println("<!DOCTYPE HTML>"); client.println("<html>"); client.println("<body>"); client.println("<h1>ESP32 Web Server with Ethernet</h1>"); client.println("</body>"); client.println("</html>");break; }if (c == '\n') {// you're starting a new line currentLineIsBlank = true; } elseif (c != '\r') {// you've gotten a character on the current line currentLineIsBlank = false; } } }// give the web browser time to receive the datadelay(1);// close the connection: client.stop();Serial.println("client disconnected"); }}
Quick Instructions
Copy the above code and paste it to Arduino IDE
Click Upload button on Arduino IDE to upload code to ESP32
Check out the result on Serial Monitor, it looks like below:
Newbiely | Arduino IDE 2.3.8
──
☐
✕
File
Edit
Sketch
Tools
Help
ESP32 Dev Module
Newbiely.ino
···
8Serial.println("Hello World!");
Output
Serial Monitor
Message (Enter to send message to 'ESP32 Dev Module' on 'COM15')
New Line
9600 baud
ESP32 - Ethernet Tutorial
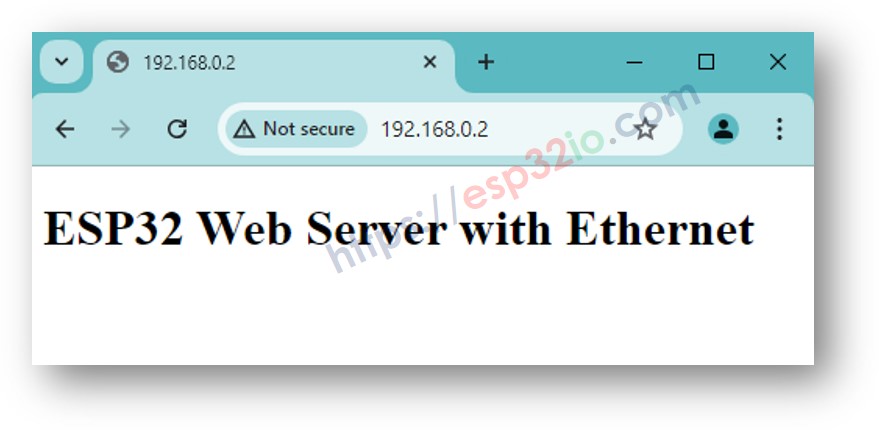
ESP32 - Web Server IP Address: 192.168.0.2
Ln 11, Col 1
ESP32 Dev Module on COM15
2
Copy the above IP address and paste it to the address bar of a web browser, you will see a simple webpage served by ESP32 as follows:
Please feel free to share the link of this tutorial. However, Please do not use our content on any other websites. We invested a lot of effort and time to create the content, please respect our work!