ESP32 - Stepper Motor and Limit Switch

In this ESP32 tutorial, we'll explore how to use ESP32, a limit switch, the L298N driver, and a stepper motor. Specifically, we'll cover:

These topics will empower you to create controlled and versatile motion applications with your ESP32.

Hardware Used In This Tutorial

1×ESP-WROOM-32 Dev Module
1×USB Cable Type-C
1×Limit Switch (KW12-3)
1×Limit Switch (V-156-1C25)
1×Stepper Motor Nema 17
1×L298N Motor Driver Module
1×12V Power Adapter
1×DC Power Jack
1×Jumper Wires
1×(Recommended) ESP32 Screw Terminal Adapter

Or you can buy the following sensor kits:

1×DIYables Sensor Kit (30 sensors/displays)
1×DIYables Sensor Kit (18 sensors/displays)
Disclosure: some of these links are affiliate links. We may earn a commission on your purchase at no extra cost to you. We appreciate it.

Introduction to Stepper Motor and Limit Switch

If you do not know about stepper motor and limit switch (pinout, how it works, how to program ...), learn about them in the following tutorials:

Wiring Diagram

This tutorial provides the ESP32 codes for two cases: One stepper motor + one limit switch, One stepper motor + two limit switches.

  • Wiring diagram between the stepper motor and a limit switch
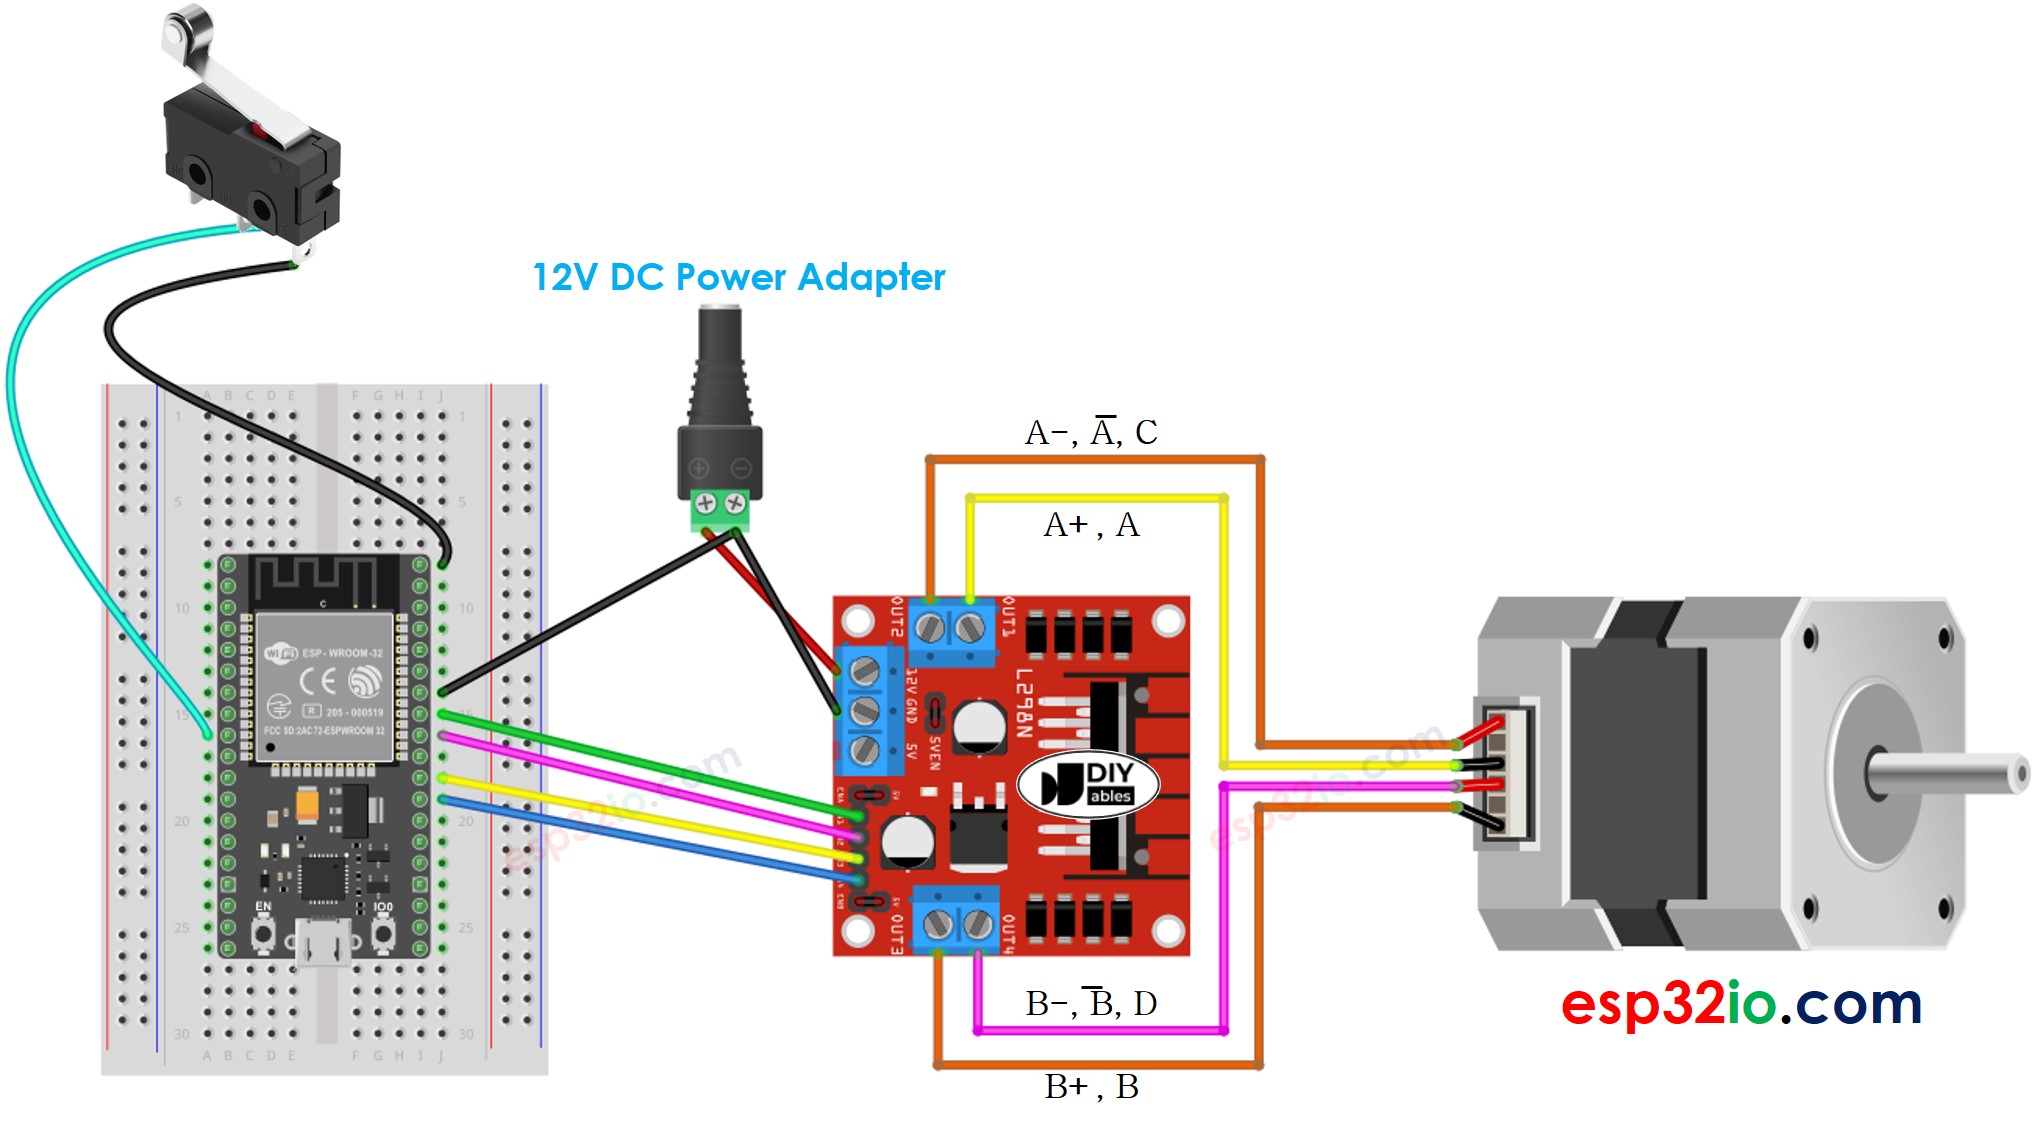
ESP32 stepper motor and limit switch wiring diagram

This image is created using Fritzing. Click to enlarge image

If you're unfamiliar with how to supply power to the ESP32 and other components, you can find guidance in the following tutorial: How to Power ESP32.

  • Wiring diagram between the stepper motor and two limit switches
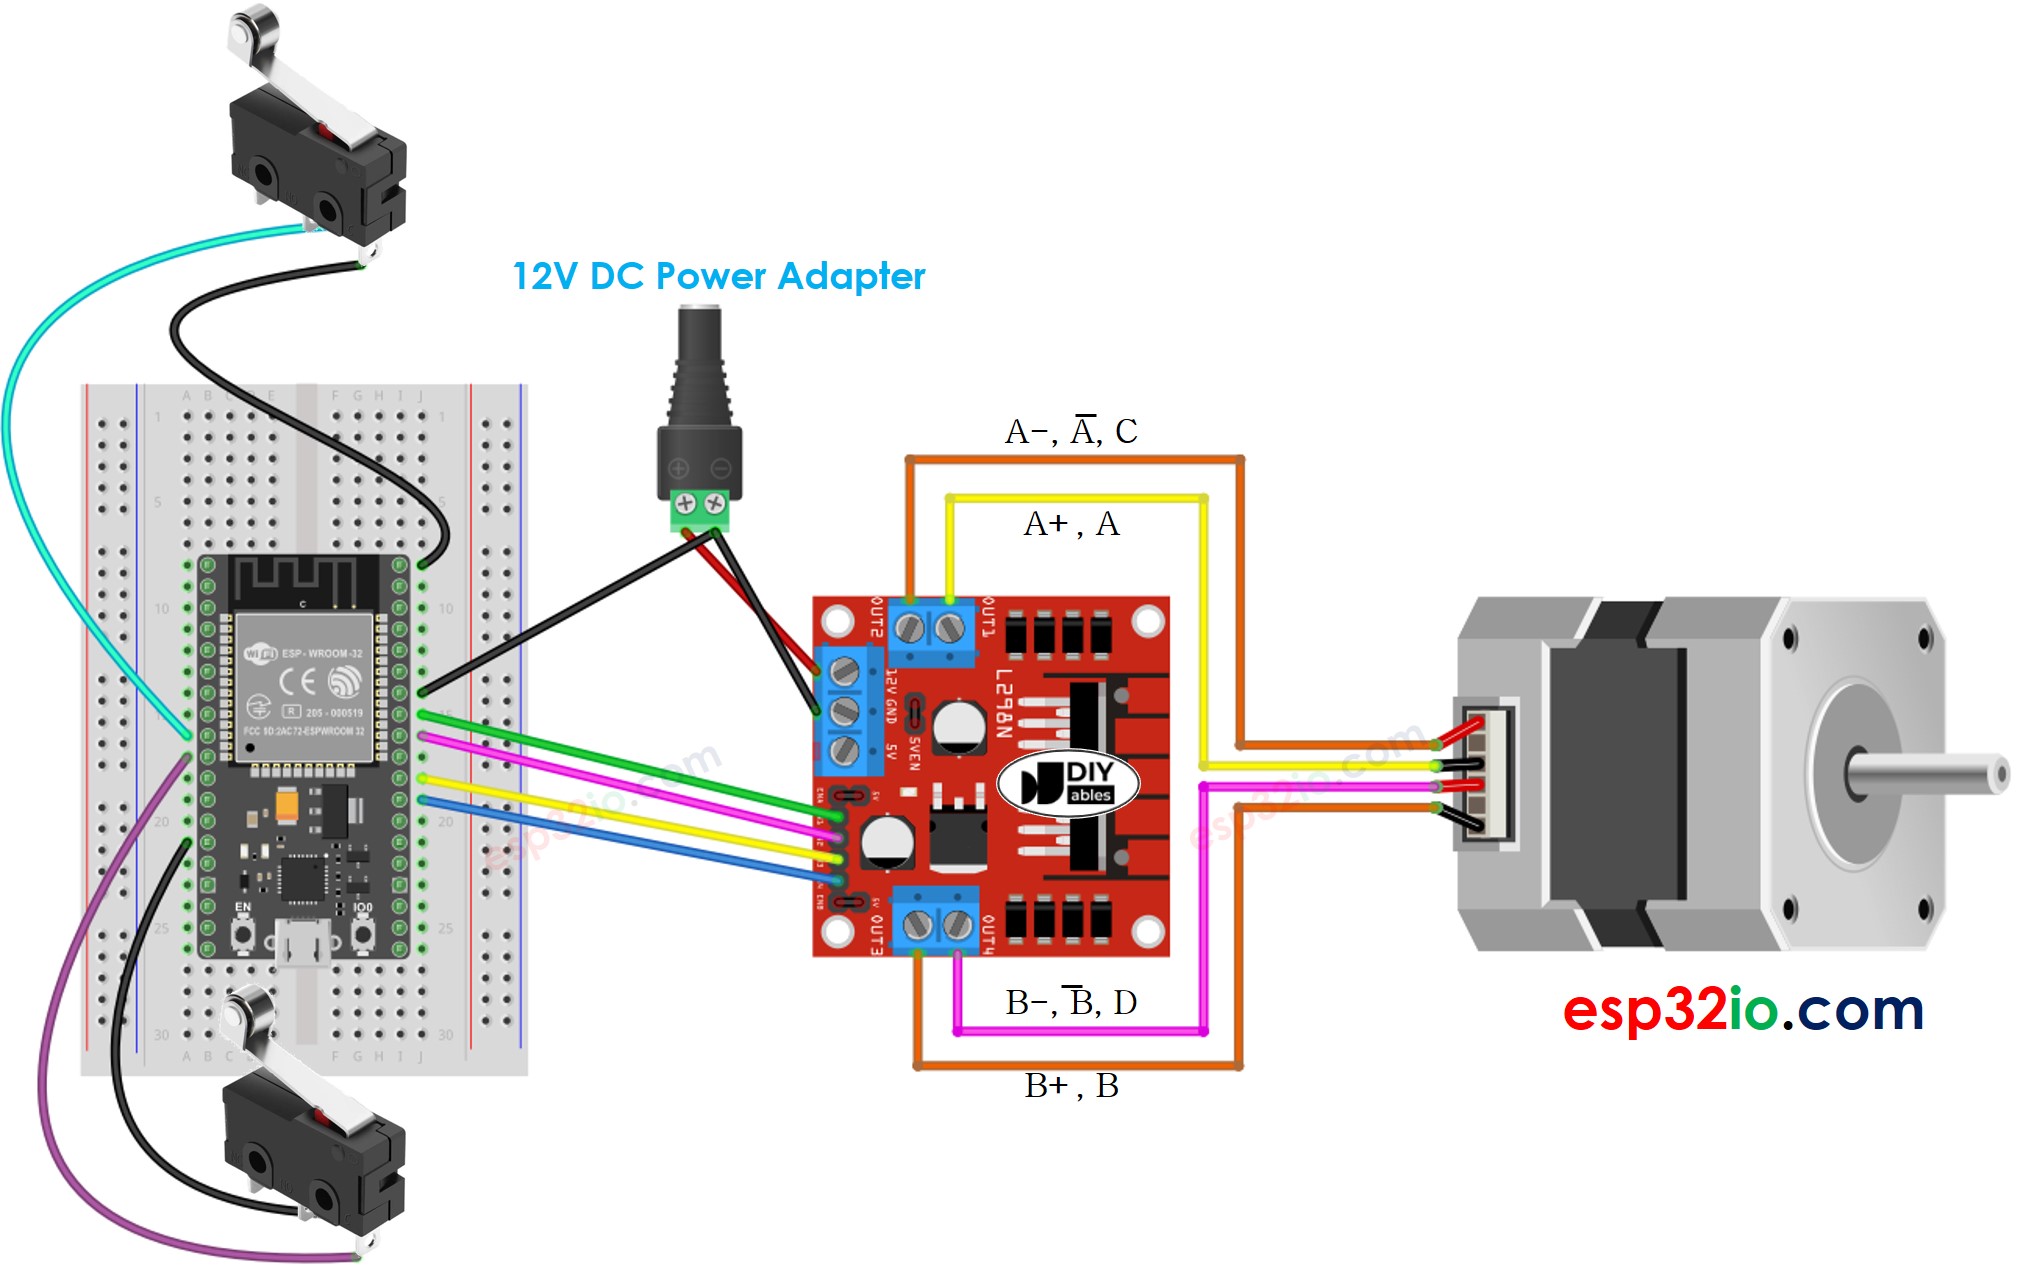
ESP32 stepper motor and two limit switches wiring diagram

This image is created using Fritzing. Click to enlarge image

※ NOTE THAT:

Depending on the stepper motor, the wiring connection between the stepper motor and L298N may be different. Please take a close look at this ESP32 - Stepper Motor tutorial to see how to connect the stepper motor to the L298N motor driver.

ESP32 Code - Stop Stepper Motor by a Limit Switch

There are several ways to make a stepper motor stop:

  • Call stepper.stop() function: This way does NOT stop the stepper motor immediately but gradually
  • Do NOT call stepper.run() function: This way stops the stepper motor immediately

The below code make a stepper motor spin infinitely and stop immediately when a limit switch is touched

/* * This ESP32 code is created by esp32io.com * * This ESP32 code is released in the public domain * * For more detail (instruction and wiring diagram), visit https://esp32io.com/tutorials/esp32-stepper-motor-and-limit-switch */ #include <ezButton.h> #include <AccelStepper.h> #define MAX_POSITION 0x7FFFFFFF // maximum of position we can set (long type) ezButton limitSwitch(25); // ESP32 pin: GPIO25 AccelStepper stepper(AccelStepper::FULL4WIRE, 19, 18, 17, 16); // ESP32 pin: GPIO19, GPIO18, GPIO17, GPIO16 bool isStopped = false; void setup() { Serial.begin(9600); limitSwitch.setDebounceTime(50); // set debounce time to 50 milliseconds stepper.setMaxSpeed(500.0); // set the maximum speed stepper.setAcceleration(50.0); // set acceleration stepper.setSpeed(100); // set initial speed stepper.setCurrentPosition(0); // set position stepper.moveTo(MAX_POSITION); } void loop() { limitSwitch.loop(); // MUST call the loop() function first if (limitSwitch.isPressed()) { Serial.println(F("The limit switch: TOUCHED")); isStopped = true; } if (isStopped == false) { // without this part, the move will stop after reaching maximum position if (stepper.distanceToGo() == 0) { // if motor moved to the maximum position stepper.setCurrentPosition(0); // reset position to 0 stepper.moveTo(MAX_POSITION); // move the motor to maximum position again } stepper.run(); // MUST be called in loop() function } else { // without calling stepper.run() function, motor stops immediately // NOTE: stepper.stop() function does NOT stops motor immediately Serial.println(F("The stepper motor is STOPPED")); } }

Quick Instructions

  • If this is the first time you use ESP32, see how to setup environment for ESP32 on Arduino IDE.
  • Do the wiring as above image.
  • Connect the ESP32 board to your PC via a micro USB cable
  • Open Arduino IDE on your PC.
  • Select the right ESP32 board (e.g. ESP32 Dev Module) and COM port.
  • Connect ESP32 to PC via USB cable
  • Open Arduino IDE, select the right board and port
  • Click to the Libraries icon on the left bar of the Arduino IDE.
  • Search “ezButton”, then find the button library by ArduinoGetStarted.com
  • Click Install button to install ezButton library.
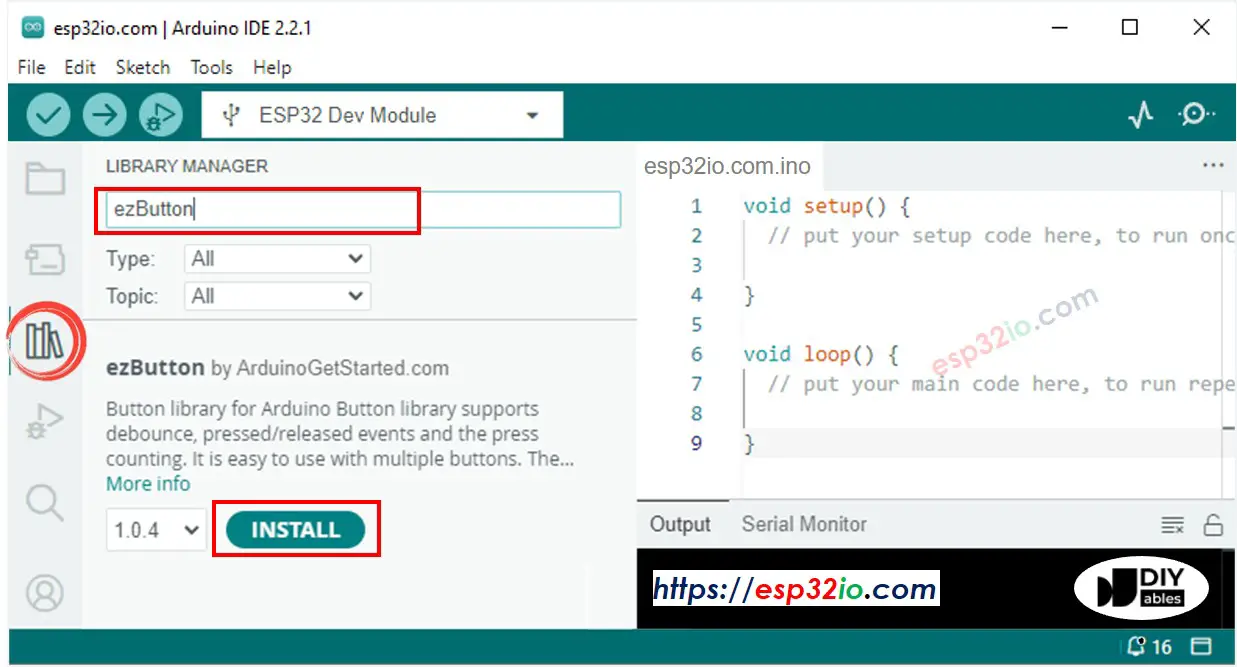
ESP32 button library
  • Search “AccelStepper”, then find the AccelStepper library by Mike McCauley
  • Click Install button to install AccelStepper library.
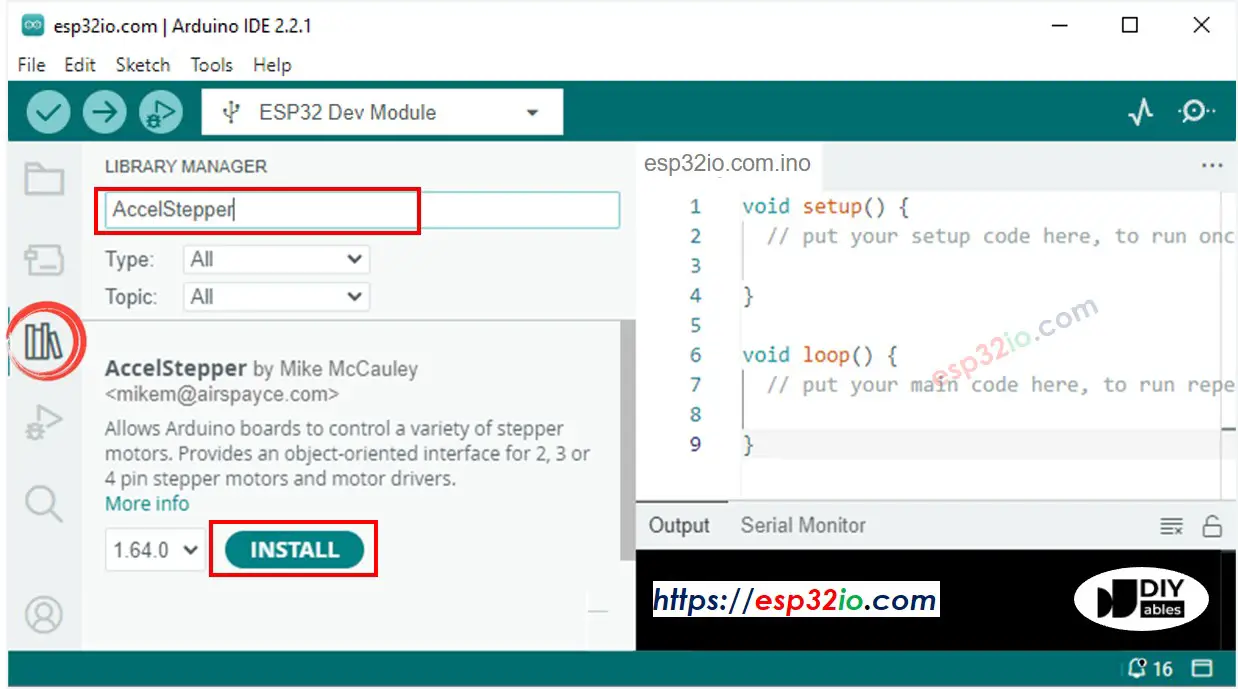
ESP32 AccelStepper library
  • Copy the above code and open with Arduino IDE
  • Click Upload button on Arduino IDE to upload code to ESP32
  • If the wiring is correct, you will see the motor rotates clockwise direction.
  • Touch the limit switch
  • You will see the motor is stopped immediately
  • The result on Serial Monitor looks like below
COM6
Send
The limit switch: TOUCHED The stepper motor is STOPPED The stepper motor is STOPPED The stepper motor is STOPPED The stepper motor is STOPPED
Autoscroll Show timestamp
Clear output
9600 baud  
Newline  

Code Explanation

Read the line-by-line explanation in comment lines of code!

ESP32 Code - Change Direction of Stepper Motor by a Limit Switch

The below code make a stepper motor spin infinitely and change its direction when a limit switch is touched

/* * This ESP32 code is created by esp32io.com * * This ESP32 code is released in the public domain * * For more detail (instruction and wiring diagram), visit https://esp32io.com/tutorials/esp32-stepper-motor-and-limit-switch */ #include <ezButton.h> #include <AccelStepper.h> #define DIRECTION_CCW -1 #define DIRECTION_CW 1 #define MAX_POSITION 0x7FFFFFFF // maximum of position we can set (long type) ezButton limitSwitch(25); // ESP32 pin: GPIO25 AccelStepper stepper(AccelStepper::FULL4WIRE, 19, 18, 17, 16); // ESP32 pin: GPIO19, GPIO18, GPIO17, GPIO16 int direction = DIRECTION_CW; long targetPos = 0; void setup() { Serial.begin(9600); limitSwitch.setDebounceTime(50); // set debounce time to 50 milliseconds stepper.setMaxSpeed(500.0); // set the maximum speed stepper.setAcceleration(50.0); // set acceleration stepper.setSpeed(100); // set initial speed stepper.setCurrentPosition(0); // set position targetPos = direction * MAX_POSITION; stepper.moveTo(targetPos); } void loop() { limitSwitch.loop(); // MUST call the loop() function first if (limitSwitch.isPressed()) { Serial.println(F("The limit switch: TOUCHED")); direction *= -1; // change direction Serial.print(F("The direction -> ")); if (direction == DIRECTION_CW) Serial.println(F("CLOCKWISE")); else Serial.println(F("ANTI-CLOCKWISE")); targetPos = direction * MAX_POSITION; stepper.setCurrentPosition(0); // set position stepper.moveTo(targetPos); } // without this part, the move will stop after reaching maximum position if (stepper.distanceToGo() == 0) { // if motor moved to the maximum position stepper.setCurrentPosition(0); // reset position to 0 stepper.moveTo(targetPos); // move the motor to maximum position again } stepper.run(); // MUST be called in loop() function }

Quick Instructions

  • Copy the above code and open with Arduino IDE
  • Click Upload button on Arduino IDE to upload code to ESP32
  • If the wiring is correct, you will see the motor spins in the clockwise direction.
  • Touch the limit switch
  • You will see the stepper motor's direction is changed to the anti-clockwise
  • Touch the limit switch again
  • You will see the stepper motor's direction is changed to clockwise
  • The result on Serial Monitor looks like below
COM6
Send
The limit switch: TOUCHED The direction -> ANTI-CLOCKWISE The limit switch: TOUCHED The direction -> CLOCKWISE
Autoscroll Show timestamp
Clear output
9600 baud  
Newline  

ESP32 Code - Change Direction of Stepper Motor by two Limit Switches

The below code make a stepper motor spin infinitely and change its direction when one of two limit switches is touched

/* * This ESP32 code is created by esp32io.com * * This ESP32 code is released in the public domain * * For more detail (instruction and wiring diagram), visit https://esp32io.com/tutorials/esp32-stepper-motor-and-limit-switch */ #include <ezButton.h> #include <AccelStepper.h> #define DIRECTION_CCW -1 #define DIRECTION_CW 1 #define STATE_CHANGE_DIR 1 #define STATE_MOVE 2 #define STATE_MOVING 3 #define MAX_POSITION 0x7FFFFFFF // maximum of position we can set (long type) ezButton limitSwitch_1(25); // ESP32 pin: GPIO25 ezButton limitSwitch_2(26); // ESP32 pin: GPIO26 AccelStepper stepper(AccelStepper::FULL4WIRE, 19, 18, 17, 16); // ESP32 pin: GPIO19, GPIO18, GPIO17, GPIO16 int stepperState = STATE_MOVE; int direction = DIRECTION_CW; long targetPos = 0; void setup() { Serial.begin(9600); limitSwitch_1.setDebounceTime(50); // set debounce time to 50 milliseconds limitSwitch_2.setDebounceTime(50); // set debounce time to 50 milliseconds stepper.setMaxSpeed(500.0); // set the maximum speed stepper.setAcceleration(50.0); // set acceleration stepper.setSpeed(100); // set initial speed stepper.setCurrentPosition(0); // set position } void loop() { limitSwitch_1.loop(); // MUST call the loop() function first limitSwitch_2.loop(); // MUST call the loop() function first if (limitSwitch_1.isPressed()) { stepperState = STATE_CHANGE_DIR; Serial.println(F("The limit switch 1: TOUCHED")); } if (limitSwitch_2.isPressed()) { stepperState = STATE_CHANGE_DIR; Serial.println(F("The limit switch 2: TOUCHED")); } switch (stepperState) { case STATE_CHANGE_DIR: direction *= -1; // change direction Serial.print(F("The direction -> ")); if (direction == DIRECTION_CW) Serial.println(F("CLOCKWISE")); else Serial.println(F("ANTI-CLOCKWISE")); stepperState = STATE_MOVE; // after changing direction, go to the next state to move the motor break; case STATE_MOVE: targetPos = direction * MAX_POSITION; stepper.setCurrentPosition(0); // set position stepper.moveTo(targetPos); stepperState = STATE_MOVING; // after moving, go to the next state to keep the motor moving infinity break; case STATE_MOVING: // without this state, the move will stop after reaching maximum position if (stepper.distanceToGo() == 0) { // if motor moved to the maximum position stepper.setCurrentPosition(0); // reset position to 0 stepper.moveTo(targetPos); // move the motor to maximum position again } break; } stepper.run(); // MUST be called in loop() function }

Quick Instructions

  • Copy the above code and open with Arduino IDE
  • Click Upload button on Arduino IDE to upload code to ESP32
  • If the wiring is correct, you will see the motor spins in the clockwise direction.
  • Touch the limit switch 1
  • You will see the stepper motor's direction is changed to anti-clockwise
  • Touch the limit switch 2
  • You will see the stepper motor's direction is changed to clockwise
  • The result on Serial Monitor looks like below
COM6
Send
The limit switch 1: TOUCHED The direction -> ANTI-CLOCKWISE The limit switch 2: TOUCHED The direction -> CLOCKWISE
Autoscroll Show timestamp
Clear output
9600 baud  
Newline  

Video Tutorial

Making video is a time-consuming work. If the video tutorial is necessary for your learning, please let us know by subscribing to our YouTube channel , If the demand for video is high, we will make the video tutorial.

※ OUR MESSAGES