ESP32 - Button Control Electromagnetic Lock
This tutorial instructs you how to use ESP32 with the button and electromagnetic lock. In detail, we will learn how to use the button to control electromagnetic lock without debouncing and with debouncing. Each time button is pressed, unlock the door for 10 seconds and then lock the door.
Or you can buy the following kits:
Disclosure: Some of the links in this section are Amazon affiliate links, meaning we may earn a commission at no additional cost to you if you make a purchase through them. Additionally, some links direct you to products from our own brand,
DIYables .
We have specific tutorials about electromagnetic lock and button. Each tutorial contains detailed information and step-by-step instructions about hardware pinout, working principle, wiring connection to ESP32, ESP32 code... Learn more about them at the following links:

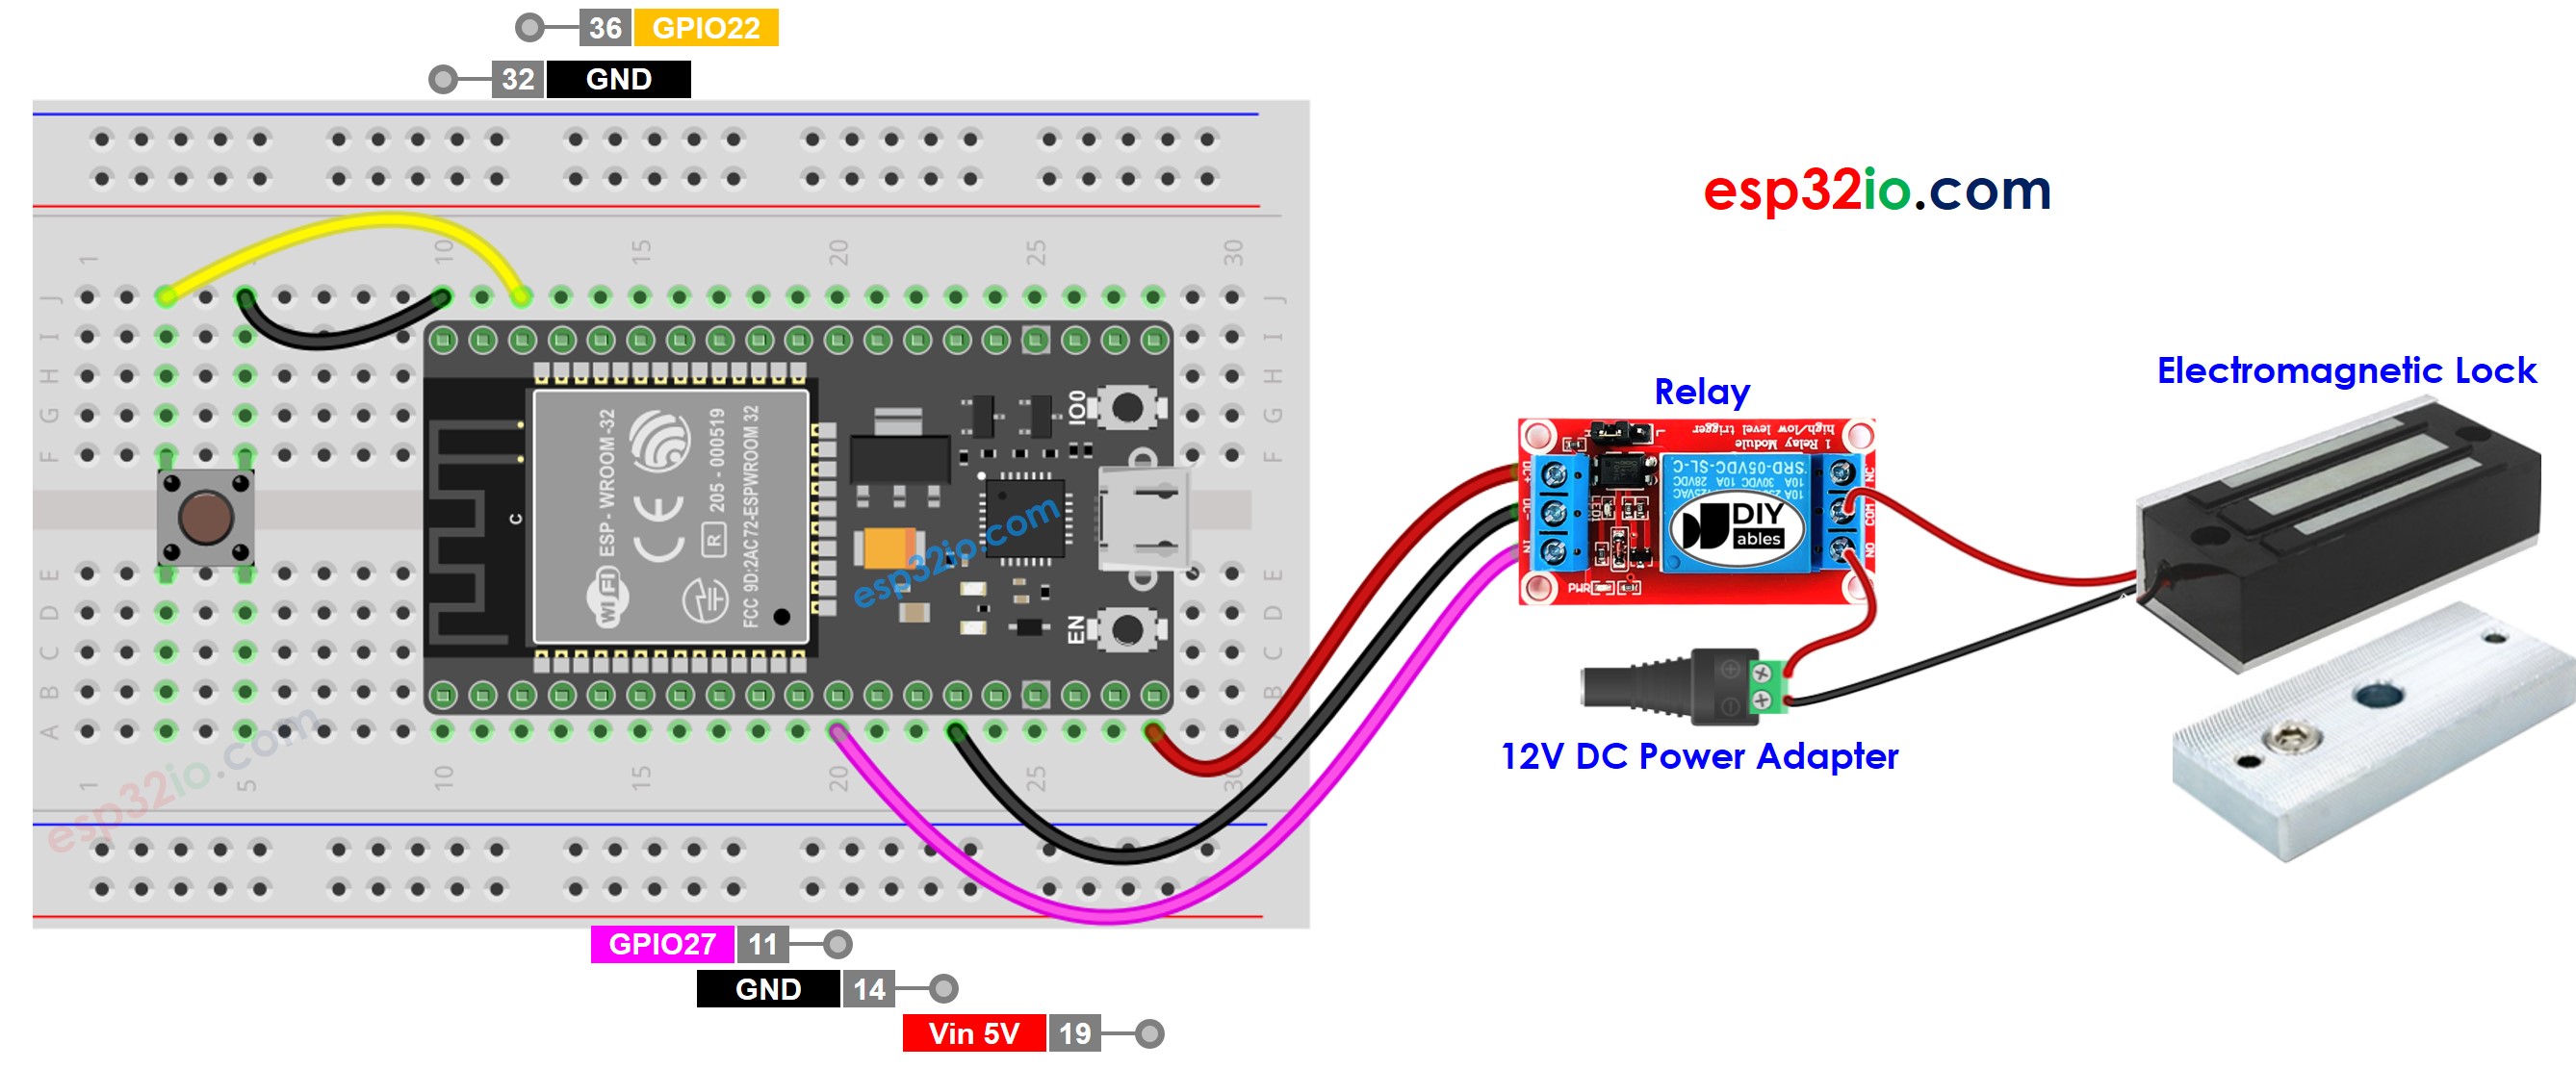
This image is created using Fritzing. Click to enlarge image
If you're unfamiliar with how to supply power to the ESP32 and other components, you can find guidance in the following tutorial: The best way to Power ESP32 and sensors/displays.
#define BUTTON_PIN 22
#define RELAY_PIN 27
int lastButtonState;
int currentButtonState;
void setup() {
Serial.begin(9600);
pinMode(BUTTON_PIN, INPUT_PULLUP);
pinMode(RELAY_PIN, OUTPUT);
digitalWrite(RELAY_PIN, HIGH);
currentButtonState = digitalRead(BUTTON_PIN);
}
void loop() {
lastButtonState = currentButtonState;
currentButtonState = digitalRead(BUTTON_PIN);
if (lastButtonState == HIGH && currentButtonState == LOW) {
Serial.println("The button is pressed");
digitalWrite(RELAY_PIN, LOW);
delay(10000);
digitalWrite(RELAY_PIN, HIGH);
}
}
Do the wiring as above image.
Connect the ESP32 board to your PC via a micro USB cable
Open Arduino IDE on your PC.
Select the right ESP32 board (e.g. ESP32 Dev Module) and COM port.
Copy the above code and paste it to Arduino IDE.
Compile and upload code to ESP32 board by clicking Upload button on Arduino IDE
Put the armature plate close to electromagnet.
Press button one time.
See the attraction between armature plate and electromagnet during 10 seconds.
The above ESP32 code contains line-by-line explanation. Please read the comments in the code!
In practice, we need to debounce for the button. The next part will show how to debounce for the button.
Why need to debounce for the button? ⇒ see ESP32 - Button Debounce tutorial
#include <ezButton.h>
#define BUTTON_PIN 22
#define RELAY_PIN 27
ezButton button(BUTTON_PIN);
void setup() {
Serial.begin(9600);
pinMode(RELAY_PIN, OUTPUT);
button.setDebounceTime(50);
digitalWrite(RELAY_PIN, HIGH);
}
void loop() {
button.loop();
if (button.isPressed()) {
Serial.println("The button is pressed");
digitalWrite(RELAY_PIN, LOW);
delay(10000);
digitalWrite(RELAY_PIN, HIGH);
}
}
Install ezButton library. See
How To
Copy the above code and paste it to Arduino IDE.
Compile and upload code to ESP32 board by clicking Upload button on Arduino IDE
Put the armature plate close to electromagnet.
Press button one time.
See the attraction between armature plate and electromagnet during 10 seconds.
※ NOTE THAT:
Since the above code used the delay() function, we do not need to do debouncing for the button. However, We still provide the code with debouncing in case you modify this code and do not use the delay() function
Making video is a time-consuming work. If the video tutorial is necessary for your learning, please let us know by subscribing to our YouTube channel , If the demand for video is high, we will make the video tutorial.

