ESP32 - Log Data with Timestamp to SD Card

In this guide, we'll explore the process of logging data with timestamps to a Micro SD Card using ESP32. Specifically, we'll cover the following topics:

The time information is extracted from an RTC module and is then recorded onto the Micro SD Card alongside the collected data.

The data logged onto the Micro SD Card can encompass a variety of information, such as:

For simplicity, this tutorial will demonstrate the process by reading values from two analog pins, serving as an example dataset. The provided code can be easily adapted to accommodate different types of data as needed.

ESP32 Log to Micro SD Card

Hardware Used In This Tutorial

1×ESP-WROOM-32 Dev Module
1×USB Cable Type-C
1×Micro SD Card
1×Micro SD Card Module
1×USB 3.0 SD Card Reader
1×Real-Time Clock DS3231 Module
1×CR2032 battery
1×Jumper Wires
1×(Recommended) ESP32 Screw Terminal Adapter

Or you can buy the following sensor kits:

1×DIYables Sensor Kit (30 sensors/displays)
1×DIYables Sensor Kit (18 sensors/displays)
Disclosure: some of these links are affiliate links. We may earn a commission on your purchase at no extra cost to you. We appreciate it.

Introduction to Micro SD Card Module and RTC Module

Unfamiliar with Micro SD Card Module and RTC module, including their pinouts, functionality, and programming? Explore comprehensive tutorials on these topics below:

Wiring Diagram

ESP32 Micro SD Card Module Wiring Diagram

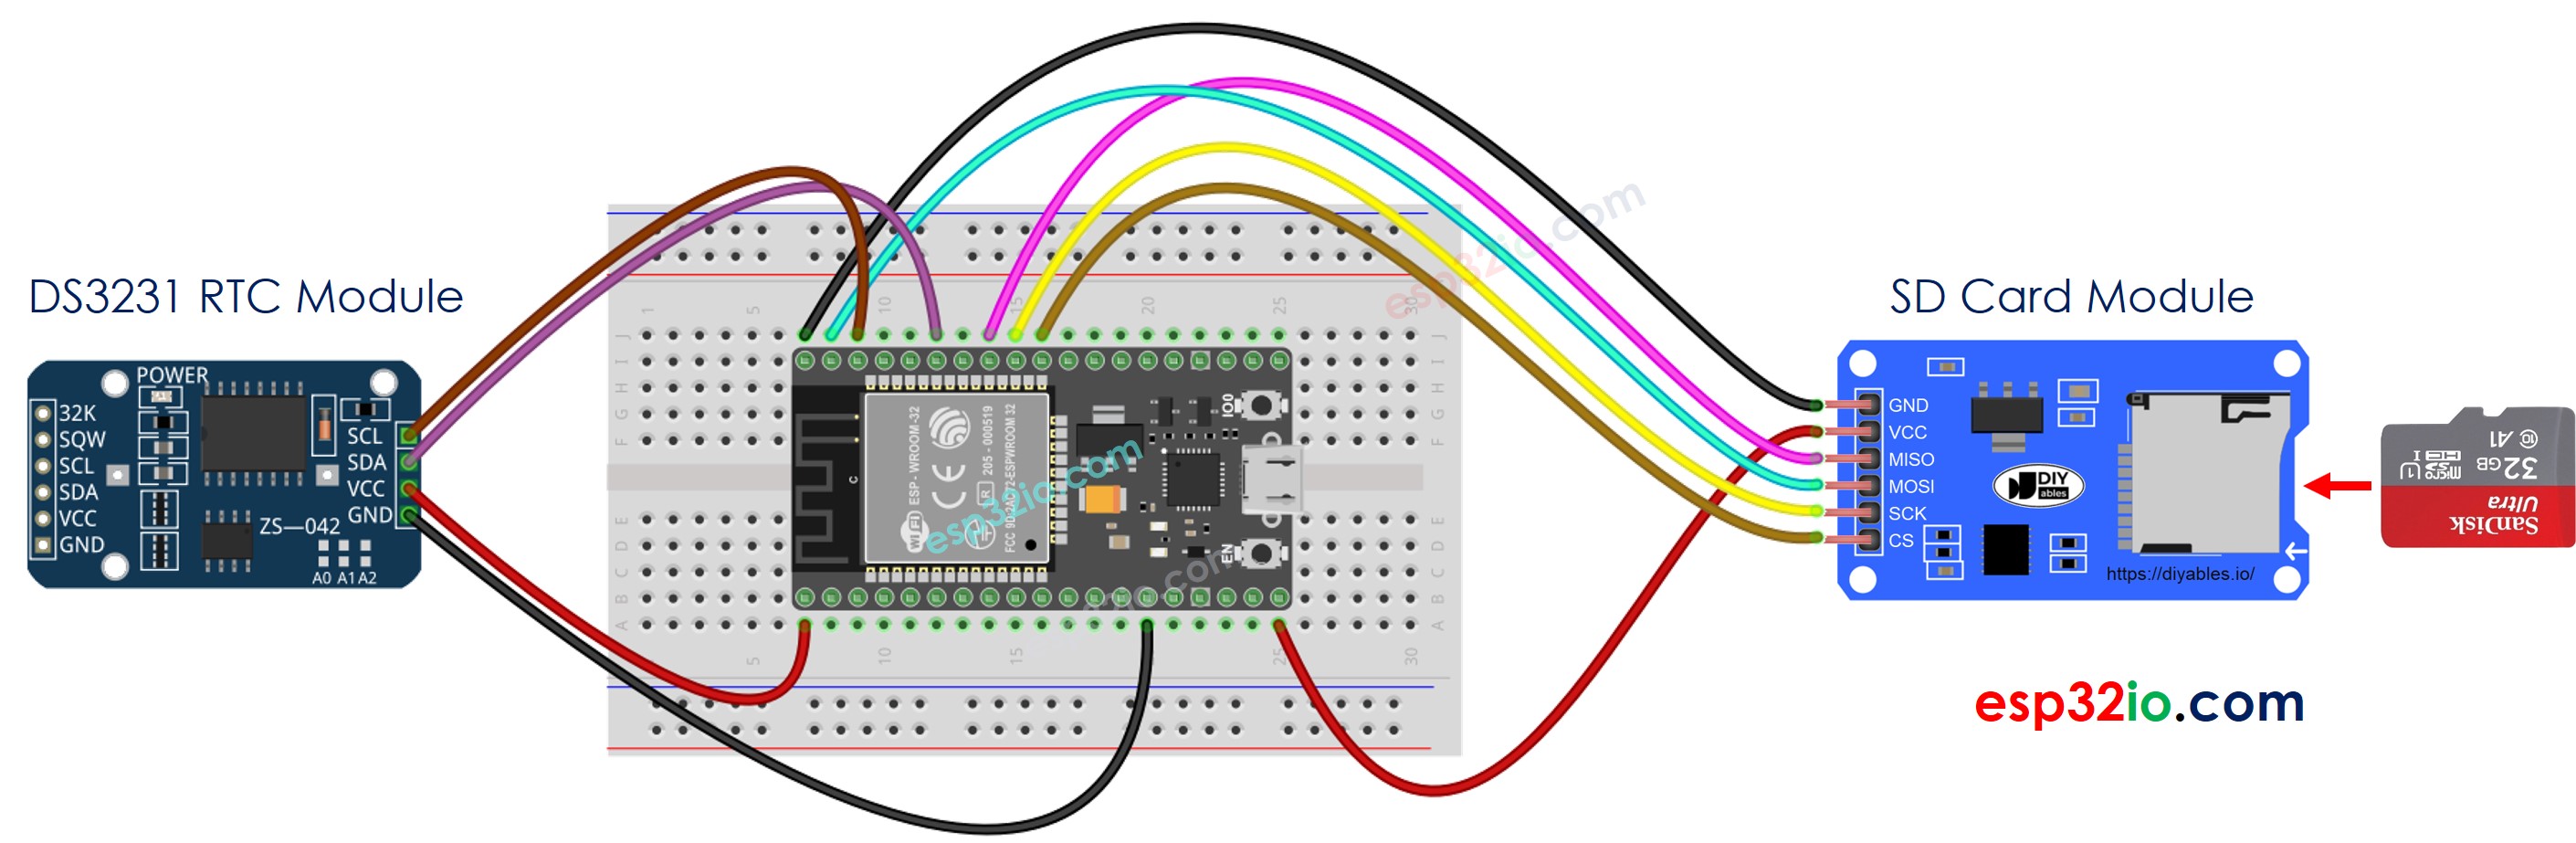
This image is created using Fritzing. Click to enlarge image

If you're unfamiliar with how to supply power to the ESP32 and other components, you can find guidance in the following tutorial: How to Power ESP32.

※ NOTE THAT:

If you use an Ethernet shield or any shield that has a Micro SD Card Holder, you do not need to use the Micro SD Card Module. You just need to insert the Micro SD Card to the Micro SD Card Holder on the shield.

ESP32 - Log Data with Timestamp to Micro SD Card

/* * This ESP32 code is created by esp32io.com * * This ESP32 code is released in the public domain * * For more detail (instruction and wiring diagram), visit https://esp32io.com/tutorials/esp32-log-data-with-timestamp-to-sd-card */ #include <SD.h> #include <RTClib.h> #define PIN_SPI_CS 5 // The ESP32 pin GPIO5 #define FILE_NAME "log.txt" RTC_DS3231 rtc; File myFile; void setup() { Serial.begin(9600); // SETUP RTC MODULE if (!rtc.begin()) { Serial.println(F("RTC module is NOT found")); while (1); } if (!SD.begin(PIN_SPI_CS)) { Serial.println(F("SD CARD FAILED, OR NOT PRESENT!")); while (1); // stop the program } Serial.println(F("SD CARD INITIALIZED.")); Serial.println(F("--------------------")); } void loop() { // open file for writing myFile = SD.open(FILE_NAME, FILE_WRITE); if (myFile) { Serial.println(F("Writing log to SD Card")); // write timestamp DateTime now = rtc.now(); myFile.print(now.year(), DEC); myFile.print('-'); myFile.print(now.month(), DEC); myFile.print('-'); myFile.print(now.day(), DEC); myFile.print(' '); myFile.print(now.hour(), DEC); myFile.print(':'); myFile.print(now.minute(), DEC); myFile.print(':'); myFile.print(now.second(), DEC); myFile.print(" "); // delimiter between timestamp and data // read data int analog_1 = analogRead(A0); int analog_2 = analogRead(A1); // write data myFile.print("analog_1 = "); myFile.print(analog_1); myFile.print(", "); // delimiter between data myFile.print("analog_2 = "); myFile.print(analog_2); myFile.write("\n"); // new line myFile.close(); } else { Serial.print(F("SD Card: Issue encountered while attempting to open the file ")); Serial.println(FILE_NAME); } delay(2000); // delay 2 seconds }

Quick Instructions

  • If this is the first time you use ESP32, see how to setup environment for ESP32 on Arduino IDE.
  • Do the wiring as above image.
  • Connect the ESP32 board to your PC via a micro USB cable
  • Open Arduino IDE on your PC.
  • Select the right ESP32 board (e.g. ESP32 Dev Module) and COM port.
  • Make sure that the Micro SD Card is formatted FAT16 or FAT32 (Google for it)
  • Copy the above code and open with Arduino IDE
  • Click Upload button on Arduino IDE to upload code to ESP32
  • See the result on Serial Monitor.
COM6
Send
SD CARD INITIALIZED. -------------------- Writing log to SD Card Writing log to SD Card Writing log to SD Card Writing log to SD Card Writing log to SD Card Writing log to SD Card Writing log to SD Card
Autoscroll Show timestamp
Clear output
9600 baud  
Newline  
  • Detach the Micro SD Card from the Micro SD Card module
  • Insert the Micro SD Card to an USB SD Card reader
  • Connect the USB SD Card reader to the PC
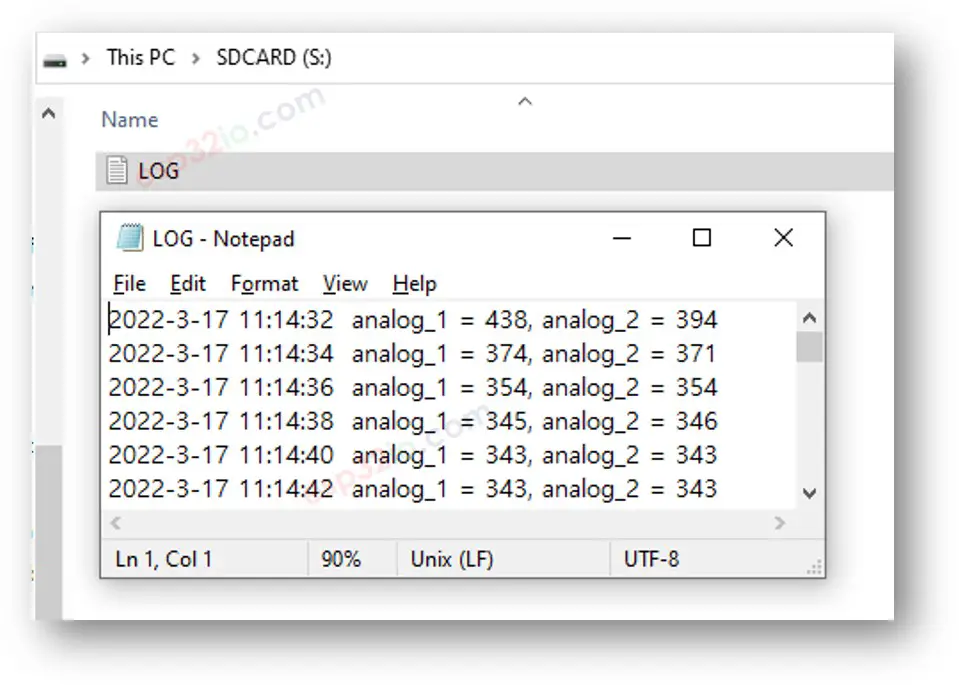
  • Open the log.txt file on your PC, it looks like below
ESP32 log to Micro SD Card with time information

If you do not have an USB SD Card reader, you can check the content of log file by running the below ESP32 Code.

/* * This ESP32 code is created by esp32io.com * * This ESP32 code is released in the public domain * * For more detail (instruction and wiring diagram), visit https://esp32io.com/tutorials/esp32-log-data-with-timestamp-to-sd-card */ #include <SD.h> #define PIN_SPI_CS 5 // The ESP32 pin GPIO5 #define FILE_NAME "log.txt" File myFile; void setup() { Serial.begin(9600); if (!SD.begin(PIN_SPI_CS)) { Serial.println(F("SD CARD FAILED, OR NOT PRESENT!")); while (1); // stop the program } Serial.println(F("SD CARD INITIALIZED.")); // open file for reading myFile = SD.open(FILE_NAME, FILE_READ); if (myFile) { while (myFile.available()) { char ch = myFile.read(); // read characters one by one from Micro SD Card Serial.print(ch); // print the character to Serial Monitor } myFile.close(); } else { Serial.print(F("SD Card: Issue encountered while attempting to open the file ")); Serial.println(FILE_NAME); } } void loop() { }

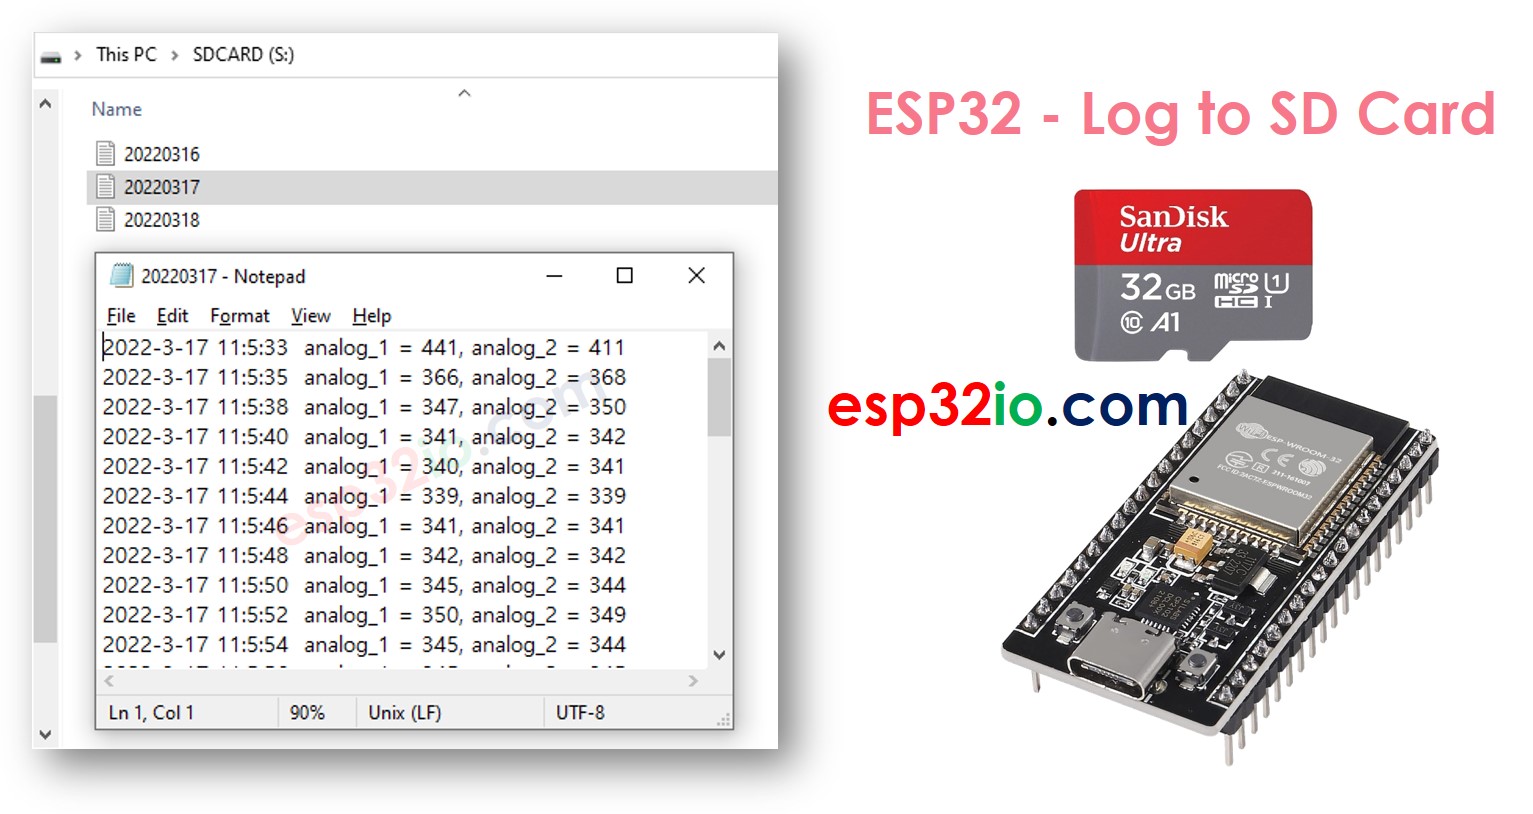
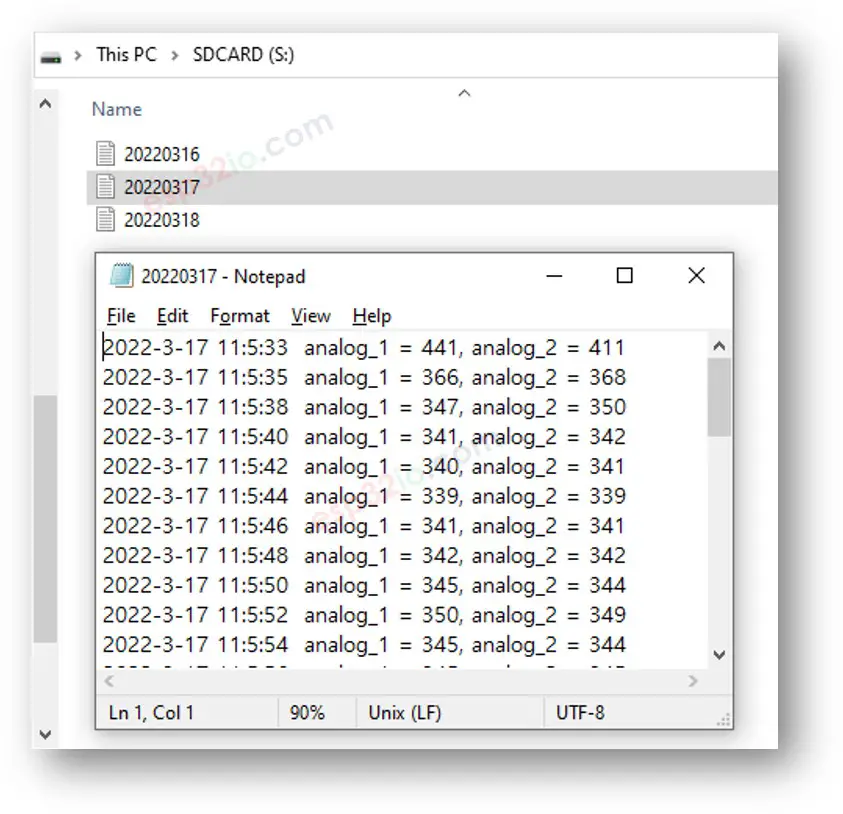
ESP32 - Log Data in multiple files

Writing log to a single file results in a big file size overtime and makes it difficult to check. The below code will write log file in multiple:

  • One file per day
  • The filename is the date informationL YYYYMMDD.txt
/* * This ESP32 code is created by esp32io.com * * This ESP32 code is released in the public domain * * For more detail (instruction and wiring diagram), visit https://esp32io.com/tutorials/esp32-log-data-with-timestamp-to-sd-card */ #include <SD.h> #include <RTClib.h> #define PIN_SPI_CS 5 // The ESP32 pin GPIO5 RTC_DS3231 rtc; File myFile; char filename[] = "yyyymmdd.txt"; // filename (without extension) should not exceed 8 chars void setup() { Serial.begin(9600); // SETUP RTC MODULE if (!rtc.begin()) { Serial.println(F("RTC module is NOT found")); while (1); } if (!SD.begin(PIN_SPI_CS)) { Serial.println(F("SD CARD FAILED, OR NOT PRESENT!")); while (1); // stop the program } Serial.println(F("SD CARD INITIALIZED.")); Serial.println(F("--------------------")); } void loop() { DateTime now = rtc.now(); int year = now.year(); int month = now.month(); int day = now.day(); // update filename filename[0] = (year / 1000) + '0'; filename[1] = ((year % 1000) / 100) + '0'; filename[2] = ((year % 100) / 10) + '0'; filename[3] = (year % 10) + '0'; filename[4] = (month / 10) + '0'; filename[5] = (month % 10) + '0'; filename[6] = (day / 10) + '0'; filename[7] = (day % 10) + '0'; // open file for writing myFile = SD.open(filename, FILE_WRITE); if (myFile) { Serial.println(F("Writing log to SD Card")); // write timestamp myFile.print(now.year(), DEC); myFile.print('-'); myFile.print(now.month(), DEC); myFile.print('-'); myFile.print(now.day(), DEC); myFile.print(' '); myFile.print(now.hour(), DEC); myFile.print(':'); myFile.print(now.minute(), DEC); myFile.print(':'); myFile.print(now.second(), DEC); myFile.print(" "); // delimiter between timestamp and data // read data int analog_1 = analogRead(A0); int analog_2 = analogRead(A1); // write data myFile.print("analog_1 = "); myFile.print(analog_1); myFile.print(", "); // delimiter between data myFile.print("analog_2 = "); myFile.print(analog_2); myFile.write("\n"); // new line myFile.close(); } else { Serial.print(F("SD Card: Issue encountered while attempting to open the file ")); Serial.println(filename); } delay(2000); // delay 2 seconds }

After a long run, If you:

  • Detach the Micro SD Card from the Micro SD Card module
  • Insert the Micro SD Card to an USB SD Card reader
  • Connect the USB SD Card reader to the PC
  • You will see the files as follows:
ESP32 log to Micro SD Card multiple files

Video Tutorial

Making video is a time-consuming work. If the video tutorial is necessary for your learning, please let us know by subscribing to our YouTube channel , If the demand for video is high, we will make the video tutorial.

※ OUR MESSAGES