ESP32 - TM1637 4-Digit 7-Segment Display
In this project, we will use an ESP32 to drive a TM1637 4-digit 7-segment display module. The ESP32 offers Wi-Fi, Bluetooth, dual cores, and a generous set of GPIO pins - making it ideal for IoT projects that need a numeric display.
What we will build:
- Wire the TM1637 module to the ESP32.
- Display integers, text, and temperature values.
- Show time in HH:MM format with a blinking colon.
- Control individual digits and brightness levels.
This tutorial shows how to program the ESP32 using the Arduino language (C/C++) via the Arduino IDE. If you’d like to learn how to program the ESP32 with MicroPython, visit this ESP32 MicroPython - TM1637 4-Digit 7-Segment Display tutorial.
Hardware Used In This Tutorial
Or you can buy the following kits:
| 1 | × | DIYables ESP32 Starter Kit (ESP32 included) | |
| 1 | × | DIYables Sensor Kit (18 sensors/displays) |
TM1637 Display Module in Detail
The TM1637 chip handles the multiplexing and driving of four 7-segment digits through a simple 2-wire serial protocol. Once digit data is written to the TM1637, it retains the data in internal memory and keeps the display lit without any further input from the microcontroller.
Module features:
- 4 digits with 7 segments and decimal points
- Colon separator between digit 1 and digit 2
- 8 brightness levels
- 2-wire interface (CLK + DIO)
- Operating voltage: 3.3V to 5V
| Function | Pin |
|---|---|
| CLK | Clock signal |
| DIO | Data I/O |
| VCC | 3.3V or 5V |
| GND | Ground |
The TM1637 works at 3.3V, matching the ESP32's logic level. No level shifter is needed.
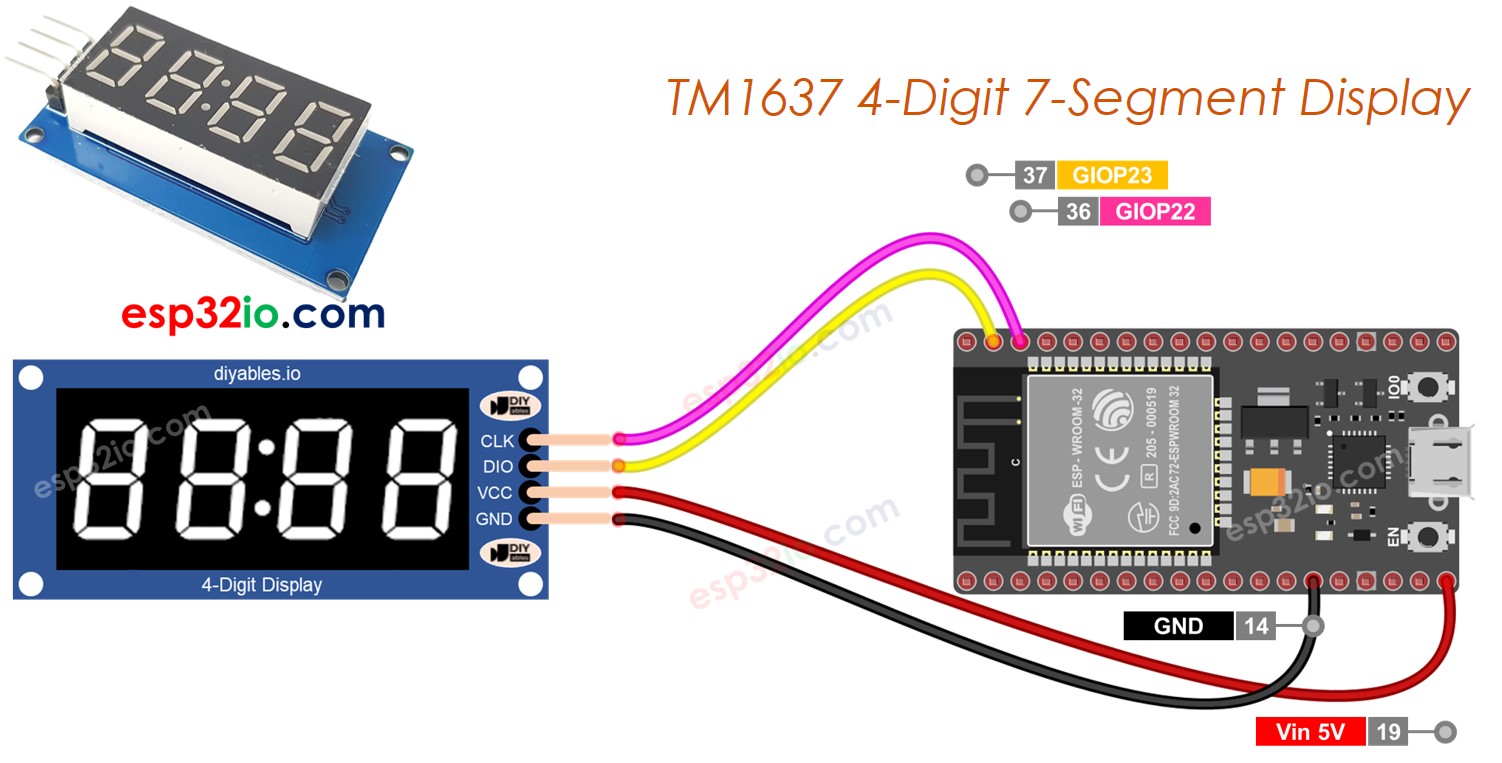
Wiring Diagram
Connect the TM1637 to the ESP32:
- CLK to GPIO 21
- DIO to GPIO 22
- VCC to 3.3V
- GND to GND
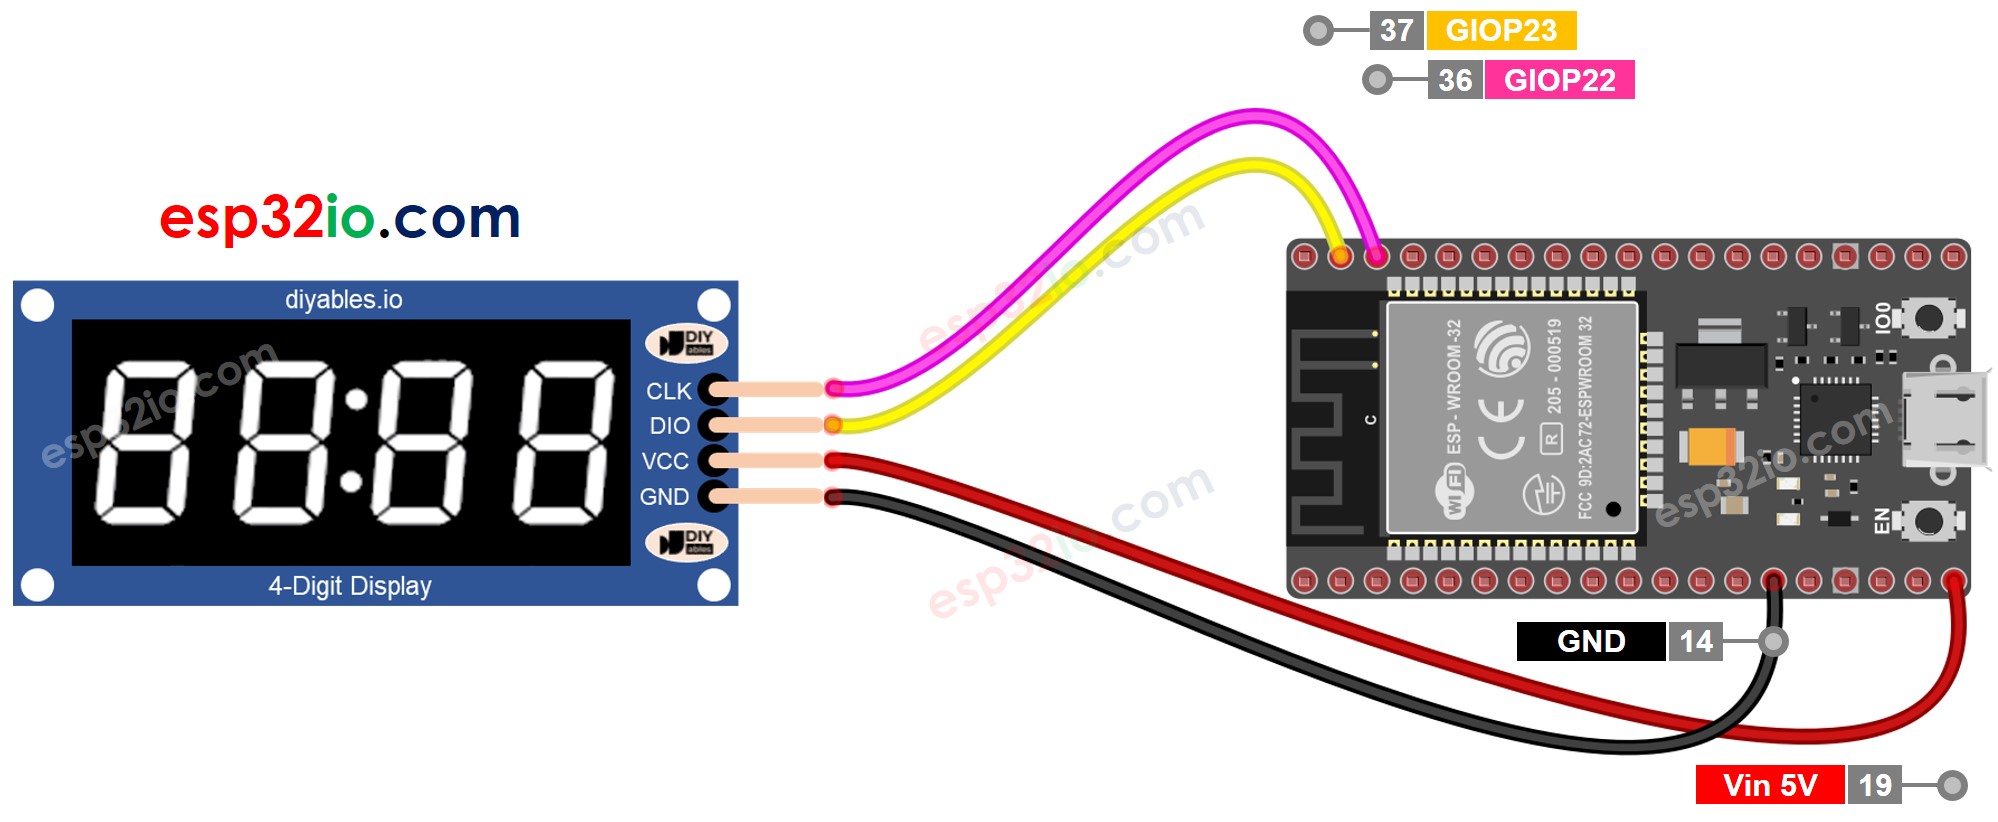
This image is created using Fritzing. Click to enlarge image
If you're unfamiliar with how to supply power to the ESP32 and other components, you can find guidance in the following tutorial: The best way to Power ESP32 and sensors/displays.
Library Installation
- Connect the ESP32 board to your computer with a USB cable.
- Open Arduino IDE and select ESP32 Dev Module as the board. Choose the correct port.
- Click the Libraries icon on the left sidebar.
- Search for "DIYables_4Digit7Segment_TM1637" and find the library by DIYables.
- Click Install.
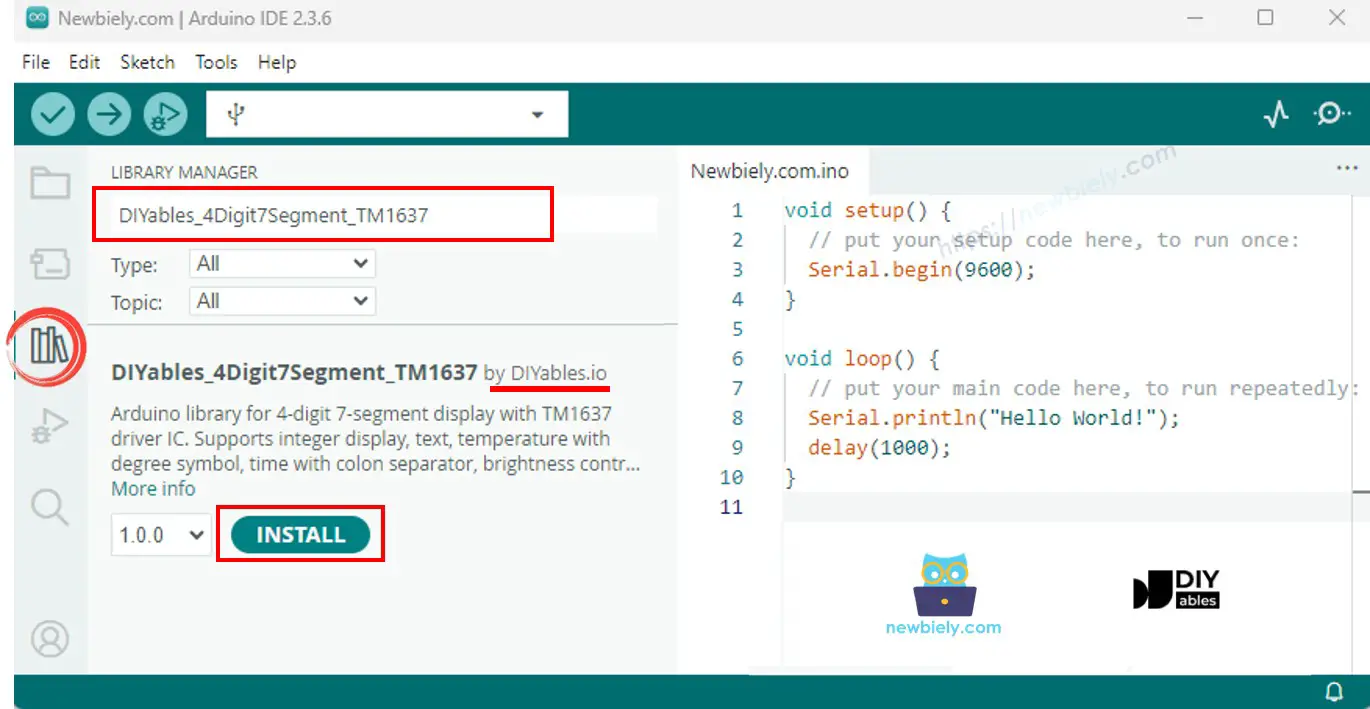
No extra dependencies required - the library is self-contained.
Starting Point
A minimal sketch to get things running:
Pass the GPIO pin numbers for CLK and DIO to the constructor, call begin(), and you are ready to display data.
Let's Build - Integer Display
Shows various integers including negative values and zero-padded numbers.
Upload and Test
- Wire the TM1637 module to the ESP32 as described above.
- Connect the ESP32 to your computer via USB.
- Open Arduino IDE, select the board and port, paste the code, and click Upload.
- Open the Serial Monitor to see the output.
The display cycles through 0, 42, 1234, -5, -123, 9999, and zero-padded "0042".
Key Methods
| Method | What It Does | Example |
|---|---|---|
| print(int) | Displays an integer | display.print(1234) |
| print(int, true) | Displays with leading zeros | display.print(42, true) |
| clear() | Clears the display | display.clear() |
Let's Build - Text and Temperature
Displays text strings and formatted temperature with the degree symbol.
Upload and Test
- Wire and upload the sketch. Open the Serial Monitor.
Shows "HELP", "Hi", "COOL", "done", then "25°C" and "72°F".
Key Methods
| Method | What It Does | Example |
|---|---|---|
| print(const char*) | Shows text | display.print("HELP") |
| printTemperature(int, char) | Shows temperature | display.printTemperature(25, 'C') |
| DEGREE | Degree character | display.DEGREE |
Let's Build - Time with Blinking Colon
Displays clock-like time with the colon toggling every half second.
Upload and Test
- Upload and observe "12:30" with the colon blinking.
Key Methods
| Method | What It Does | Example | |
|---|---|---|---|
| printTime(int, int) | Shows HH | MM | display.printTime(12, 30) |
| printTime(int, int, bool) | Controls colon | display.printTime(12, 30, false) |
Let's Build - Blink Effect
Toggles the display on and off to create a blinking effect.
Upload and Test
- Upload the code. "1234" blinks five times, then "HELP" blinks five times.
Key Methods
| Method | What It Does | Example |
|---|---|---|
| off() | Display off, data stays | display.off() |
| on() | Display back on | display.on() |
| setBrightness(int) | Sets brightness 0-7 | display.setBrightness(4) |
Let's Build - Individual Digit Control
Sets each digit separately with numbers, characters, and the colon.
Upload and Test
- Upload and observe the various digit and character combinations.
Key Methods
| Method | What It Does | Example |
|---|---|---|
| setNumber(int, int) | Sets digit 0-9 | display.setNumber(0, 1) |
| setChar(int, char) | Sets character | display.setChar(0, 'H') |
| setColon(bool) | Controls colon | display.setColon(true) |
| setSegments(int, uint8_t) | Raw segment data | display.setSegments(0, 0x76) |
Troubleshooting
- Display stays off - Check wiring. Make sure CLK and DIO go to the correct ESP32 GPIO pins. Verify VCC is connected to 3.3V.
- Wrong characters shown - CLK and DIO are probably swapped. Switch the two wires.
- Too dim - Use setBrightness(7) for maximum brightness.
- Upload fails - Hold the BOOT button on the ESP32 during upload if your board requires it.
Platform Support
The library is built using only Arduino standard APIs and works across all Arduino-compatible platforms including ESP32.