ESP32 - Motion Sensor - Piezo Buzzer
This tutorial instructs you how to use ESP32 with HC-SR501 motion sensor and Piezo Buzzer. In detail:
ESP32 automatically makes sound if the motion is detected, and stops making sound if otherwise
ESP32 automatically makes a melody of song if the motion is detected, and stops making sound if otherwise
Or you can buy the following kits:
Disclosure: Some of the links in this section are Amazon affiliate links, meaning we may earn a commission at no additional cost to you if you make a purchase through them. Additionally, some links direct you to products from our own brand,
DIYables .
We have specific tutorials about piezo buzzer and motion sensor. Each tutorial contains detailed information and step-by-step instructions about hardware pinout, working principle, wiring connection to ESP32, ESP32 code... Learn more about them at the following links:
Please note that this tutorial use 3-5V buzzer, but you can adapt it for 12v buzzer. you can learn about ESP32 - Buzzer tutorial
The wiring diagram with power supply from USB cable
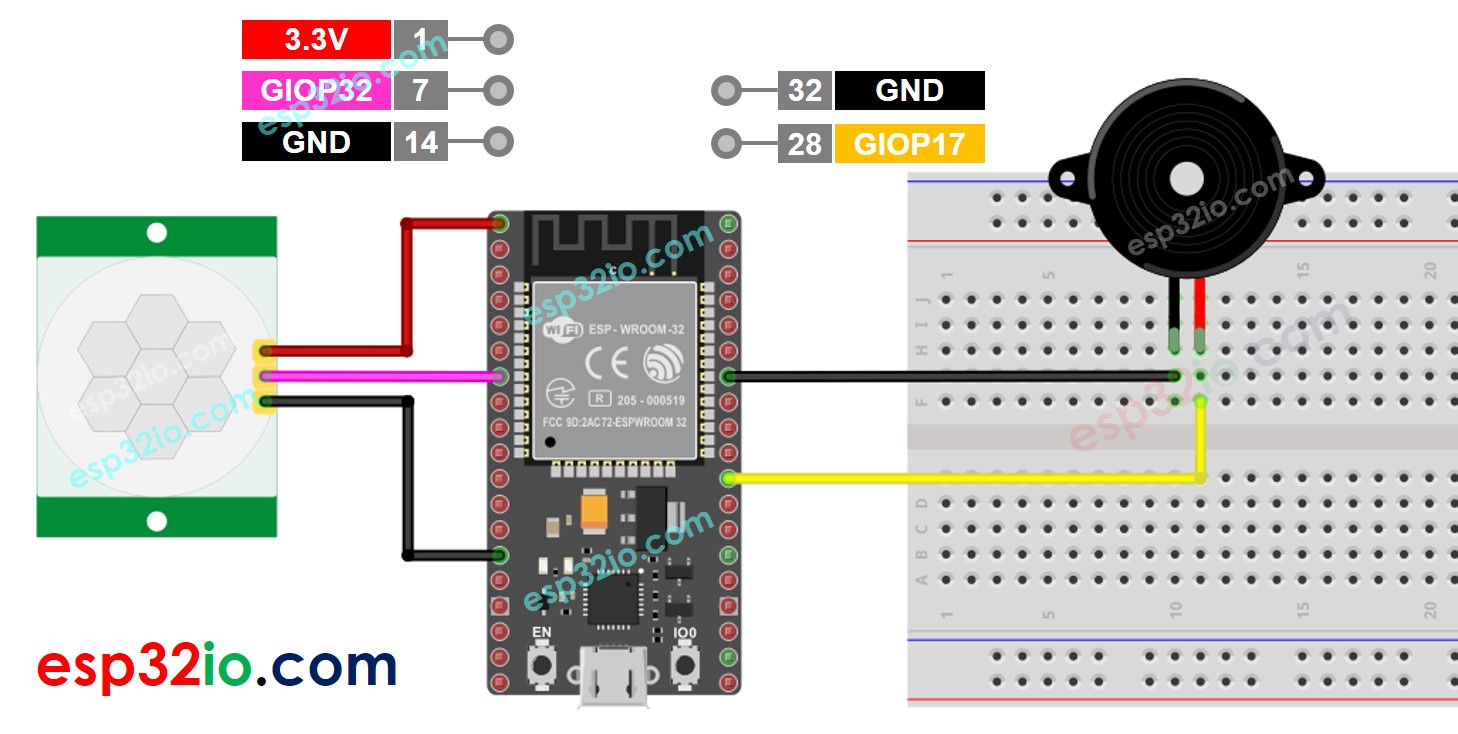
This image is created using Fritzing. Click to enlarge image
The wiring diagram with power supply from 5v adapter
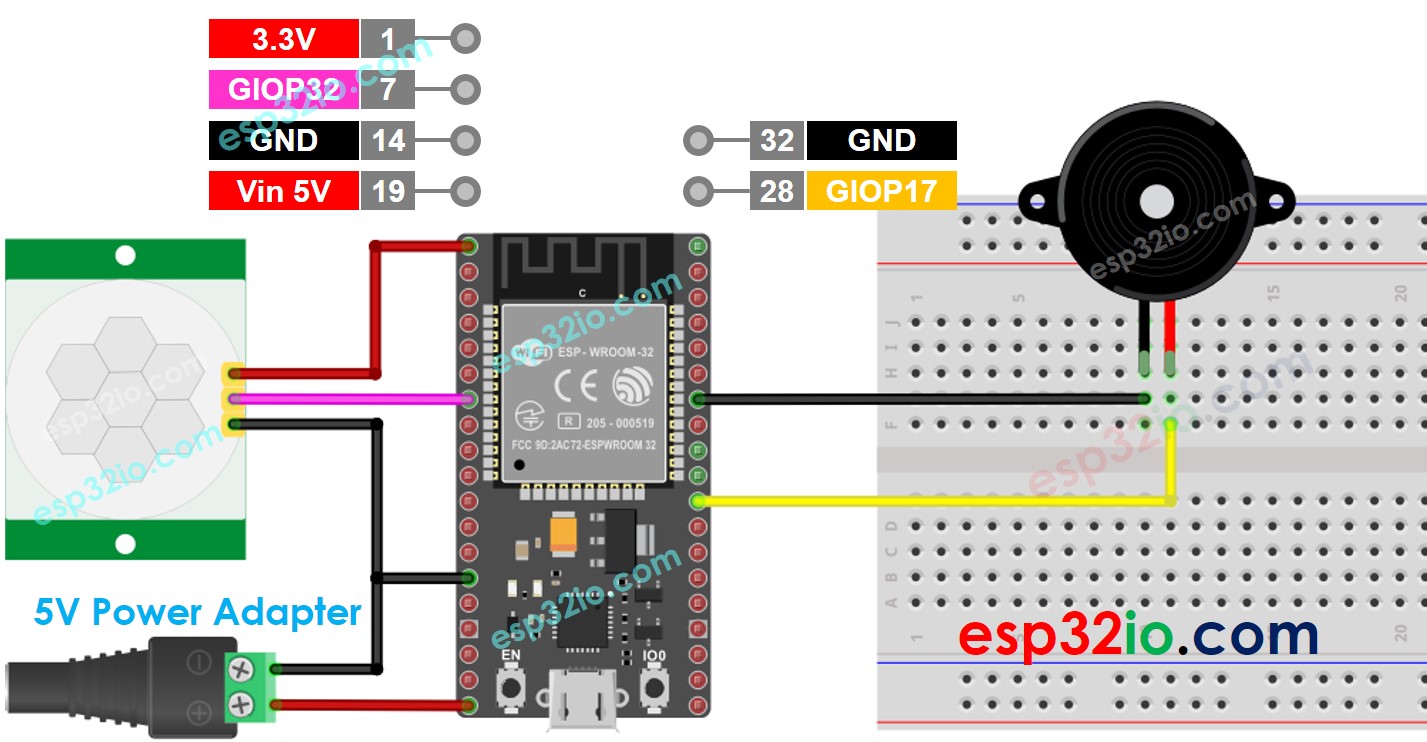
This image is created using Fritzing. Click to enlarge image
If you're unfamiliar with how to supply power to the ESP32 and other components, you can find guidance in the following tutorial: The best way to Power ESP32 and sensors/displays.
| |
|---|
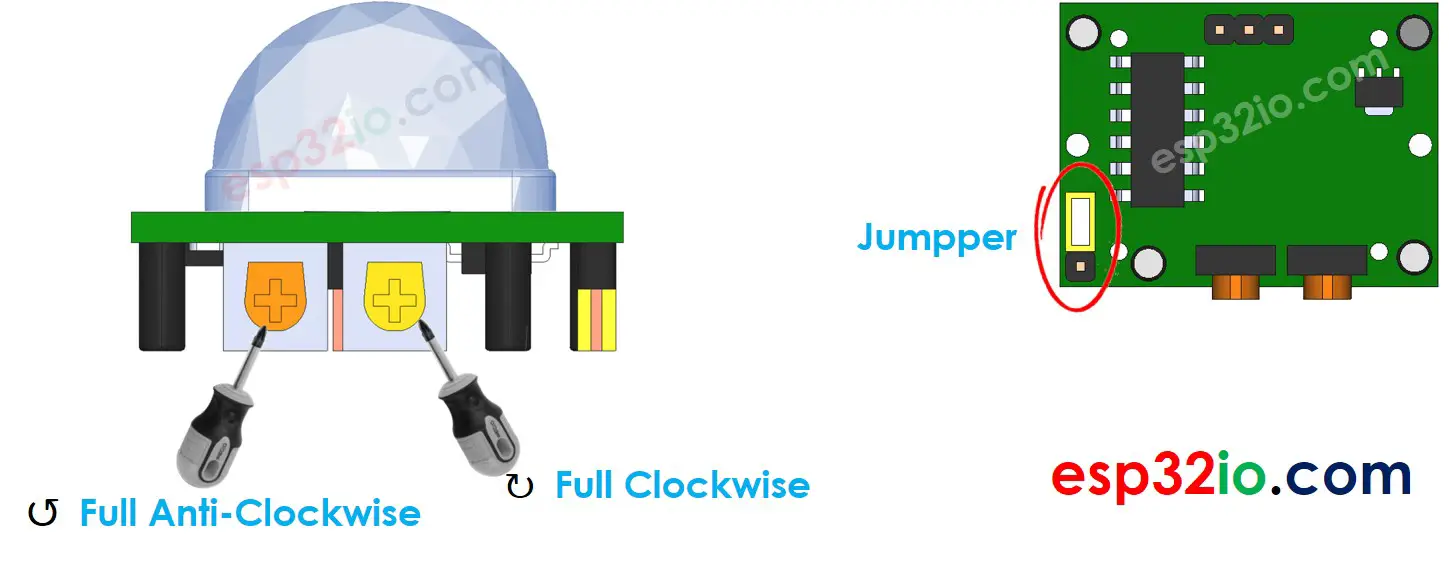
| Detection Range Adjuster | Fully screw it in the clockwise direction. |
| Time Delay Adjuster | Fully screw it in the anti-clockwise direction. |
| Repeat Trigger Selector | Put jumper like the below image. |
#define MOTION_SENSOR_PIN 32
#define BUZZER_PIN 17
int motionStateCurrent = LOW;
int motionStatePrevious = LOW;
void setup() {
Serial.begin(9600);
pinMode(MOTION_SENSOR_PIN, INPUT);
pinMode(BUZZER_PIN, OUTPUT);
}
void loop() {
motionStatePrevious = motionStateCurrent;
motionStateCurrent = digitalRead(MOTION_SENSOR_PIN);
if (motionStatePrevious == LOW && motionStateCurrent == HIGH) {
Serial.println("Motion detected!, making sound");
digitalWrite(BUZZER_PIN, HIGH);
} else if (motionStatePrevious == HIGH && motionStateCurrent == LOW) {
Serial.println("Motion stopped!, stops making sound");
digitalWrite(BUZZER_PIN, LOW);
}
}
Do the wiring as above image.
Connect the ESP32 board to your PC via a micro USB cable
Open Arduino IDE on your PC.
Select the right ESP32 board (e.g. ESP32 Dev Module) and COM port.
Copy the above code and paste it to Arduino IDE.
Compile and upload code to ESP32 board by clicking Upload button on Arduino IDE
Move your hand in front of sensor
Listen to piezo buzzer's sound
The above ESP32 code contains line-by-line explanation. Please read the comments in the code!
#include "pitches.h"
#define MOTION_SENSOR_PIN 32
#define BUZZER_PIN 17
int melody[] = {
NOTE_E5, NOTE_E5, NOTE_E5,
NOTE_E5, NOTE_E5, NOTE_E5,
NOTE_E5, NOTE_G5, NOTE_C5, NOTE_D5,
NOTE_E5,
NOTE_F5, NOTE_F5, NOTE_F5, NOTE_F5,
NOTE_F5, NOTE_E5, NOTE_E5, NOTE_E5, NOTE_E5,
NOTE_E5, NOTE_D5, NOTE_D5, NOTE_E5,
NOTE_D5, NOTE_G5
};
int noteDurations[] = {
8, 8, 4,
8, 8, 4,
8, 8, 8, 8,
2,
8, 8, 8, 8,
8, 8, 8, 16, 16,
8, 8, 8, 8,
4, 4
};
void setup() {
Serial.begin(9600);
pinMode(MOTION_SENSOR_PIN, INPUT);
}
void loop() {
int motionState = digitalRead(MOTION_SENSOR_PIN);
if (motionState == HIGH) {
Serial.println("The motion is detected");
buzzer();
}
}
void buzzer() {
int size = sizeof(noteDurations) / sizeof(int);
for (int thisNote = 0; thisNote < size; thisNote++) {
int noteDuration = 1000 / noteDurations[thisNote];
tone(BUZZER_PIN, melody[thisNote], noteDuration);
int pauseBetweenNotes = noteDuration * 1.30;
delay(pauseBetweenNotes);
noTone(BUZZER_PIN);
}
}
Copy the above code and paste it to Arduino IDE.
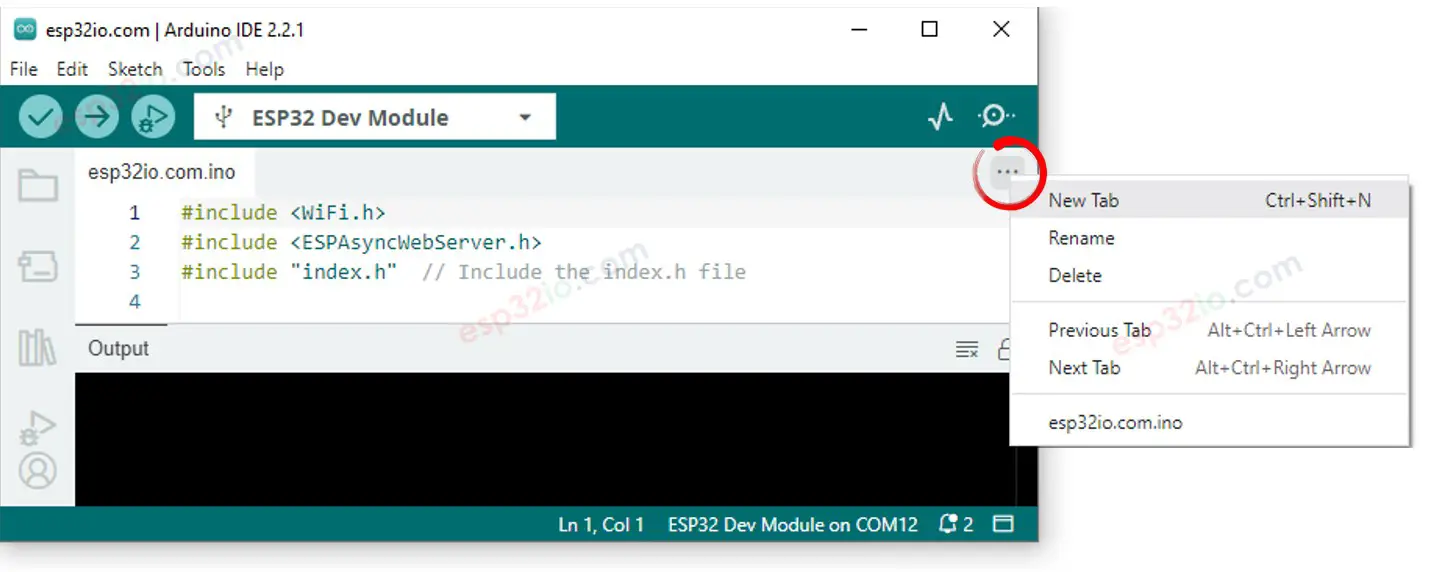
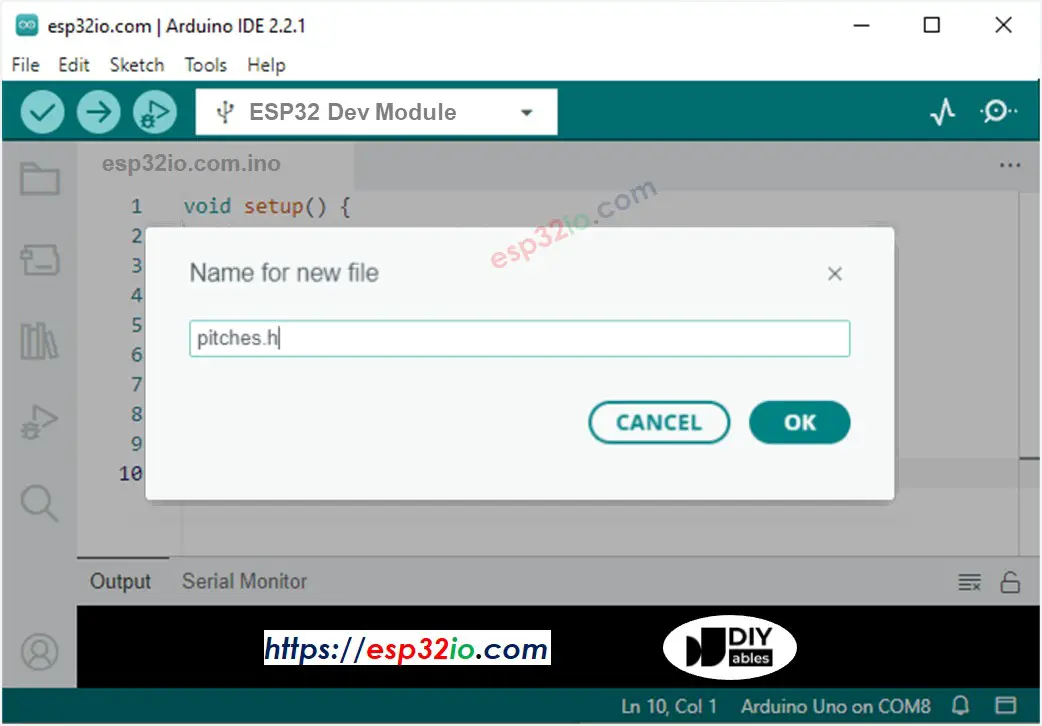
Create the pitches.h file On Arduino IDE by:
#define NOTE_B0 31
#define NOTE_C1 33
#define NOTE_CS1 35
#define NOTE_D1 37
#define NOTE_DS1 39
#define NOTE_E1 41
#define NOTE_F1 44
#define NOTE_FS1 46
#define NOTE_G1 49
#define NOTE_GS1 52
#define NOTE_A1 55
#define NOTE_AS1 58
#define NOTE_B1 62
#define NOTE_C2 65
#define NOTE_CS2 69
#define NOTE_D2 73
#define NOTE_DS2 78
#define NOTE_E2 82
#define NOTE_F2 87
#define NOTE_FS2 93
#define NOTE_G2 98
#define NOTE_GS2 104
#define NOTE_A2 110
#define NOTE_AS2 117
#define NOTE_B2 123
#define NOTE_C3 131
#define NOTE_CS3 139
#define NOTE_D3 147
#define NOTE_DS3 156
#define NOTE_E3 165
#define NOTE_F3 175
#define NOTE_FS3 185
#define NOTE_G3 196
#define NOTE_GS3 208
#define NOTE_A3 220
#define NOTE_AS3 233
#define NOTE_B3 247
#define NOTE_C4 262
#define NOTE_CS4 277
#define NOTE_D4 294
#define NOTE_DS4 311
#define NOTE_E4 330
#define NOTE_F4 349
#define NOTE_FS4 370
#define NOTE_G4 392
#define NOTE_GS4 415
#define NOTE_A4 440
#define NOTE_AS4 466
#define NOTE_B4 494
#define NOTE_C5 523
#define NOTE_CS5 554
#define NOTE_D5 587
#define NOTE_DS5 622
#define NOTE_E5 659
#define NOTE_F5 698
#define NOTE_FS5 740
#define NOTE_G5 784
#define NOTE_GS5 831
#define NOTE_A5 880
#define NOTE_AS5 932
#define NOTE_B5 988
#define NOTE_C6 1047
#define NOTE_CS6 1109
#define NOTE_D6 1175
#define NOTE_DS6 1245
#define NOTE_E6 1319
#define NOTE_F6 1397
#define NOTE_FS6 1480
#define NOTE_G6 1568
#define NOTE_GS6 1661
#define NOTE_A6 1760
#define NOTE_AS6 1865
#define NOTE_B6 1976
#define NOTE_C7 2093
#define NOTE_CS7 2217
#define NOTE_D7 2349
#define NOTE_DS7 2489
#define NOTE_E7 2637
#define NOTE_F7 2794
#define NOTE_FS7 2960
#define NOTE_G7 3136
#define NOTE_GS7 3322
#define NOTE_A7 3520
#define NOTE_AS7 3729
#define NOTE_B7 3951
#define NOTE_C8 4186
#define NOTE_CS8 4435
#define NOTE_D8 4699
#define NOTE_DS8 4978
Compile and upload code to ESP32 board by clicking Upload button on Arduino IDE
Move your hand in front of sensor
Listen to piezo buzzer's melody
The above ESP32 code contains line-by-line explanation. Please read the comments in the code!
※ NOTE THAT:
The above code using delay() function. This blocks other code during playing melody. To avoid blocking other code, use the ezBuzzer library instead. This library is designed for buzzer to beep or play memody without blocking other code.
Making video is a time-consuming work. If the video tutorial is necessary for your learning, please let us know by subscribing to our YouTube channel , If the demand for video is high, we will make the video tutorial.