ESP32 - GPS

In this guide, we'll discover how to extract GPS coordinates (longitude, latitude, altitude), GPS speed (in kilometers per hour), and date-time information from the NEO-6M GPS module. Additionally, we'll explore the process of calculating the distance between the current GPS position and a predefined set of GPS coordinates (such as the coordinates of London).

Hardware Used In This Tutorial

1×ESP-WROOM-32 Dev Module
1×Micro USB Cable
1×NEO-6M GPS module
1×Jumper Wires
1×Breadboard
1×(Optional) ESP32 Screw Terminal Adapter

Or you can buy the following sensor kit:

1×DIYables Sensor Kit 30 types, 69 units
Disclosure: some of these links are affiliate links. We may earn a commission on your purchase at no extra cost to you. We appreciate it.

Introduction to NEO-6M GPS module

Pinout

The NEO-6M GPS module has 4 pins:

  • VCC pin: needs to be connected to VCC (5V)
  • GND pin: needs to be connected to GND (0V)
  • TX pin: is used for communication between the GPS module and ESP32, needs to be connect to Serial RX pin on ESP32.
  • RX pin: is used for communication between the GPS module and ESP32, needs to be connect to Serial TX pin on ESP32.
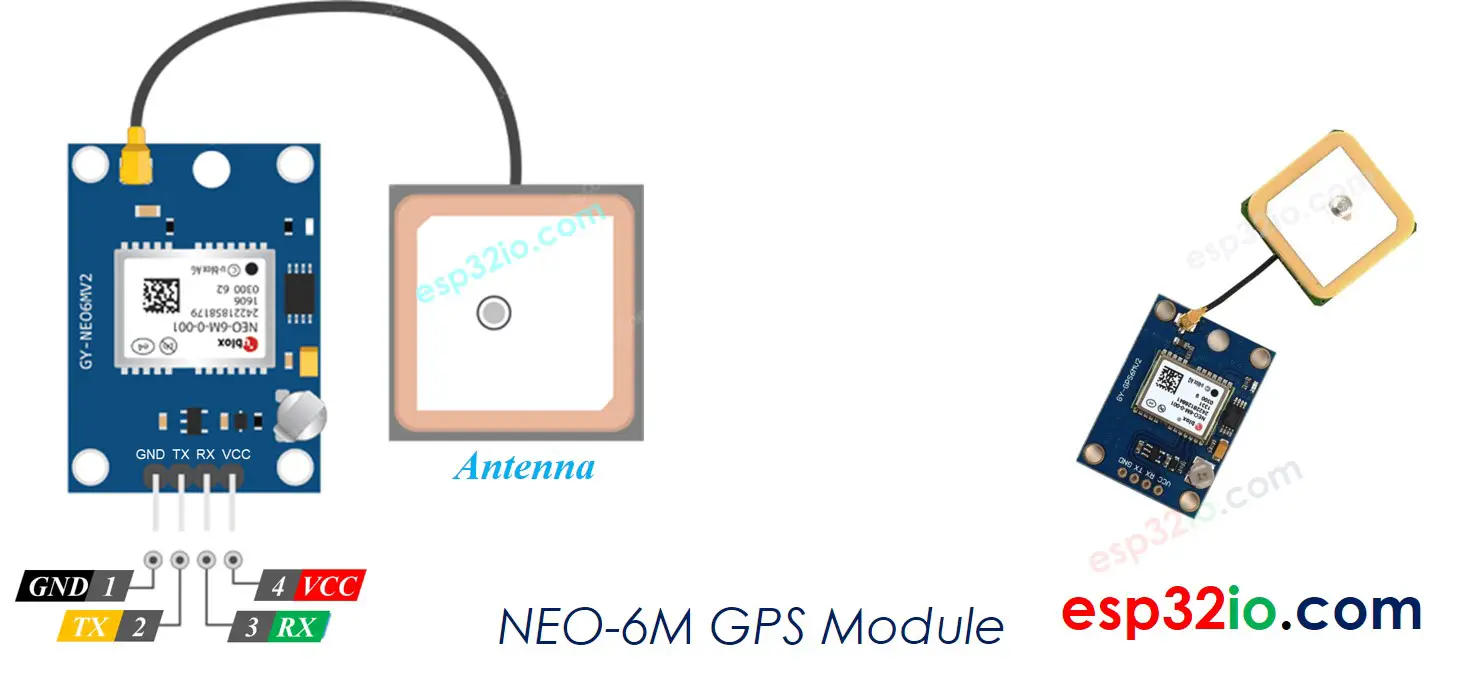
NEO-6M GPS module Pinout

Wiring Diagram

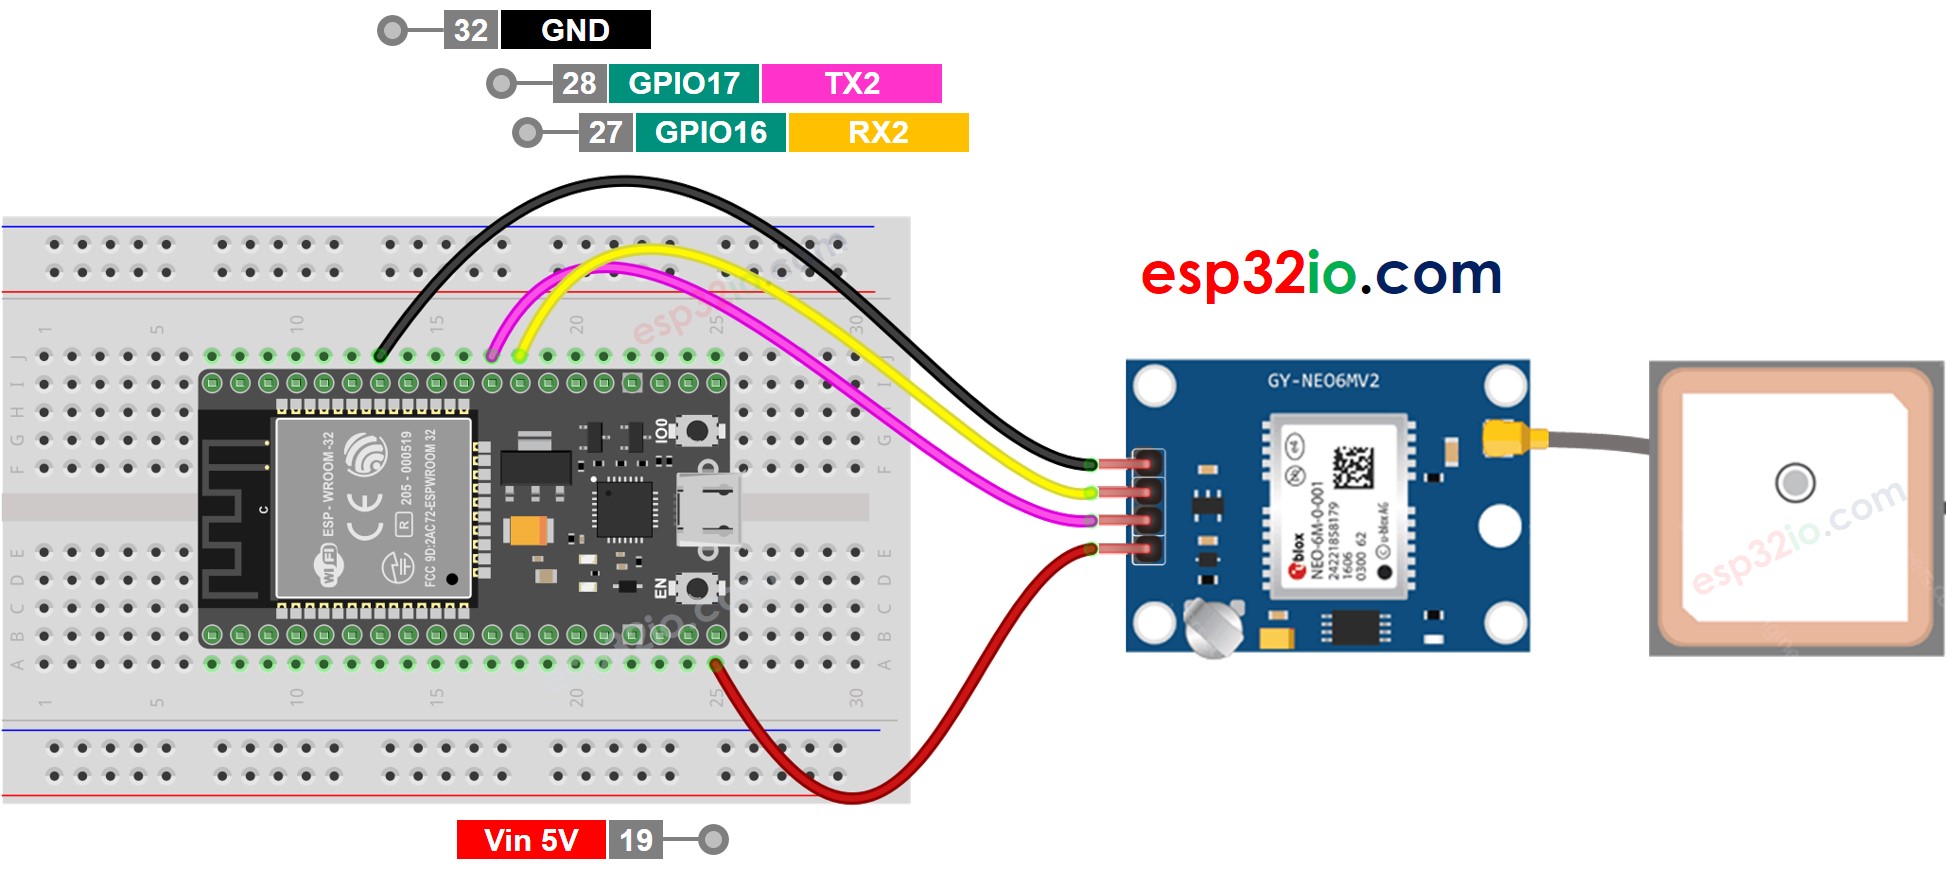
ESP32 GPS module Wiring Diagram

This image is created using Fritzing. Click to enlarge image

ESP32 Code

Reading GPS coordinates, speed (km/h), and date time

/* * This ESP32 code is created by esp32io.com * * This ESP32 code is released in the public domain * * For more detail (instruction and wiring diagram), visit https://esp32io.com/tutorials/esp32-gps */ #include <TinyGPS++.h> #define GPS_BAUDRATE 9600 // The default baudrate of NEO-6M is 9600 TinyGPSPlus gps; // the TinyGPS++ object void setup() { Serial.begin(9600); Serial2.begin(GPS_BAUDRATE); Serial.println(F("ESP32 - GPS module")); } void loop() { if (Serial2.available() > 0) { if (gps.encode(Serial2.read())) { if (gps.location.isValid()) { Serial.print(F("- latitude: ")); Serial.println(gps.location.lat()); Serial.print(F("- longitude: ")); Serial.println(gps.location.lng()); Serial.print(F("- altitude: ")); if (gps.altitude.isValid()) Serial.println(gps.altitude.meters()); else Serial.println(F("INVALID")); } else { Serial.println(F("- location: INVALID")); } Serial.print(F("- speed: ")); if (gps.speed.isValid()) { Serial.print(gps.speed.kmph()); Serial.println(F(" km/h")); } else { Serial.println(F("INVALID")); } Serial.print(F("- GPS date&time: ")); if (gps.date.isValid() && gps.time.isValid()) { Serial.print(gps.date.year()); Serial.print(F("-")); Serial.print(gps.date.month()); Serial.print(F("-")); Serial.print(gps.date.day()); Serial.print(F(" ")); Serial.print(gps.time.hour()); Serial.print(F(":")); Serial.print(gps.time.minute()); Serial.print(F(":")); Serial.println(gps.time.second()); } else { Serial.println(F("INVALID")); } Serial.println(); } } if (millis() > 5000 && gps.charsProcessed() < 10) Serial.println(F("No GPS data received: check wiring")); }

Quick Instructions

  • If this is the first time you use ESP32, see how to setup environment for ESP32 on Arduino IDE.
  • Do the wiring as above image.
  • Connect the ESP32 board to your PC via a micro USB cable
  • Open Arduino IDE on your PC.
  • Select the right ESP32 board (e.g. ESP32 Dev Module) and COM port.
  • On Arduino IDE, Go to Manage Libraries in the left bar
  • Search “TinyGPSPlus”, then find the TinyGPSPlus library by Mikal Hart
  • Click Install button to install TinyGPSPlus library.
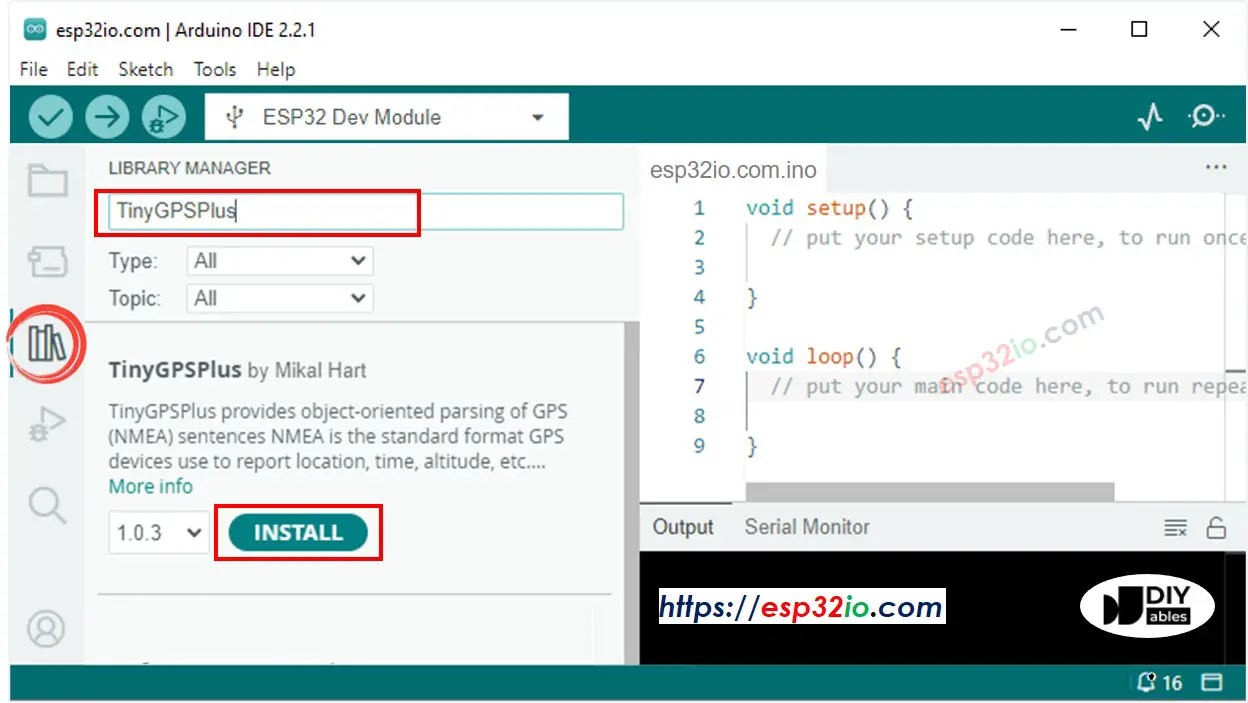
ESP32 TinyGPS++ library
  • Copy the above code and open with Arduino IDE
  • Click Upload button on Arduino IDE to upload code to ESP32
  • See the result on Serial Monitor:
COM6
Send
Autoscroll Show timestamp
Clear output
9600 baud  
Newline  

Calculating the distance from current location to a predefined location

The below code calculates the distance between the current location and London (lat:51.508131 , long: -0.128002)

/* * This ESP32 code is created by esp32io.com * * This ESP32 code is released in the public domain * * For more detail (instruction and wiring diagram), visit https://esp32io.com/tutorials/esp32-gps */ #include <TinyGPS++.h> #define GPS_BAUDRATE 9600 // The default baudrate of NEO-6M is 9600 TinyGPSPlus gps; // the TinyGPS++ object const double LONDON_LAT = 51.508131; const double LONDON_LON = -0.128002; void setup() { Serial.begin(9600); Serial2.begin(GPS_BAUDRATE); Serial.println(F("ESP32 - GPS module")); } void loop() { if (Serial2.available() > 0) { if (gps.encode(Serial2.read())) { if (gps.location.isValid()) { double latitude = gps.location.lat(); double longitude = gps.location.lng(); unsigned long distanceKm = TinyGPSPlus::distanceBetween(latitude, longitude, LONDON_LAT, LONDON_LON) / 1000; Serial.print(F("- latitude: ")); Serial.println(latitude); Serial.print(F("- longitude: ")); Serial.println(longitude); Serial.print(F("- distance to London: ")); Serial.println(distanceKm); } else { Serial.println(F("- location: INVALID")); } Serial.println(); } } if (millis() > 5000 && gps.charsProcessed() < 10) Serial.println(F("No GPS data received: check wiring")); }

Quick Instructions

  • Copy the above code and open with Arduino IDE
  • Click Upload button on Arduino IDE to upload code to ESP32
  • See the result on Serial Monitor:
COM6
Send
Autoscroll Show timestamp
Clear output
9600 baud  
Newline  

Video Tutorial

Making video is a time-consuming work. If the video tutorial is necessary for your learning, please let us know by subscribing to our YouTube channel , If the demand for video is high, we will make the video tutorial.

Learn More

※ OUR MESSAGES