ESP32 - MQTT

In this tutorial, we will explore how to utilize ESP32 for sending and receiving data to and from an MQTT broker using the MQTT protocol. Specifically, we will cover:

ESP32 MQTT

We will delve into two distinct scenarios:

Hardware Used In This Tutorial

1×ESP-WROOM-32 Dev Module
1×USB Cable Type-C
1×(Recommended) ESP32 Screw Terminal Adapter

Or you can buy the following sensor kits:

1×DIYables Sensor Kit (30 sensors/displays)
1×DIYables Sensor Kit (18 sensors/displays)
Disclosure: some of these links are affiliate links. We may earn a commission on your purchase at no extra cost to you. We appreciate it.

Introduction to ESP32 and MQTT

If you're already familiar with the MQTT protocol, great! If not, you can look it up online. This tutorial is all about using ESP32 to send and receive data using MQTT.

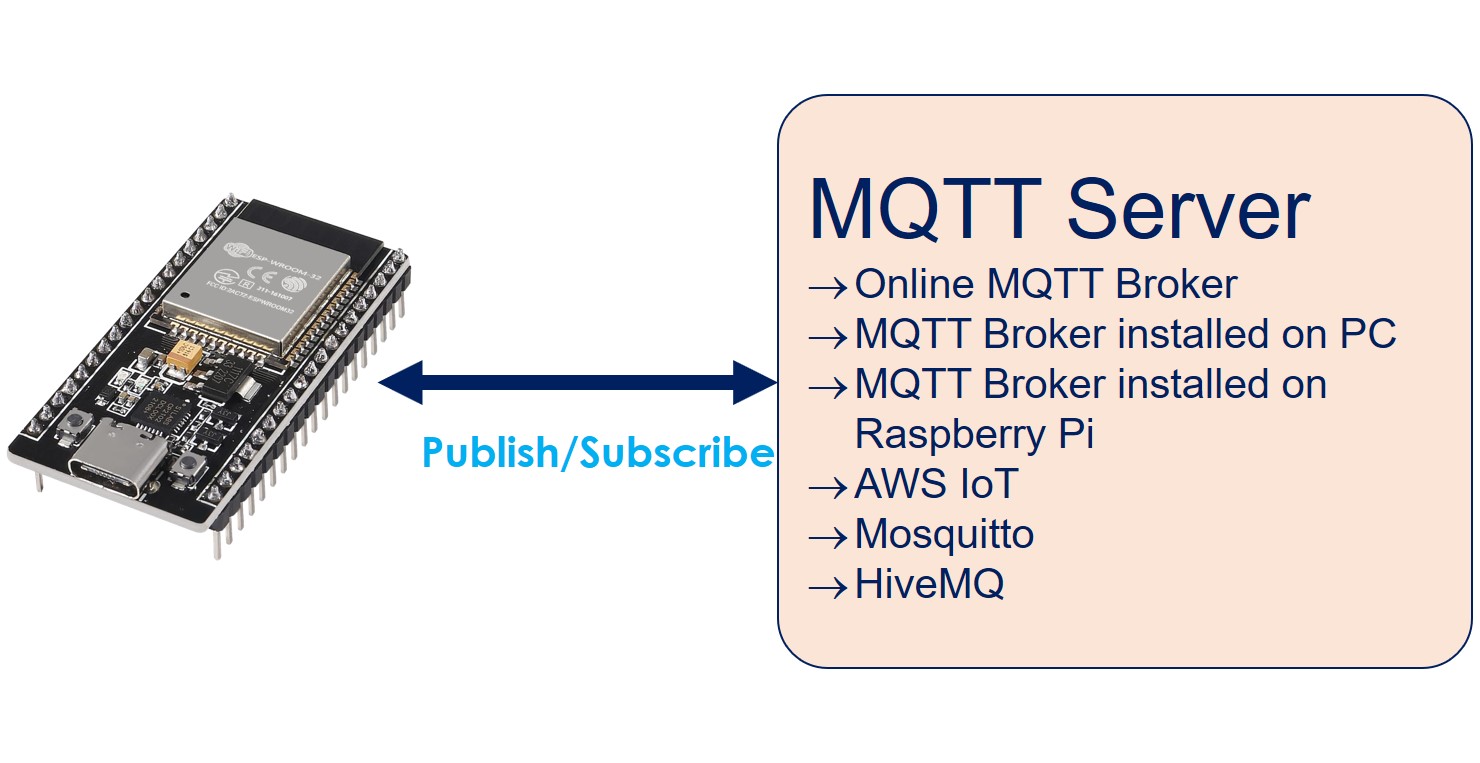
Here are some ways ESP32 can work with MQTT:

  • Connect ESP32 to an online MQTT broker like Mosquitto or AWS IoT.
  • Connect ESP32 to an MQTT broker installed on your computer, such as Mosquitto or HiveMQ.
  • Connect ESP32 to an MQTT broker running on your Raspberry Pi, for example, Mosquitto.
  • Connect ESP32 to a cloud-based MQTT broker, like Mosquitto or HiveMQ on AWS EC2.

In this tutorial, we'll start by seeing if ESP32 can connect to an online Mosquitto broker. We'll have ESP32 send and receive data through this broker over the internet.

Then, we'll set up the Mosquitto broker on our computer. We'll connect ESP32 to this local broker and continue to send and receive data.

Once you've finished this tutorial, you can explore more by checking out these other tutorials:

These links will provide further guidance on related topics.

Connect ESP32 to an online MQTT broker

In this part, we will learn how to connect ESP32 to test.mosquitto.org, an online MQTT broker created by Mosquitto. Please note that this broker should be used for the testing purpose only.

ESP32 Code

The below ESP32 code does:

  • Connect to the MQTT broker
  • Subscribe to a topic
  • Periodically publish messages to the same topic that it subscribes
/* * This ESP32 code is created by esp32io.com * * This ESP32 code is released in the public domain * * For more detail (instruction and wiring diagram), visit https://esp32io.com/tutorials/esp32-mqtt */ #include <WiFi.h> #include <MQTTClient.h> #include <ArduinoJson.h> const char WIFI_SSID[] = "YOUR_WIFI_SSID"; // CHANGE TO YOUR WIFI SSID const char WIFI_PASSWORD[] = "YOUR_WIFI_PASSWORD"; // CHANGE TO YOUR WIFI PASSWORD const char MQTT_BROKER_ADRRESS[] = "test.mosquitto.org"; // CHANGE TO MQTT BROKER'S ADDRESS const int MQTT_PORT = 1883; const char MQTT_CLIENT_ID[] = "YOUR-NAME-esp32-001"; // CHANGE IT AS YOU DESIRE const char MQTT_USERNAME[] = ""; // CHANGE IT IF REQUIRED, empty if not required const char MQTT_PASSWORD[] = ""; // CHANGE IT IF REQUIRED, empty if not required // The MQTT topics that ESP32 should publish/subscribe const char PUBLISH_TOPIC[] = "YOUR-NAME-esp32-001/loopback"; // CHANGE IT AS YOU DESIRE const char SUBSCRIBE_TOPIC[] = "YOUR-NAME-esp32-001/loopback"; // CHANGE IT AS YOU DESIRE const int PUBLISH_INTERVAL = 5000; // 5 seconds WiFiClient network; MQTTClient mqtt = MQTTClient(256); unsigned long lastPublishTime = 0; void setup() { Serial.begin(9600); WiFi.mode(WIFI_STA); WiFi.begin(WIFI_SSID, WIFI_PASSWORD); Serial.println("ESP32 - Connecting to Wi-Fi"); while (WiFi.status() != WL_CONNECTED) { delay(500); Serial.print("."); } Serial.println(); connectToMQTT(); } void loop() { mqtt.loop(); if (millis() - lastPublishTime > PUBLISH_INTERVAL) { sendToMQTT(); lastPublishTime = millis(); } } void connectToMQTT() { // Connect to the MQTT broker mqtt.begin(MQTT_BROKER_ADRRESS, MQTT_PORT, network); // Create a handler for incoming messages mqtt.onMessage(messageHandler); Serial.print("ESP32 - Connecting to MQTT broker"); while (!mqtt.connect(MQTT_CLIENT_ID, MQTT_USERNAME, MQTT_PASSWORD)) { Serial.print("."); delay(100); } Serial.println(); if (!mqtt.connected()) { Serial.println("ESP32 - MQTT broker Timeout!"); return; } // Subscribe to a topic, the incoming messages are processed by messageHandler() function if (mqtt.subscribe(SUBSCRIBE_TOPIC)) Serial.print("ESP32 - Subscribed to the topic: "); else Serial.print("ESP32 - Failed to subscribe to the topic: "); Serial.println(SUBSCRIBE_TOPIC); Serial.println("ESP32 - MQTT broker Connected!"); } void sendToMQTT() { StaticJsonDocument<200> message; message["timestamp"] = millis(); message["data"] = analogRead(0); // Or you can read data from other sensors char messageBuffer[512]; serializeJson(message, messageBuffer); mqtt.publish(PUBLISH_TOPIC, messageBuffer); Serial.println("ESP32 - sent to MQTT:"); Serial.print("- topic: "); Serial.println(PUBLISH_TOPIC); Serial.print("- payload:"); Serial.println(messageBuffer); } void messageHandler(String &topic, String &payload) { Serial.println("ESP32 - received from MQTT:"); Serial.println("- topic: " + topic); Serial.println("- payload:"); Serial.println(payload); }

Quick Instructions

  • If this is the first time you use ESP32, see how to setup environment for ESP32 on Arduino IDE.
  • Do the wiring as above image.
  • Connect the ESP32 board to your PC via a USB cable
  • Open Arduino IDE on your PC.
  • Select the right ESP32 board (e.g. ESP32 Dev Module) and COM port.
  • Open Arduino IDE on your PC
  • Open the Library Manager by clicking on the Library Manager icon on the left navigation bar of Arduino IDE
  • Type MQTT on the search box, then look for the MQTT library by Joel Gaehwiler.
  • Click Install button to install MQTT library.
ESP32 MQTT library
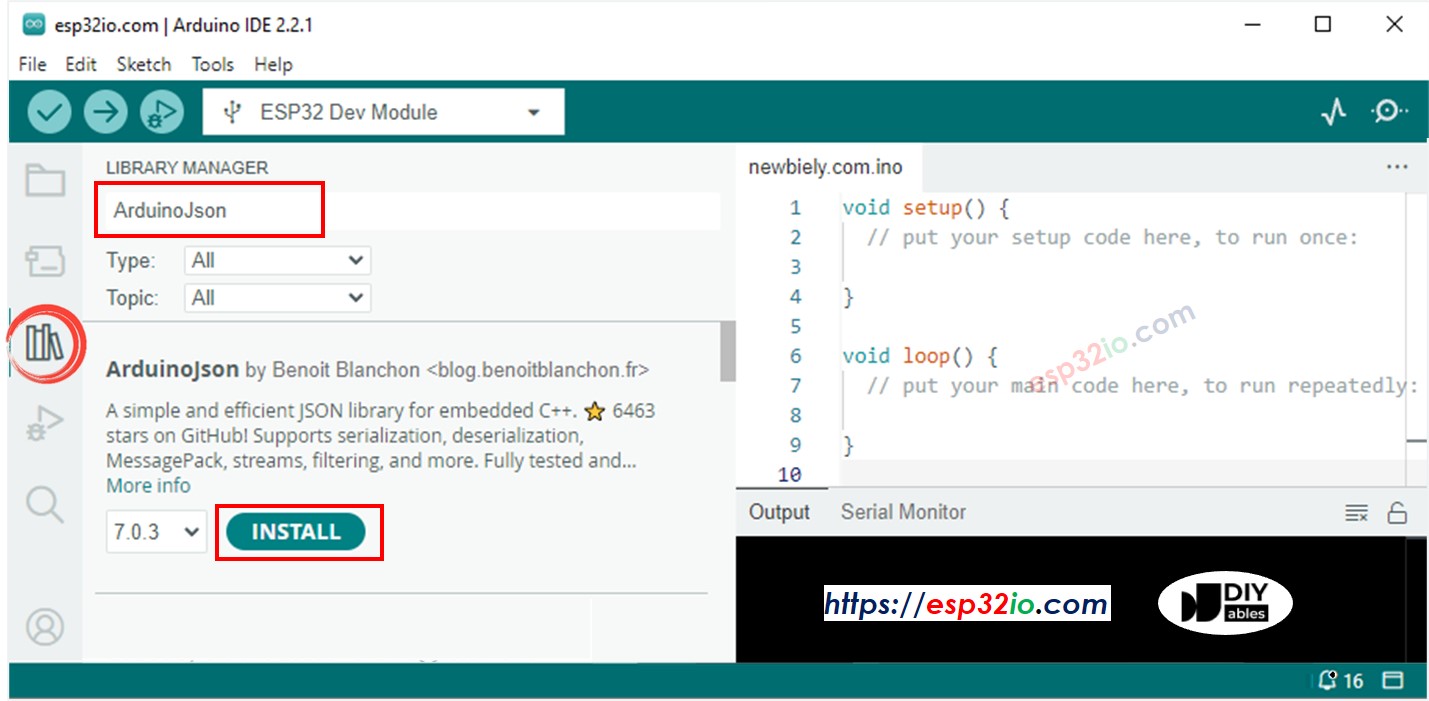
  • Type ArduinoJson on the search box, then look for the ArduinoJson library by Benoit Blanchon.
  • Click Install button to install ArduinoJson library.
ESP32 Json library
  • Copy the above code and open with Arduino IDE
  • Replace the WiFi information (SSID and password) in the code with your own.
  • In the code, you will see the word 'YOUR-NAME' three times. Replace this word with your name or random characters (alphabet characters only, no spaces). This is necessary because if you do not make the change, there may be multiple people running this code at the same time, which could lead to conflicts because the MQTT client IDs and topics are the same for everyone.
  • Click Upload button on Arduino IDE to upload code to ESP32
  • Open the Serial Monitor
  • See the result on Serial Monitor.
COM6
Send
ESP32 - Connecting to MQTT broker ESP32 - Subscribed to the topic: YOUR-NAME-esp32-001/loopback ESP32 - MQTT broker Connected! ESP32 - sent to MQTT: - topic: YOUR-NAME-esp32-001/loopback - payload:{"timestamp":11757,"data":255} ESP32 - received from MQTT: - topic: YOUR-NAME-esp32-001/loopback - payload: {"timestamp":11757,"data":255} ESP32 - sent to MQTT: - topic: YOUR-NAME-esp32-001/loopback - payload:{"timestamp":16896,"data":259} ESP32 - received from MQTT: - topic: YOUR-NAME-esp32-001/loopback - payload: {"timestamp":16896,"data":259}
Autoscroll Show timestamp
Clear output
9600 baud  
Newline  

As you can observe, the ESP32 publishes messages to the MQTT broker and then receives the same message back. This occurs because the provided code subscribes to the same topic to which it publishes data. If you prefer the ESP32 not to receive the message it publishes, you can easily achieve this by making the SUBSCRIBE topic different from the PUBLISH topic.

Connect ESP32 to the MQTT broker installed on your PC

Installing Mosquitto MQTT Broker

  • Install it on the D: drive instead of the C: drive. Avoid installing the Mosquitto broker on the C: drive to prevent potential issues.

Run Mosquitto MQTT broker

Now, let's check if the MQTT broker is functioning properly by following these steps:

  • Go to the directory where Mosquitto was installed. For instance: D:\Draft\mosquitto>
  • Make a new file named test.conf, copy the content below, and save it in that directory:
listener 1883 allow_anonymous true
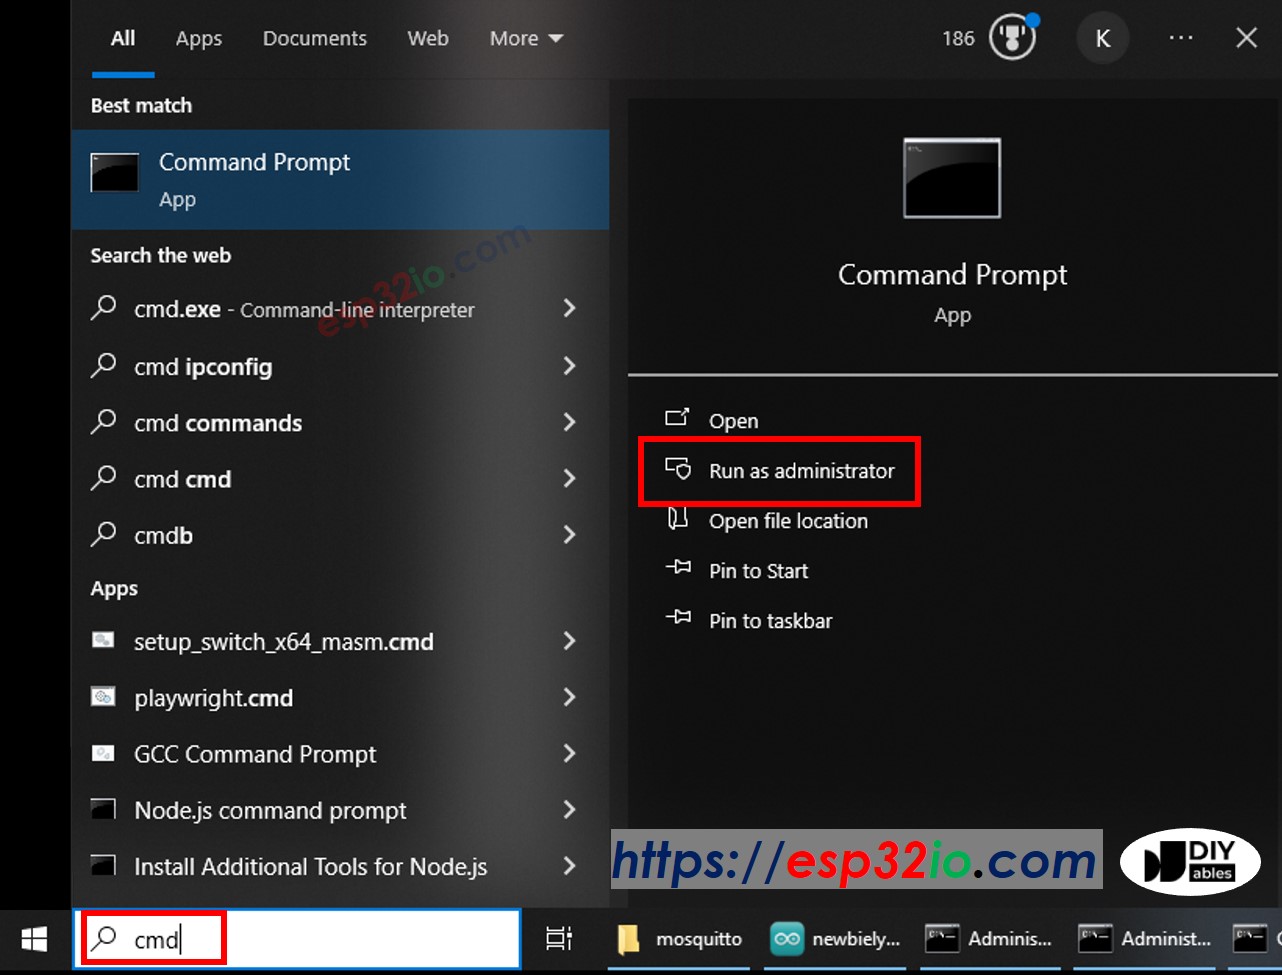
  • Run a Command Prompt as Administrator on your PC. Let's call it Broker Window. Do not close it until the end of the tutorial.
Windows command prompt administrator
  • Run the below commands one by one:
cd /d D:\Draft\mosquitto mosquitto -v -c test.conf
  • You will see:
Command Prompt
Microsoft Windows [Version 10.0.19045.3930] (c) Microsoft Corporation. All rights reserved. C:\WINDOWS\system32>cd /d D:\Draft\mosquitto D:\Draft\mosquitto>mosquitto -v -c test.conf 1710918939: mosquitto version 2.0.18 starting 1710918939: Config loaded from test.conf. 1710918939: Opening ipv6 listen socket on port 1883. 1710918939: Opening ipv4 listen socket on port 1883. 1710918939: mosquitto version 2.0.18 running
  • Open another Command Prompt as Administrator on your PC.
  • Find the IP address of your PC by running the below command:
ipconfig
Command Prompt
C:\WINDOWS\system32>ipconfig Windows IP Configuration Ethernet adapter: Subnet Mask . . . . . . . . . . . : 255.0.0.0 IPv4 Address. . . . . . . . . . . : 192.168.0.26 Subnet Mask . . . . . . . . . . . : 255.255.255.0 Default Gateway . . . . . . . . . :
  • Write down the IP address for later use. In the above example: 192.168.0.26

Test if the Mosquitto Broker works

  • Open another Command Prompt as Administrator on your PC. Let's call it Subscriber Window
  • Subscribe to a topic by running the below commands one by one (replace by your IP address):
cd /d D:\Draft\mosquitto mosquitto_sub -h 192.168.0.26 -p 1883 -t esp32-001/send
  • Open another Command Prompt as Administrator on your PC. Let's call it Publisher Window
  • Publish a message to the same topic by running the below commands one by one (replace by your IP address):
cd /d D:\Draft\mosquitto mosquitto_pub -h 192.168.0.26 -p 1883 -t esp32-001/send -m "Hello, MQTT!"
  • You will see:
Command Prompt
Microsoft Windows [Version 10.0.19045.3930] (c) Microsoft Corporation. All rights reserved. C:\WINDOWS\system32>cd /d D:\Draft\mosquitto D:\Draft\mosquitto>mosquitto_pub -h 192.168.0.26 -p 1883 -t esp32-001/send -m "Hello, MQTT!" D:\Draft\mosquitto>

You will see that message is forwarded to the Subscriber Window as follows:

Command Prompt
Microsoft Windows [Version 10.0.19045.3930] (c) Microsoft Corporation. All rights reserved. C:\WINDOWS\system32>cd /d D:\Draft\mosquitto D:\Draft\mosquitto>mosquitto_sub -h 192.168.0.26 -p 1883 -t esp32-001/send Hello, MQTT!

Now, you installed successfully the Mosquitto MQTT broker on your PC. Please do NOT close three windows: Broker Window, Subscriber Window, and Publisher Window. We will use them next.

ESP32 Code

The below ESP32 code does:

  • Connect to the MQTT broker
  • Subscribe to a topic
  • Periodically publish messages to another topic
/* * This ESP32 code is created by esp32io.com * * This ESP32 code is released in the public domain * * For more detail (instruction and wiring diagram), visit https://esp32io.com/tutorials/esp32-mqtt */ #include <WiFi.h> #include <MQTTClient.h> #include <ArduinoJson.h> #define CLIENT_ID "ESP32-001" // CHANGE IT AS YOU DESIRE const char WIFI_SSID[] = "YOUR_WIFI_SSID"; // CHANGE TO YOUR WIFI SSID const char WIFI_PASSWORD[] = "YOUR_WIFI_PASSWORD"; // CHANGE TO YOUR WIFI PASSWORD const char MQTT_BROKER_ADRRESS[] = "192.168.0.26"; // CHANGE TO MQTT BROKER'S IP ADDRESS const int MQTT_PORT = 1883; const char MQTT_USERNAME[] = ""; // CHANGE IT IF REQUIRED const char MQTT_PASSWORD[] = ""; // CHANGE IT IF REQUIRED // The MQTT topics that this device should publish/subscribe #define PUBLISH_TOPIC "esp32-001/send" #define SUBSCRIBE_TOPIC "esp32-001/receive" #define PUBLISH_INTERVAL 5000 // 4 seconds WiFiClient network; MQTTClient mqtt = MQTTClient(256); unsigned long lastPublishTime = 0; void setup() { Serial.begin(9600); WiFi.mode(WIFI_STA); WiFi.begin(WIFI_SSID, WIFI_PASSWORD); Serial.println("ESP32 - Connecting to Wi-Fi"); while (WiFi.status() != WL_CONNECTED) { delay(500); Serial.print("."); } Serial.println(); connectToMQTT(); } void loop() { mqtt.loop(); if (millis() - lastPublishTime > PUBLISH_INTERVAL) { sendToMQTT(); lastPublishTime = millis(); } } void connectToMQTT() { // Connect to the MQTT broker mqtt.begin(MQTT_BROKER_ADRRESS, MQTT_PORT, network); // Create a handler for incoming messages mqtt.onMessage(messageHandler); Serial.print("ESP32 - Connecting to MQTT broker"); while (!mqtt.connect(CLIENT_ID, MQTT_USERNAME, MQTT_PASSWORD)) { Serial.print("."); delay(100); } Serial.println(); if (!mqtt.connected()) { Serial.println("ESP32 - MQTT broker Timeout!"); return; } // Subscribe to a topic, the incoming messages are processed by messageHandler() function if (mqtt.subscribe(SUBSCRIBE_TOPIC)) Serial.print("ESP32 - Subscribed to the topic: "); else Serial.print("ESP32 - Failed to subscribe to the topic: "); Serial.println(SUBSCRIBE_TOPIC); Serial.println("ESP32 - MQTT broker Connected!"); } void sendToMQTT() { StaticJsonDocument<200> message; message["timestamp"] = millis(); message["data"] = analogRead(0); // Or you can read data from other sensors char messageBuffer[512]; serializeJson(message, messageBuffer); mqtt.publish(PUBLISH_TOPIC, messageBuffer); Serial.println("ESP32 - sent to MQTT:"); Serial.print("- topic: "); Serial.println(PUBLISH_TOPIC); Serial.print("- payload:"); Serial.println(messageBuffer); } void messageHandler(String &topic, String &payload) { Serial.println("ESP32 - received from MQTT:"); Serial.println("- topic: " + topic); Serial.println("- payload:"); Serial.println(payload); // You can process the incoming data as json object, then control something /* StaticJsonDocument<200> doc; deserializeJson(doc, payload); const char* message = doc["message"]; */ }

Quick Instructions

  • Copy the above code and open with Arduino IDE
  • Replace the WiFi information (SSID and password) in the code with your own.
  • Replace the MQTT broker address in the code (domain name or IP address).
  • Click Upload button on Arduino IDE to upload code to ESP32

Send message from ESP32 to PC via MQTT

ESP32 codes publishes data to the MQTT topic esp32-001/send, Subscriber Window on PC subscribe that topic to receive the data.

  • Open the Serial Monitor, you will see ESP32 periodically publish a message to a topic.
COM6
Send
ESP32 - Connecting to MQTT broker ESP32 - Subscribed to the topic: esp32-001/receive ESP32 - MQTT broker Connected! ESP32 - sent to MQTT: - topic: esp32-001/send - payload:{"timestamp":10708,"data":311} ESP32 - sent to MQTT: - topic: esp32-001/send - payload:{"timestamp":15837,"data":298} ESP32 - sent to MQTT: - topic: esp32-001/send - payload:{"timestamp":20965,"data":291} ESP32 - sent to MQTT: - topic: esp32-001/send - payload:{"timestamp":26094,"data":286}
Autoscroll Show timestamp
Clear output
9600 baud  
Newline  
  • Check the Subscriber Window, you will see that it receives the message published by ESP32 as below:
Command Prompt
Microsoft Windows [Version 10.0.19045.3930] (c) Microsoft Corporation. All rights reserved. C:\WINDOWS\system32>cd /d D:\Draft\mosquitto D:\Draft\mosquitto>mosquitto_sub -h 192.168.0.26 -p 1883 -t esp32-001/send Hello, MQTT! {"timestamp":10708,"data":311} {"timestamp":15837,"data":298} {"timestamp":20965,"data":291} {"timestamp":26094,"data":286}

Send message from PC to ESP32 via MQTT

ESP32 subscribes to the topic esp32-001/receive, Publisher Window on PC publish a message to that topic to send it to the ESP32.

  • Publish a message to the topic that ESP32 subscribed by running the following command on Publisher Window:
mosquitto_pub -h 192.168.0.26 -p 1883 -t esp32-001/receive -m "Hello, ESP32!"
  • You will see this message is received by ESP32 on Serial Monitor as below:
COM6
Send
ESP32 - received from MQTT: - topic: esp32-001/receive - payload: Hello, ESP32!
Autoscroll Show timestamp
Clear output
9600 baud  
Newline  

Video Tutorial

Making video is a time-consuming work. If the video tutorial is necessary for your learning, please let us know by subscribing to our YouTube channel , If the demand for video is high, we will make the video tutorial.

※ OUR MESSAGES