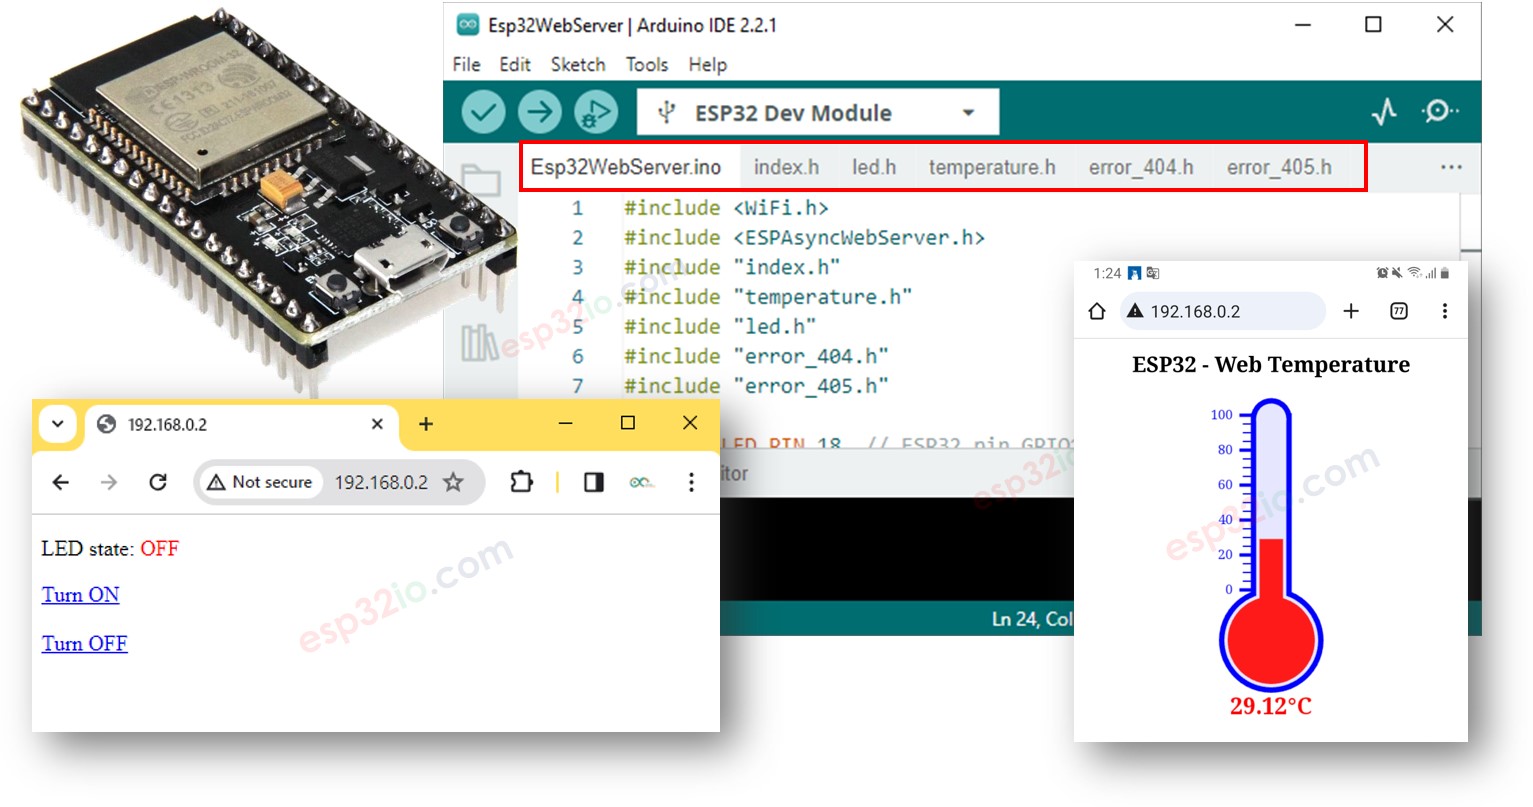
In this tutorial, we'll find out how to turn an ESP32 into a web server that can handle multiple pages at the same time, such as index.html, temperature.html, led.html, error_404.html, and error_405.html...
By following this tutorial, you will be able to turn your ESP32 into a web server with some cool features:
Multiple web pages are active simultaneously.
The HTML content (including HTML, CSS, and Javascript) for each page is kept separately in its own file on the Arduino IDE.
The HTML content can be dynamically updated with real-time values from sensors, making the web pages dynamic and responsive.
The web server allows to control something connected to ESP32 via web.
The web server handles HTTP error codes such as 404 Not Found
It might sound complicated, but don't worry! This tutorial provides step-by-step guidance, and the code is designed to be beginner-friendly, ensuring that you can easily comprehend and create your own ESP32 web server.
Disclosure: Some of the links in this section are Amazon affiliate links, meaning we may earn a commission at no additional cost to you if you make a purchase through them. Additionally, some links direct you to products from our own brand, DIYables .
Introduction to ESP32 and Web Server
If you're not familiar with ESP32 and Web Server (including pinout, how it works, and programming), you can learn about them through the following tutorials:
Below is the complete ESP32 code that creates a web server with multiple pages. To keep it simple, the HTML content for each page is very simple and embedded directly in the ESP32 code. In the another part, we will learn how to separate the HTML contents for each page into separate files, making the code more organized and manageable.
/* * This ESP32 code is created by esp32io.com * * This ESP32 code is released in the public domain * * For more detail (instruction and wiring diagram), visit https://esp32io.com/tutorials/esp32-web-server-multiple-pages */#include <DIYables_ESP32_WebServer.h>#define LED_PIN 18 // ESP32 pin GPIO18 connected to LEDint LED_state = LOW;floatgetTemperature() {// YOUR SENSOR IMPLEMENTATION HERE// simulate the temperature valuefloat temp_x100 = random(0, 10000); // a ramdom value from 0 to 10000return temp_x100 / 100; // return the simulated temperature value from 0 to 100 in float}// WiFi credentialsconstchar WIFI_SSID[] = "YOUR_WIFI_SSID";constchar WIFI_PASSWORD[] = "YOUR_WIFI_PASSWORD";// Create web server instanceDIYables_ESP32_WebServer server;// Page handlersvoid handleHome(WiFiClient& client, const String& method, const String& request, const QueryParams& params, const String& jsonData) {Serial.println("Web Server: home page"); server.sendResponse(client, "This is the ESP32 home page");}void handleTemperature(WiFiClient& client, const String& method, const String& request, const QueryParams& params, const String& jsonData) {Serial.println("Web Server: temperature page");float temperature = getTemperature();String reponse = "Temperature: " + String(temperature); server.sendResponse(client, reponse.c_str());}void handleLed(WiFiClient& client, constString& method, constString& request, const QueryParams& params, constString& jsonData) {Serial.println("Web Server: LED page");// Check for the 'state' parameter in the query stringString state = "";for (int i = 0; i < params.count; i++) {if (String(params.params[i].key) == "state") { state = params.params[i].value;if (state == "on") { LED_state = HIGH; } elseif (state == "off") { LED_state = LOW; }// control LED heredigitalWrite(LED_PIN, LED_state);Serial.print(" => turning LED to ");Serial.print(state);Serial.println();break; } }String reponse = "LED state: " + String(LED_state); server.sendResponse(client, reponse.c_str());}void handleNotFound(WiFiClient& client, constString& method, constString& request, const QueryParams& params, constString& jsonData) {String response = "<!DOCTYPE html><html><head><meta charset=\"UTF-8\"><title>404 Not Found</title></head><body>"; response += "<h1>404 - Page Not Found</h1>"; response += "<p>Sorry, we couldn't find that page!</p>"; response += "<a href=\"/\">Return to Home</a></body></html>"; server.sendResponse(client, response.c_str());}voidsetup() {Serial.begin(9600);delay(1000);pinMode(LED_PIN, OUTPUT);Serial.println("ESP32 Web Server");// Configure routes server.addRoute("/", handleHome); server.addRoute("/temperature.html", handleTemperature); server.addRoute("/led.html", handleLed);// Set custom 404 handler server.setNotFoundHandler(handleNotFound);// Start web server with WiFi connection server.begin(WIFI_SSID, WIFI_PASSWORD);}voidloop() { server.handleClient();}
Please note that you need to change the 192.168.0.2 to the IP address you got on Serial Monitor.
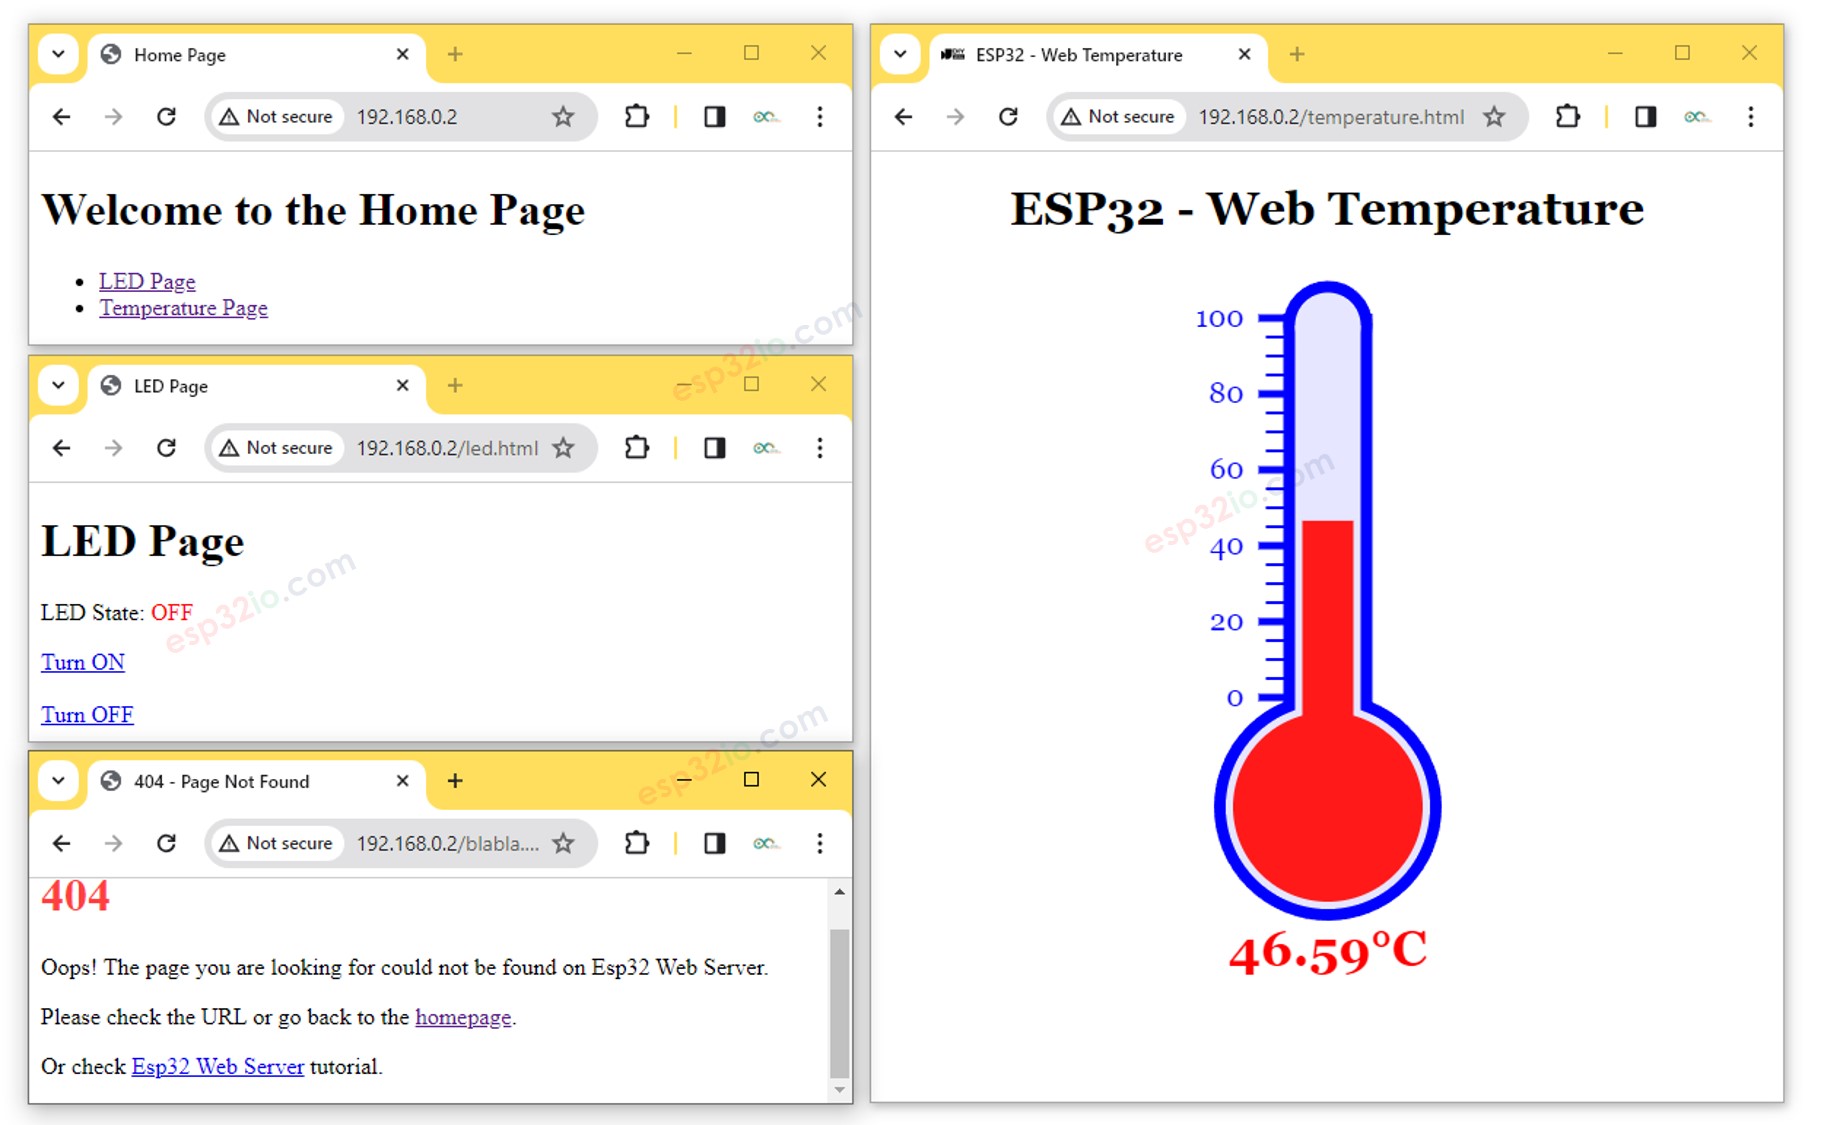
You will see the following pages: home page, led page, temperature page, and Not Found page
You can also check the output on Serial Monitor
Newbiely | Arduino IDE 2.3.8
──
☐
✕
File
Edit
Sketch
Tools
Help
ESP32 Dev Module
Newbiely.ino
···
8Serial.println("Hello World!");
Output
Serial Monitor
Message (Enter to send message to 'ESP32 Dev Module' on 'COM15')
New Line
9600 baud
Connecting to WiFi...
Connected to WiFi
ESP32 Web Server's IP address: 192.168.0.2
ESP32 Web server started
Web Server: home page
Web Server: LED page
Web Server: LED page => turning LED to on
Web Server: LED page => turning LED to off
Web Server: temperature page
Web Server: Not Found
Ln 11, Col 1
ESP32 Dev Module on COM15
2
The previous code has very simple HTML content for each page. But if we want to make a fancy interface with lots of HTML, the code can get big and messy. To make it simpler, we will learn how to separate the HTML from the ESP32 code. This lets us keep the HTML in separate files, making it easier to manage and work with.
ESP32 Code - Complete multiple-page Web server
Open the Arduino IDE.
Create a new sketch and give it a name, for example, ESP32WebServer.ino.
Copy the provided code and paste it into that file.
/* * This ESP32 code is created by esp32io.com * * This ESP32 code is released in the public domain * * For more detail (instruction and wiring diagram), visit https://esp32io.com/tutorials/esp32-web-server-multiple-pages */#include <DIYables_ESP32_WebServer.h>#include"index.h"#include"temperature.h"#include"led.h"#include"error_404.h"#define LED_PIN 18 // ESP32 pin GPIO18 connected to LEDint LED_state = LOW;floatgetTemperature() {// YOUR SENSOR IMPLEMENTATION HERE// simulate the temperature valuefloat temp_x100 = random(0, 10000); // a ramdom value from 0 to 10000return temp_x100 / 100; // return the simulated temperature value from 0 to 100 in float}// WiFi credentialsconstchar WIFI_SSID[] = "YOUR_WIFI_SSID";constchar WIFI_PASSWORD[] = "YOUR_WIFI_PASSWORD";// Create web server instanceDIYables_ESP32_WebServer server;// Page handlersvoid handleHome(WiFiClient& client, const String& method, const String& request, const QueryParams& params, const String& jsonData) {Serial.println("Web Server: home page"); server.sendResponse(client, HTML_CONTENT_HOME);}void handleTemperature(WiFiClient& client, const String& method, const String& request, const QueryParams& params, const String& jsonData) {Serial.println("Web Server: temperature page");float temperature = getTemperature();String html = HTML_CONTENT_TEMPERATURE; // Use the HTML content from the temperature.h file html.replace("%TEMPERATURE_VALUE%", String(temperature)); // update the temperature value server.sendResponse(client, html.c_str());}void handleLed(WiFiClient& client, const String& method, const String& request, const QueryParams& params, const String& jsonData) {Serial.println("Web Server: LED page");// Check for the 'state' parameter in the query stringString state = "";for (int i = 0; i < params.count; i++) {if (String(params.params[i].key) == "state") { state = params.params[i].value;if (state == "on") { LED_state = HIGH; } elseif (state == "off") { LED_state = LOW; }// control LED heredigitalWrite(LED_PIN, LED_state);Serial.print(" => turning LED to ");Serial.print(state);Serial.println();break; } }String html = HTML_CONTENT_LED; // Use the HTML content from the led.h file html.replace("%LED_STATE%", LED_state ? "ON" : "OFF"); // update the LED state server.sendResponse(client, html.c_str());}void handleNotFound(WiFiClient& client, const String& method, const String& request, const QueryParams& params, const String& jsonData) {// Handle 404 Not Found errorSerial.println("Web Server: Not Found");// Use the HTML content from the error_404.h file server.sendResponse(client, HTML_CONTENT_404);}voidsetup() {Serial.begin(9600);delay(1000);pinMode(LED_PIN, OUTPUT);Serial.println("ESP32 Web Server");// Configure routes server.addRoute("/", handleHome); server.addRoute("/temperature.html", handleTemperature); server.addRoute("/led.html", handleLed);// Set custom 404 handler server.setNotFoundHandler(handleNotFound);// Start web server with WiFi connection server.begin(WIFI_SSID, WIFI_PASSWORD);}voidloop() { server.handleClient();}
Change the WiFi information (SSID and password) in the code to yours
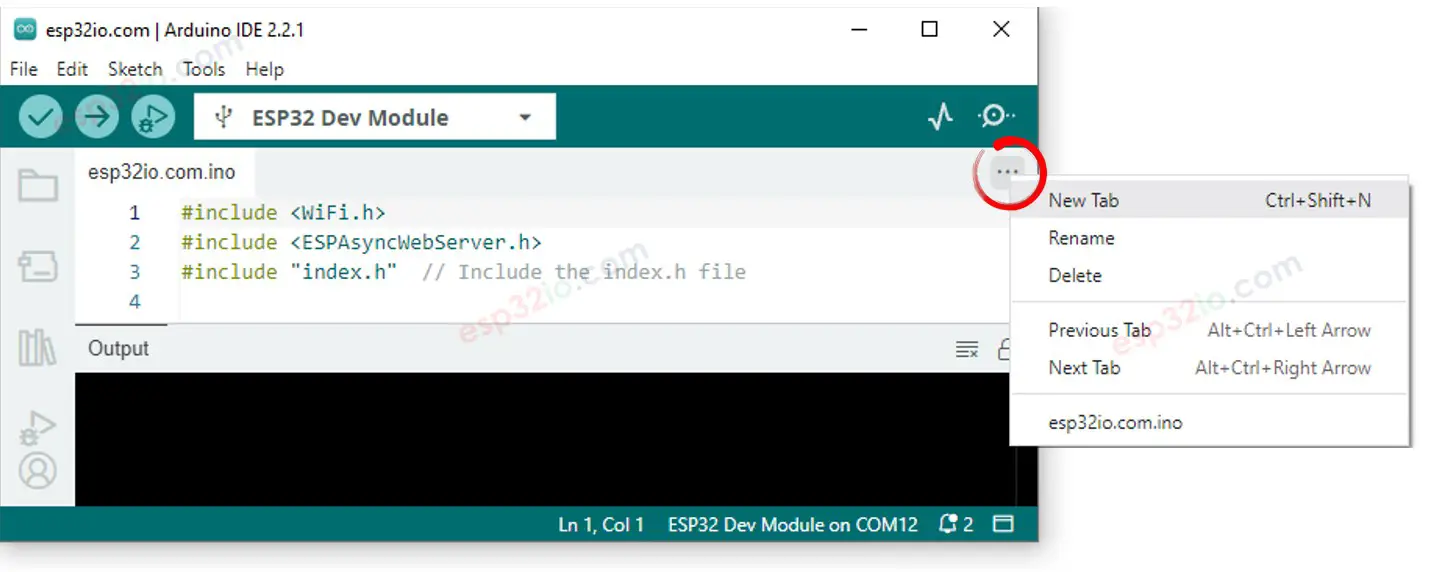
Create the index.h file On Arduino IDE by:
Either click on the button just below the serial monitor icon and choose New Tab, or use Ctrl+Shift+N keys.
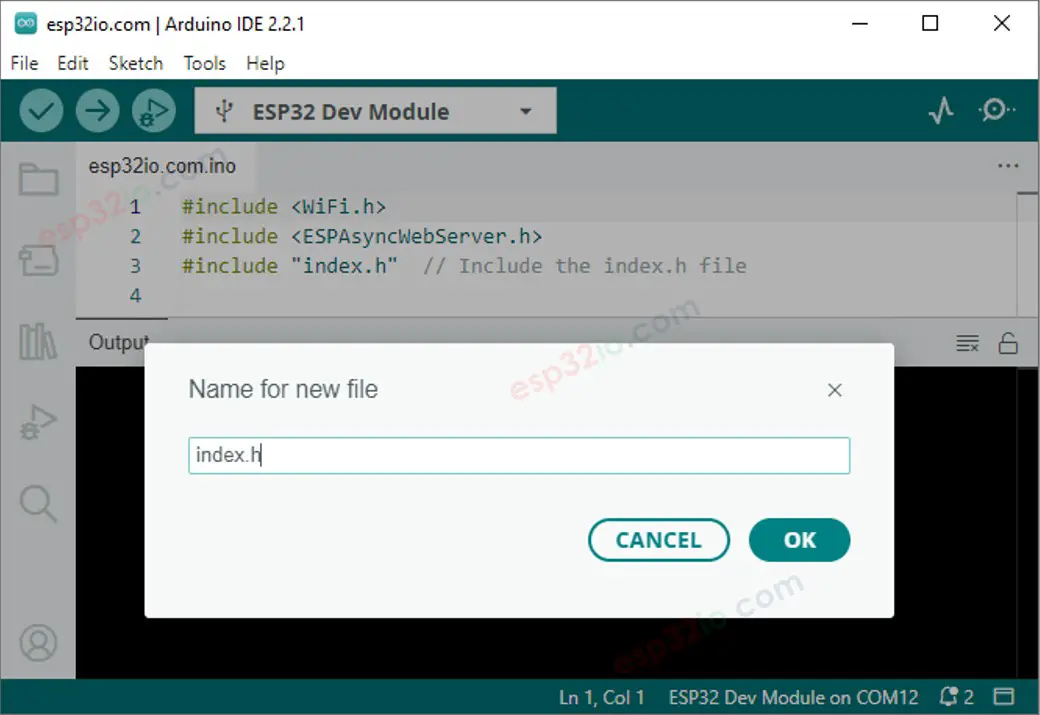
Give file's name index.h and click OK button
Copy the below code and paste it to the index.h file.
/* * This ESP32 code is created by esp32io.com * * This ESP32 code is released in the public domain * * For more detail (instruction and wiring diagram), visit https://esp32io.com/tutorials/esp32-web-server-multiple-pages */constchar *HTML_CONTENT_HOME = R"=====(<!DOCTYPE html><html lang="en"><head> <meta charset="UTF-8"> <meta name="viewport" content="width=device-width, initial-scale=1.0"> <link rel="icon" href="data:,"> <title>Home Page</title></head><body> <h1>Welcome to the Home Page</h1> <ul> <li><a href="/led.html">LED Page</a></li> <li><a href="/temperature.html">Temperature Page</a></li> </ul></body></html>)=====";
Similarly, Create the led.h file On Arduino IDE with the following content.
/* * This ESP32 code is created by esp32io.com * * This ESP32 code is released in the public domain * * For more detail (instruction and wiring diagram), visit https://esp32io.com/tutorials/esp32-web-server-multiple-pages */constchar *HTML_CONTENT_LED = R"=====(<!DOCTYPE html><html lang="en"><head> <meta charset="UTF-8"> <meta name="viewport" content="width=device-width, initial-scale=1.0"> <link rel="icon" href="data:,"> <title>LED Page</title></head><body> <h1>LED Page</h1> <p>LED State: <span style="color: red;">%LED_STATE%</span></p> <a href='/led.html?state=on'>Turn ON</a> <br><br> <a href='/led.html?state=off'>Turn OFF</a></body></html>)=====";
Similarly, Create the temperature.h file On Arduino IDE with the following content.
/* * This ESP32 code is created by esp32io.com * * This ESP32 code is released in the public domain * * For more detail (instruction and wiring diagram), visit https://esp32io.com/tutorials/esp32-web-server-multiple-pages */constchar *HTML_CONTENT_TEMPERATURE = R"=====(<!DOCTYPE html><html><head><title>ESP32 - Web Temperature</title><meta name="viewport" content="width=device-width, initial-scale=0.7, maximum-scale=0.7"><meta charset="utf-8"><link rel="icon" href="https://diyables.io/images/page/diyables.svg"><style>body { font-family: "Georgia"; text-align: center; font-size: width/2pt;}h1 { font-weight: bold; font-size: width/2pt;}h2 { font-weight: bold; font-size: width/2pt;}button { font-weight: bold; font-size: width/2pt;}</style><script>var cvs_width = 200, cvs_height = 450;function init() { var canvas = document.getElementById("cvs"); canvas.width = cvs_width; canvas.height = cvs_height + 50; var ctx = canvas.getContext("2d"); ctx.translate(cvs_width/2, cvs_height - 80); update_view(%TEMPERATURE_VALUE%);}function update_view(temp) { var canvas = document.getElementById("cvs"); var ctx = canvas.getContext("2d"); var radius = 70; var offset = 5; var width = 45; var height = 330; ctx.clearRect(-cvs_width/2, -350, cvs_width, cvs_height); ctx.strokeStyle="blue"; ctx.fillStyle="blue";//5-step Degree var x = -width/2; ctx.lineWidth=2;for (var i = 0; i <= 100; i+=5) { var y = -(height - radius)*i/100 - radius - 5; ctx.beginPath(); ctx.lineTo(x, y); ctx.lineTo(x - 20, y); ctx.stroke(); }//20-step Degree ctx.lineWidth=5;for (var i = 0; i <= 100; i+=20) { var y = -(height - radius)*i/100 - radius - 5; ctx.beginPath(); ctx.lineTo(x, y); ctx.lineTo(x - 25, y); ctx.stroke(); ctx.font="20px Georgia"; ctx.textBaseline="middle"; ctx.textAlign="right"; ctx.fillText(i.toString(), x - 35, y); }// shape ctx.lineWidth=16; ctx.beginPath(); ctx.arc(0, 0, radius, 0, 2 * Math.PI); ctx.stroke(); ctx.beginPath(); ctx.rect(-width/2, -height, width, height); ctx.stroke(); ctx.beginPath(); ctx.arc(0, -height, width/2, 0, 2 * Math.PI); ctx.stroke(); ctx.fillStyle="#e6e6ff"; ctx.beginPath(); ctx.arc(0, 0, radius, 0, 2 * Math.PI); ctx.fill(); ctx.beginPath(); ctx.rect(-width/2, -height, width, height); ctx.fill(); ctx.beginPath(); ctx.arc(0, -height, width/2, 0, 2 * Math.PI); ctx.fill(); ctx.fillStyle="#ff1a1a"; ctx.beginPath(); ctx.arc(0, 0, radius - offset, 0, 2 * Math.PI); ctx.fill(); temp = Math.round(temp * 100) / 100; var y = (height - radius)*temp/100.0 + radius + 5; ctx.beginPath(); ctx.rect(-width/2 + offset, -y, width - 2*offset, y); ctx.fill(); ctx.fillStyle="red"; ctx.font="bold 34px Georgia"; ctx.textBaseline="middle"; ctx.textAlign="center"; ctx.fillText(temp.toString() + "°C", 0, 100);}window.onload = init;</script></head><body><h1>ESP32 - Web Temperature</h1><canvas id="cvs"></canvas></body></html>)=====";
Similarly, Create the error_404.h file On Arduino IDE with the following content.
/* * This ESP32 code is created by esp32io.com * * This ESP32 code is released in the public domain * * For more detail (instruction and wiring diagram), visit https://esp32io.com/tutorials/esp32-web-server-multiple-pages */constchar *HTML_CONTENT_404 = R"=====(<!DOCTYPE html><html lang="en"><head> <meta charset="UTF-8"> <meta name="viewport" content="width=device-width, initial-scale=1.0"> <link rel="icon" href="data:,"> <title>404 - Page Not Found</title> <style> h1 {color: #ff4040;} </style></head><body> <h1>404</h1> <p>Oops! The page you are looking for could not be found on Esp32 Web Server.</p> <p>Please check the URL or go back to the <a href="/">homepage</a>.</p> <p>Or check <a href="https://esp32io.com/tutorials/esp32-web-server-multiple-pages"> Esp32 Web Server</a> tutorial.</p></body></html>)=====";
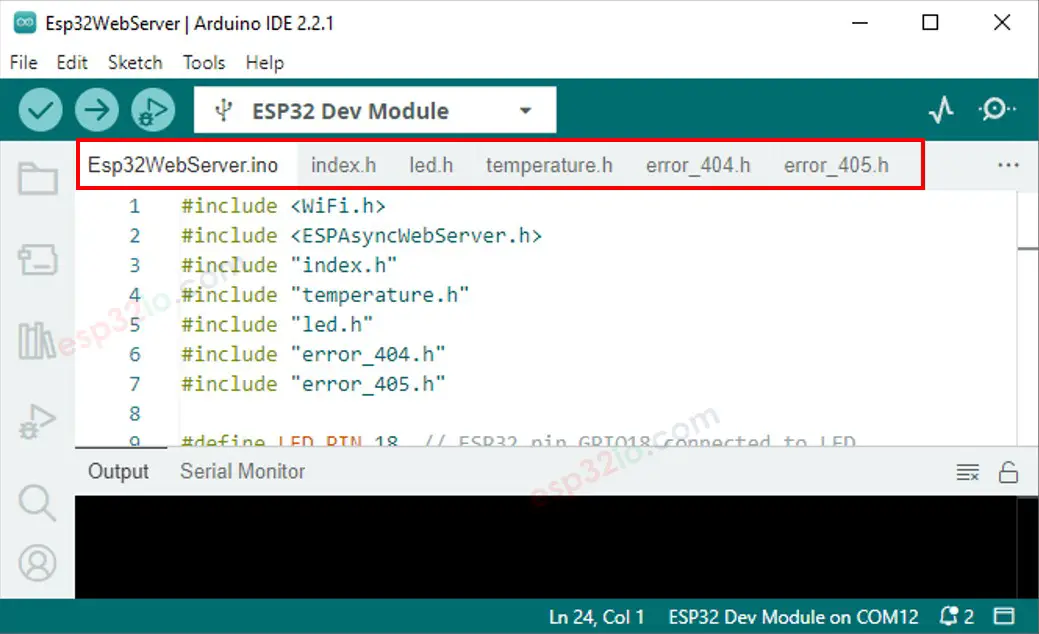
Now you have multiple files on Arduino IDE like below:
Click Upload button on Arduino IDE to upload code to ESP32
Access the web pages of ESP32 board via web browser one by one as before. You will see all web page as below:
Please feel free to share the link of this tutorial. However, Please do not use our content on any other websites. We invested a lot of effort and time to create the content, please respect our work!