ESP32 - Serial Monitor
This tutorial instructs you how to use Serial Monitor on Arduino IDE with ESP32
Hardware Used In This Tutorial
Or you can buy the following kits:
| 1 | × | DIYables ESP32 Starter Kit (ESP32 included) | |
| 1 | × | DIYables Sensor Kit (18 sensors/displays) |
Introduction to Serial Monitor
When you program for ESP32, You need to have something to know how ESP32 code run ⇒ use Serial Monitor tool in Arduino IDE. It is designed for two purposes:
- ESP32 → PC: Your code on ESP32 send data via Serial. Yhe Serial Monitor on PC receives the data and display it. This is very useful for debugging and monitoring
- PC → ESP32: You type some data and send it from PC to ESP32. This is useful to send comamand from your PC to ESP32
You need an micro USB cable between PC and ESP32. This cable is also used to upload the code to ESP32.
How To Use Serial Monitor
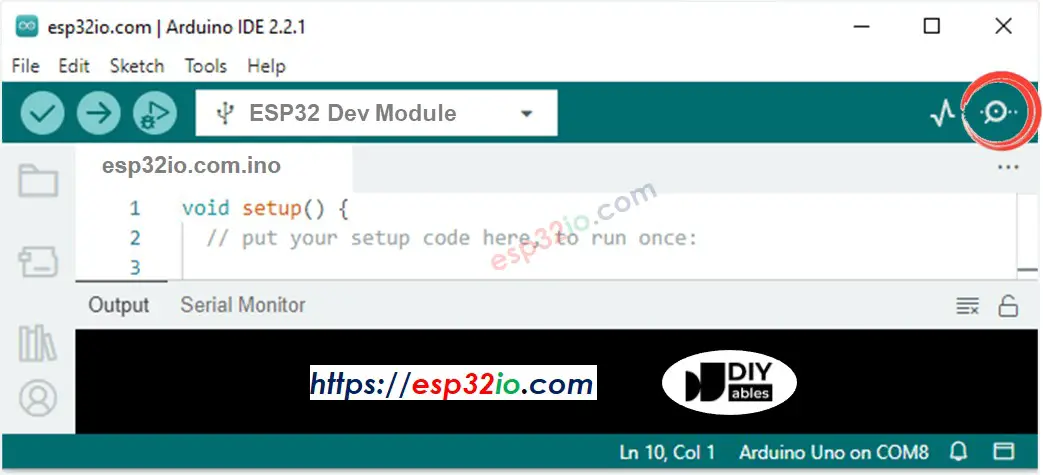
Open Serial Monitor
You just need to click on an icon on Arduino IDE as below image:
Components on Serial Monitor
The Serial Momitor is composed of 8 components
- Output console: this component displays data received from ESP32.
- Autoscroll checkbox: this component offers options to enable/disable the automatic scroll on the output console.
- Show timestamp checkbox: this component offers options to add timestamp before data.
- Clear output button: When this button is clicked, the text on the output console is cleared.
- Baud rate selection: this component offers options to select communication speed (baud rate) between PC and ESP32. This value MUST be the same as the value used in ESP32 code (in Serial.begin() function).
- Textbox: this component allow you to type characters that will be sent to ESP32 board when you click Send button
- Ending selection: this component offers options to select the ending characters appended to data sent to ESP32. Available options include:
- No line ending: adds nothing
- Newline: adds newline (LF, or '\n') character
- Carriage return: adds carriage return (CR, or '\r') character
- Both NL and CR: adds both newline and carriage return characters
- Send button: when this button is clicked, The Serial Monitor sends data in Textbox plus the ending characters to ESP32
ESP32 To PC
How to send data from ESP32 board to PC:
- Set the baud rate and initialize Serial port by using Serial.begin() function
- Send data to Serial Monitor using one of the below functions:
- If this is the first time you use ESP32, see how to setup environment for ESP32 on Arduino IDE.
- Copy the above code and paste it to Arduino IDE.
- Compile and upload code to ESP32 board by clicking Upload button on Arduino IDE
- Open Serial Monitor on Arduino IDE
- Select baurate 9600
- See the output on Serial Monitor
- Try changing Serial.println() function to Serial.print() function
For example, send “Hello World!” to Serial Monitor
Example Use
The below example code sends the “esp32io.com” from ESP32 to Serial Monitor every second
Quick Instructions
PC To ESP32
How to send data from PC to ESP32
- On the PC:
- Type text on Serial Monitor
- Click Send button.
- Set baud rate and begin Serial port
- Check if the incoming data is available
- Read data from Serial port using one of the blow functions:
- If the received text (command) is “ON”, turn the LED on
- If the received text (command) is “OFF”: turn the LED off
- If this is the first time you use ESP32, see how to setup environment for ESP32 on Arduino IDE.
- Copy the above code and paste it to Arduino IDE.
- Compile and upload code to ESP32 board by clicking Upload button on Arduino IDE
- Open Serial Monitor on Arduino IDE
- Select baurate 9600 and newline option
- Type “ON” or “OFF” and click Send button
- See the built-in LED's state on ESP32 board. We will see LED's state is ON or OFF, respectively.
- We also see LED's state on Serial Monitor
- Type “ON” or “OFF” command several times.
And then you write ESP32 code to read data and process it:
For example:
Example Use
The below ESP32 example code reads commands from Serial to turn on/off a built-in LED.
⇒ We need to send a terminator along with a command ⇒ we can append a newline character ('\n'). To append newline character, select “newline” option on Serial Monitor before sending the data. ESP32 will read data until the newline character. In this case, the newline character is called terminator or delimiter.
Quick Instructions
Video Tutorial
Making video is a time-consuming work. If the video tutorial is necessary for your learning, please let us know by subscribing to our YouTube channel , If the demand for video is high, we will make the video tutorial.