ESP32 - Read Config from SD Card

In this tutorial, we will delve into the utilization of a config file on a Micro SD Card. The tutorial will cover the following aspects:
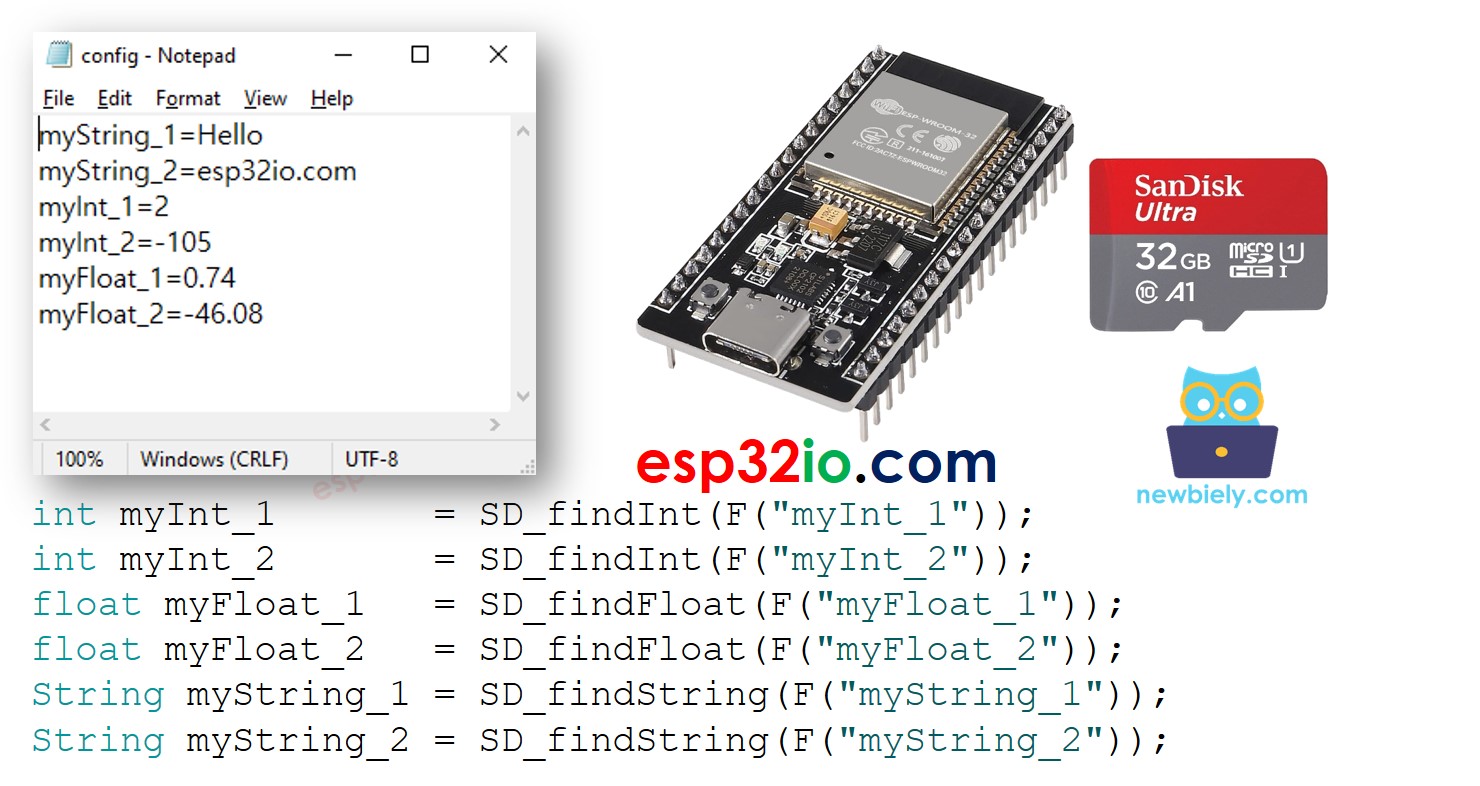
This tutorial enables you to manage configuration settings through a file stored on the Micro SD Card, offering flexibility for various data types such as integers, floats, and strings.

ESP32 Micro SD Card Config File

Hardware Used In This Tutorial

1×ESP-WROOM-32 Dev Module
1×USB Cable Type-C
1×Micro SD Card
1×Micro SD Card Module
1×Jumper Wires
1×USB 3.0 SD Card Reader
1×(Recommended) ESP32 Screw Terminal Adapter

Or you can buy the following sensor kits:

1×DIYables Sensor Kit (30 sensors/displays)
1×DIYables Sensor Kit (18 sensors/displays)
Disclosure: some of these links are affiliate links. We may earn a commission on your purchase at no extra cost to you. We appreciate it.

Introduction to Micro SD Card Module

Unfamiliar with Micro SD Card Module, including their pinouts, functionality, and programming? learn about them in the ESP32 - Micro SD Card tutorial.

How It Works

The key-value pairs are pre-stored on the Micro SD Card according to the following format:

  • Each key-value pair is on one line. In another word, each key-value pair is separated from others by a newline character
  • The key and value are separated by a = character

ESP32 code will search the key and find the corresponding value, and save the value to a variable. The variable type can be int, float, or String
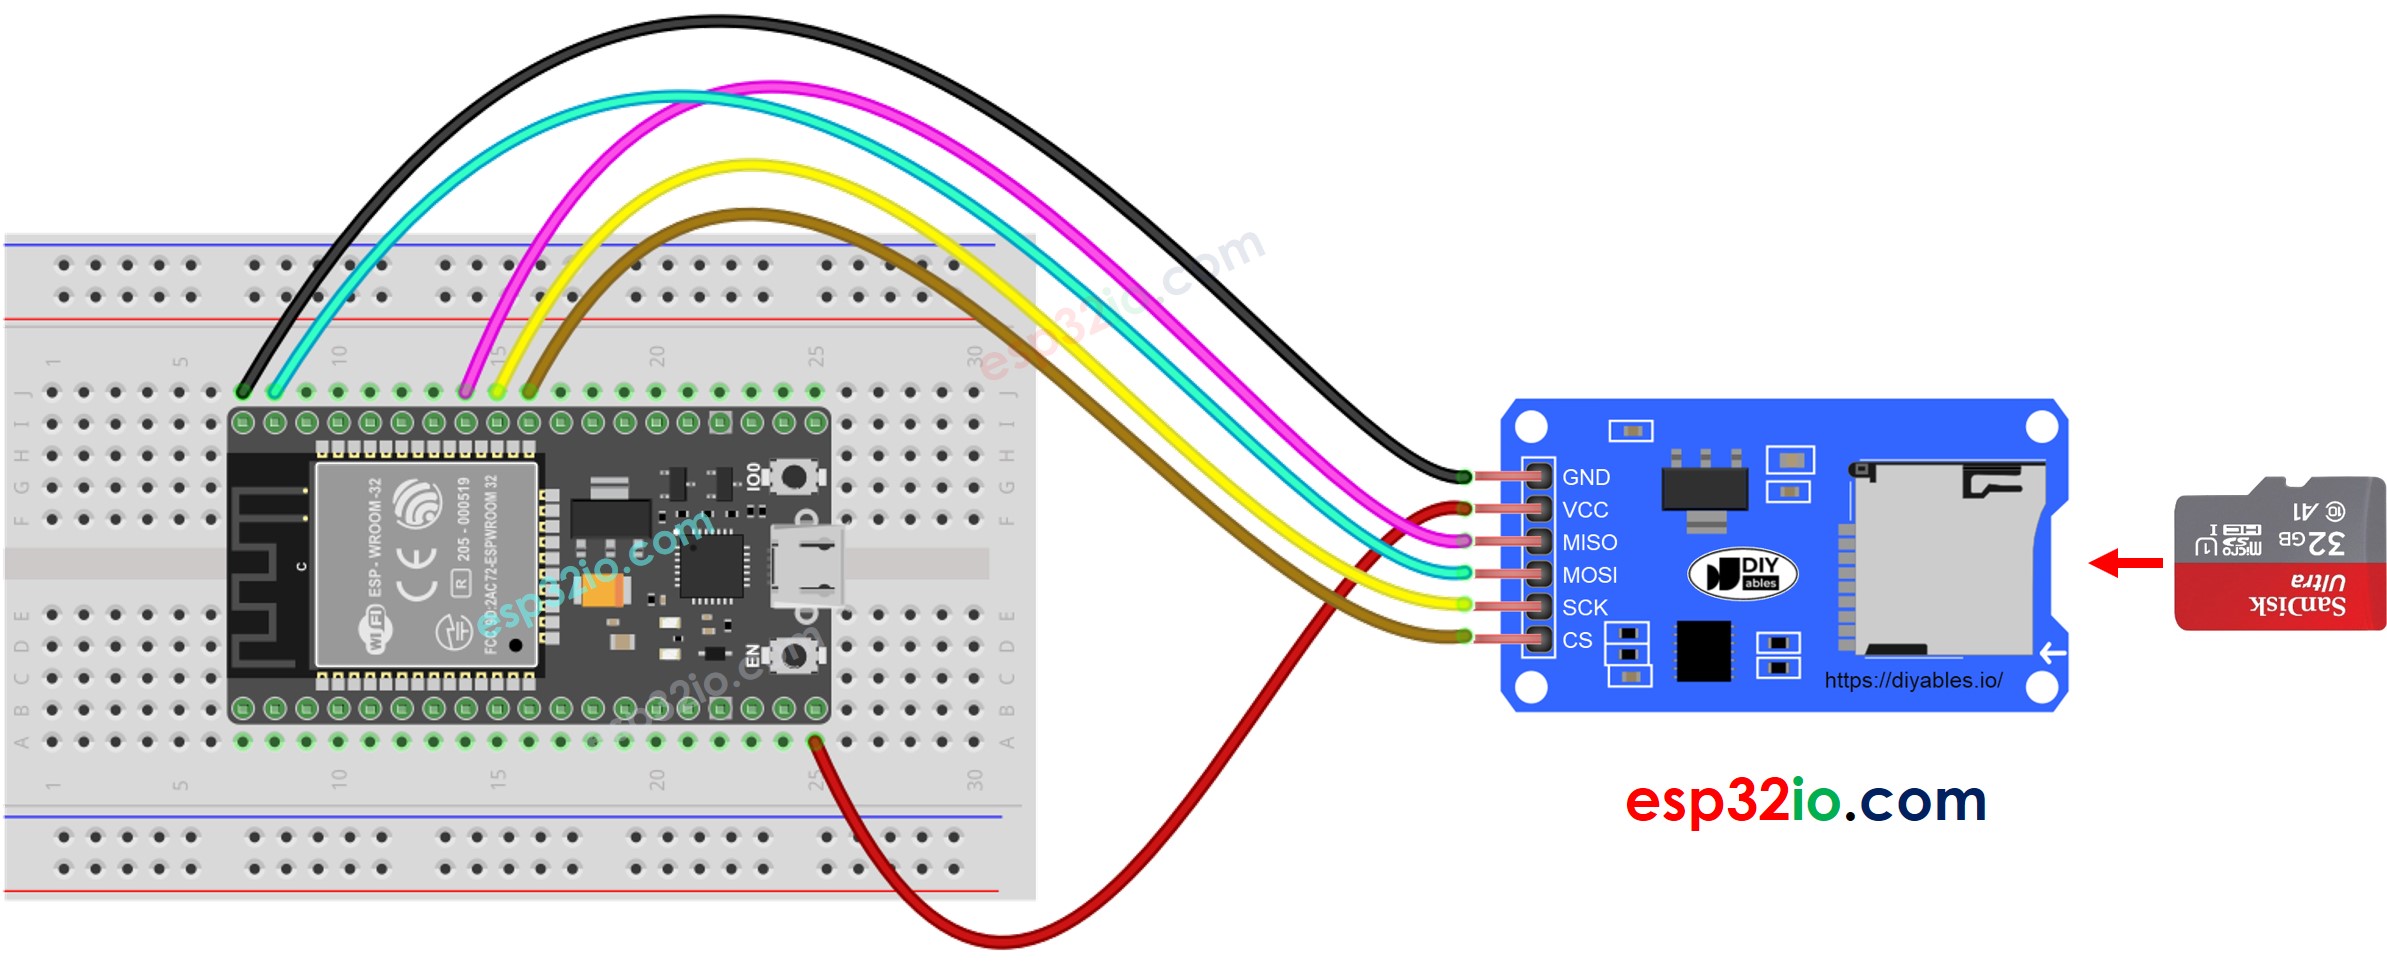
Wiring Diagram

ESP32 Micro SD Card Module Wiring Diagram

This image is created using Fritzing. Click to enlarge image

If you're unfamiliar with how to supply power to the ESP32 and other components, you can find guidance in the following tutorial: How to Power ESP32.

※ NOTE THAT:

If you use an Ethernet shield or any shield that has a Micro SD Card Holder, you do not need to use the Micro SD Card Module. You just need to insert the Micro SD Card to the Micro SD Card Holder on the shield.

How To read config to variables

  • Create config.txt file on your PC via Notepad or Notepad++
  • Copy below key-value pairs and paste it to the config.txt:
myString_1=Hello myString_2=esp32io.com myInt_1=2 myInt_2=-105 myFloat_1=0.74 myFloat_2=-46.08
  • Connect the Micro SD Card to the PC via USB 3.0 SD Card Reader
  • Make sure that the Micro SD Card is formatted FAT16 or FAT32 (Google for it)
  • Copy config.txt file to the root directory of the Micro SD Card
  • Disconnect the Micro SD Card from PC
  • Connect the Micro SD Card to ESP32 via Micro SD Card Module according to the above wiring diagram
  • Copy the below code and open with Arduino IDE
/* * This ESP32 code is created by esp32io.com * * This ESP32 code is released in the public domain * * For more detail (instruction and wiring diagram), visit https://esp32io.com/tutorials/esp32-read-config-from-sd-card */ #include <SD.h> #define PIN_SPI_CS 5 // The ESP32 pin GPIO5 #define FILE_NAME "config.txt" #define KEY_MAX_LENGTH 30 // change it if key is longer #define VALUE_MAX_LENGTH 30 // change it if value is longer // variables int myInt_1; int myInt_2; float myFloat_1; float myFloat_2; String myString_1; String myString_2; void setup() { Serial.begin(9600); if (!SD.begin(PIN_SPI_CS)) { Serial.println(F("SD Card failed, or not present")); while (1); // stop the program } Serial.println(F("SD Card initialized.")); myInt_1 = SD_findInt(F("myInt_1")); myInt_2 = SD_findInt(F("myInt_2")); myFloat_1 = SD_findFloat(F("myFloat_1")); myFloat_2 = SD_findFloat(F("myFloat_2")); myString_1 = SD_findString(F("myString_1")); myString_2 = SD_findString(F("myString_2")); Serial.print(F("myInt_1 = ")); Serial.println(myInt_1); Serial.print(F("myInt_2 = ")); Serial.println(myInt_2); Serial.print(F("myFloat_1 = ")); Serial.println(myFloat_1); Serial.print(F("myFloat_2 = ")); Serial.println(myFloat_2); Serial.print(F("myString_1 = ")); Serial.println(myString_1); Serial.print(F("myString_2 = ")); Serial.println(myString_2); } void loop() { } bool SD_available(const __FlashStringHelper * key) { char value_string[VALUE_MAX_LENGTH]; int value_length = SD_findKey(key, value_string); return value_length > 0; } int SD_findInt(const __FlashStringHelper * key) { char value_string[VALUE_MAX_LENGTH]; int value_length = SD_findKey(key, value_string); return HELPER_ascii2Int(value_string, value_length); } float SD_findFloat(const __FlashStringHelper * key) { char value_string[VALUE_MAX_LENGTH]; int value_length = SD_findKey(key, value_string); return HELPER_ascii2Float(value_string, value_length); } String SD_findString(const __FlashStringHelper * key) { char value_string[VALUE_MAX_LENGTH]; int value_length = SD_findKey(key, value_string); return HELPER_ascii2String(value_string, value_length); } int SD_findKey(const __FlashStringHelper * key, char * value) { File configFile = SD.open(FILE_NAME); if (!configFile) { Serial.print(F("SD Card: Issue encountered while attempting to open the file ")); Serial.println(FILE_NAME); return; } char key_string[KEY_MAX_LENGTH]; char SD_buffer[KEY_MAX_LENGTH + VALUE_MAX_LENGTH + 1]; // 1 is = character int key_length = 0; int value_length = 0; // Flash string to string PGM_P keyPoiter; keyPoiter = reinterpret_cast<PGM_P>(key); byte ch; do { ch = pgm_read_byte(keyPoiter++); if (ch != 0) key_string[key_length++] = ch; } while (ch != 0); // check line by line while (configFile.available()) { int buffer_length = configFile.readBytesUntil('\n', SD_buffer, 100); if (SD_buffer[buffer_length - 1] == '\r') buffer_length--; // trim the \r if (buffer_length > (key_length + 1)) { // 1 is = character if (memcmp(SD_buffer, key_string, key_length) == 0) { // equal if (SD_buffer[key_length] == '=') { value_length = buffer_length - key_length - 1; memcpy(value, SD_buffer + key_length + 1, value_length); break; } } } } configFile.close(); // close the file return value_length; } int HELPER_ascii2Int(char *ascii, int length) { int sign = 1; int number = 0; for (int i = 0; i < length; i++) { char c = *(ascii + i); if (i == 0 && c == '-') sign = -1; else { if (c >= '0' && c <= '9') number = number * 10 + (c - '0'); } } return number * sign; } float HELPER_ascii2Float(char *ascii, int length) { int sign = 1; int decimalPlace = 0; float number = 0; float decimal = 0; for (int i = 0; i < length; i++) { char c = *(ascii + i); if (i == 0 && c == '-') sign = -1; else { if (c == '.') decimalPlace = 1; else if (c >= '0' && c <= '9') { if (!decimalPlace) number = number * 10 + (c - '0'); else { decimal += ((float)(c - '0') / pow(10.0, decimalPlace)); decimalPlace++; } } } } return (number + decimal) * sign; } String HELPER_ascii2String(char *ascii, int length) { String str; str.reserve(length); str = ""; for (int i = 0; i < length; i++) { char c = *(ascii + i); str += String(c); } return str; }
  • Click Upload button on Arduino IDE to upload code to ESP32
  • See the result on Serial Monitor.
COM6
Send
SD Card initialized. myInt_1 = 2 myInt_2 = -105 myFloat_1 = 0.74 myFloat_2 = -46.08 myString_1 = Hello myString_2 = esp32io.com
Autoscroll Show timestamp
Clear output
9600 baud  
Newline  
  • The Serial Monitor shows the values from variables that is identical to the values saved on the micro SD Card

Now you can modify the code to add more variables.

※ NOTE THAT:

The above code does not care about the order of key-value pairs. It will search for the key from the beginning to the end of the file until the key is matched.

Video Tutorial

Making video is a time-consuming work. If the video tutorial is necessary for your learning, please let us know by subscribing to our YouTube channel , If the demand for video is high, we will make the video tutorial.

※ OUR MESSAGES