ESP32 - Button - Long Press Short Press

This tutorial instructs you how to use ESP32 to detect the long press and short press, In detail, we will learn:

Hardware Used In This Tutorial

1×ESP-WROOM-32 Dev Module
1×USB Cable Type-C
1×Push Button
1×(Optional) Panel-mount Push Button
1×Breadboard
1×Jumper Wires
1×(Optional) DC Power Jack
1×(Recommended) ESP32 Screw Terminal Adapter

Or you can buy the following sensor kit:

1×DIYables Sensor Kit 30 types, 69 units
Disclosure: some of these links are affiliate links. We may earn a commission on your purchase at no extra cost to you. We appreciate it.

Introduction to Button

We have specific tutorials about button. Each tutorial contains detailed information and step-by-step instructions about hardware pinout, working principle, wiring connection to ESP32, ESP32 code... Learn more about them at the following links:

Wiring Diagram

ESP32 Button Wiring Diagram

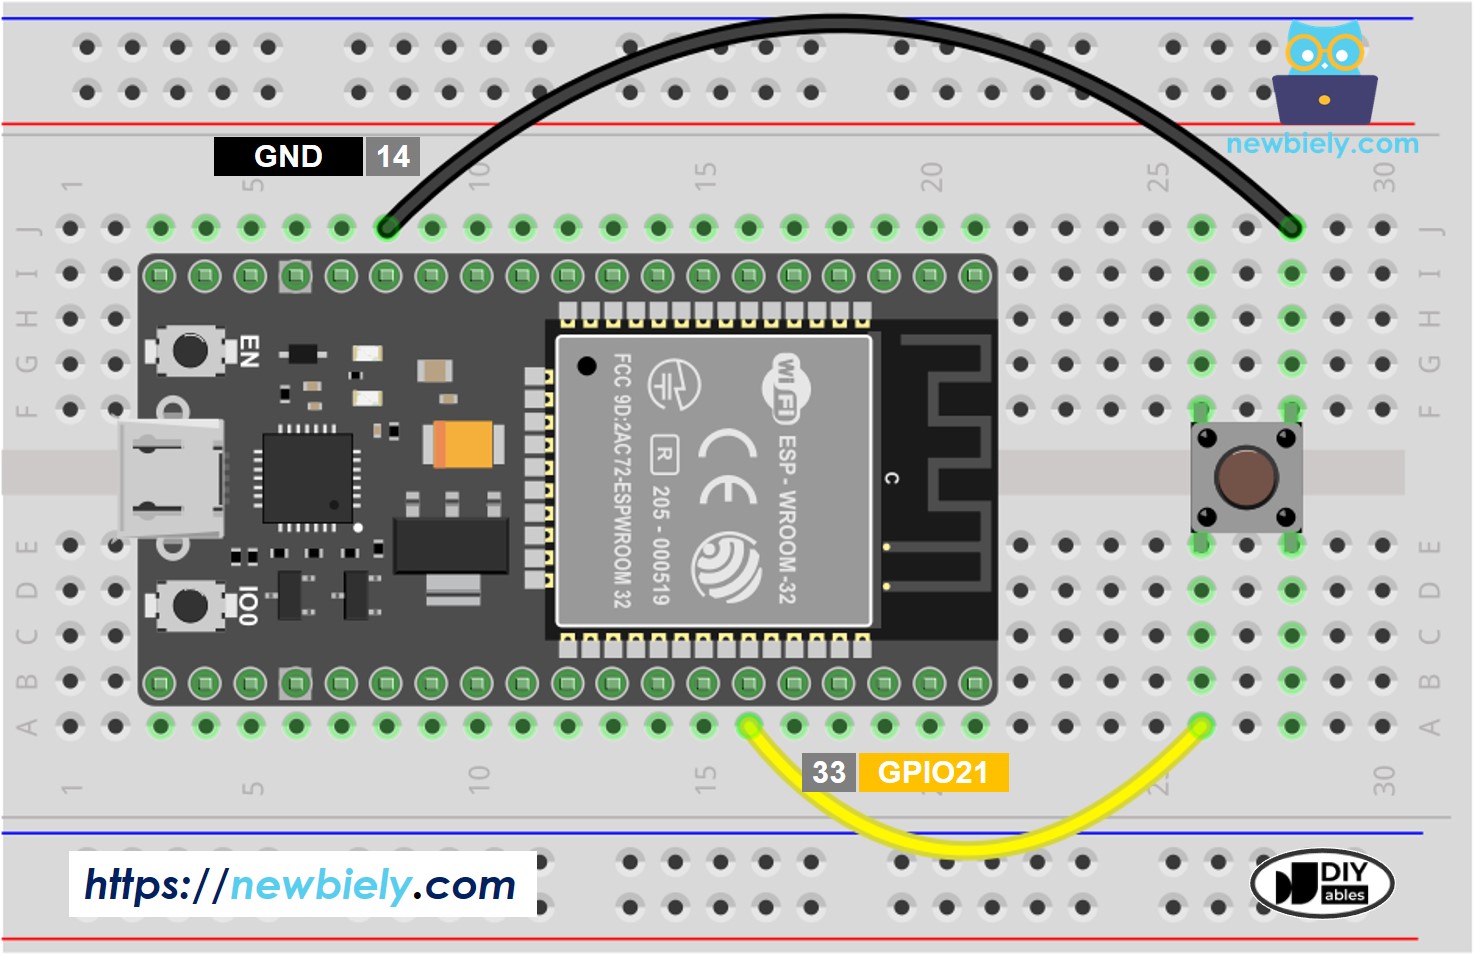
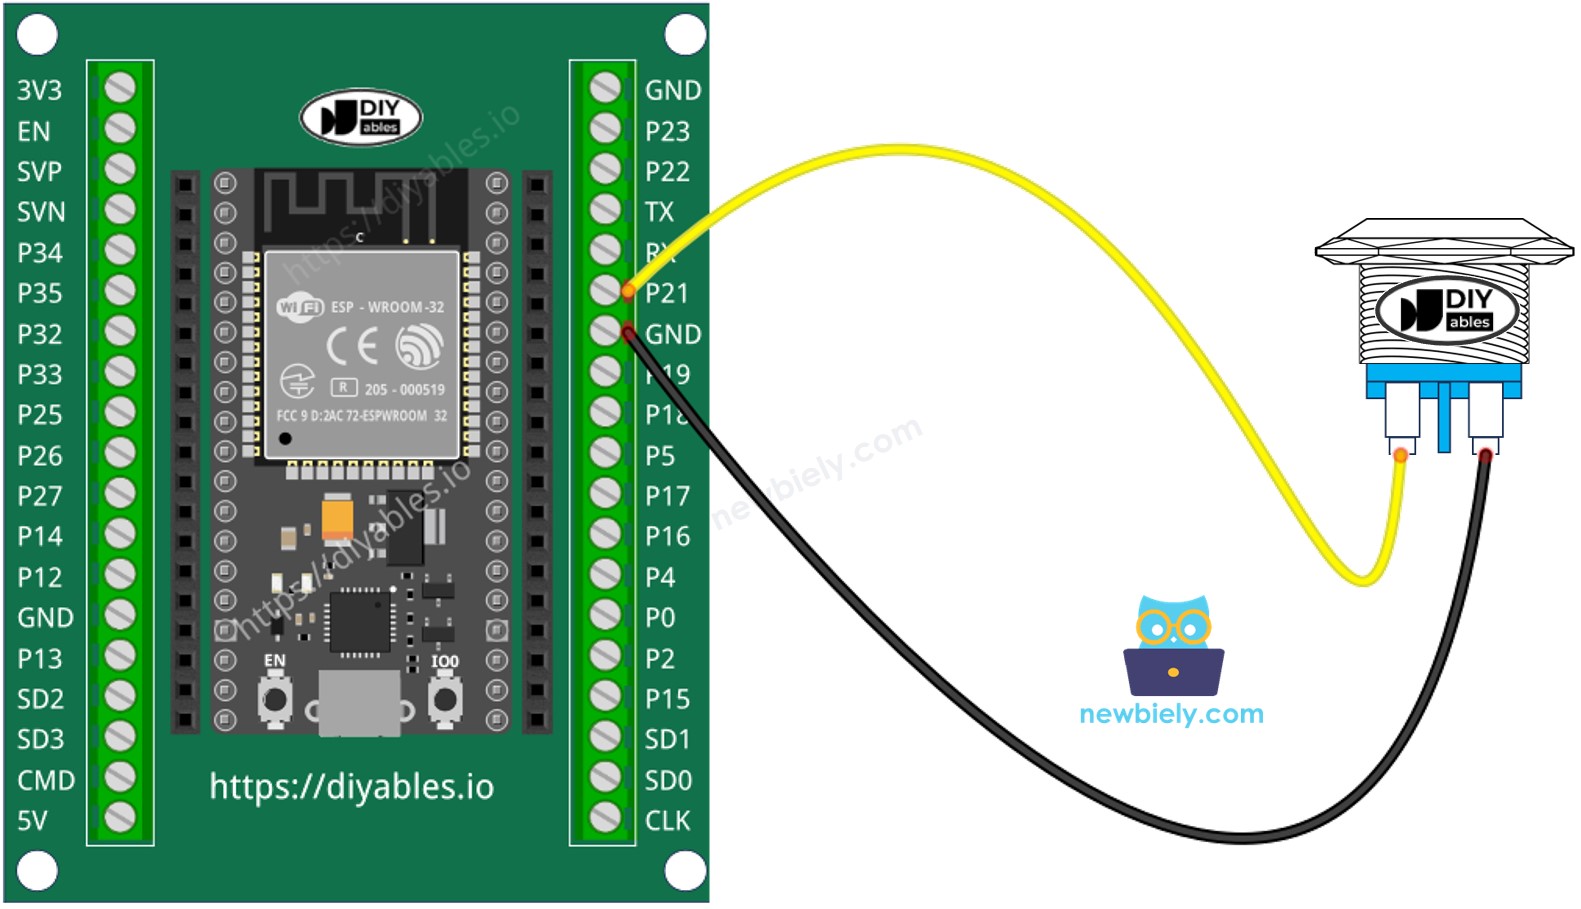
This image is created using Fritzing. Click to enlarge image

If you're unfamiliar with how to supply power to the ESP32 and other components, you can find guidance in the following tutorial: How to Power ESP32.

This tutorial will use the internal pull-up resistor. The state of the button is HIGH when normal and LOW when pressed.

How To Detect Short Press

  • Measure the time between the pressed and released events.
  • If the duration is shorter than a pre-defined time, the short press event is detected.

Let's see step by step:

  • Define how long the maximum of short press lasts
#define SHORT_PRESS_TIME 500 // 500 milliseconds
  • Detect the button is pressed and save the pressed time
if(lastState == HIGH && currentState == LOW) pressedTime = millis();
  • Detect the button is released and save the released time
if(lastState == LOW && currentState == HIGH) releasedTime = millis();
  • Calculate press duration and
long pressDuration = releasedTime - pressedTime;
  • Determine the short press by comparing the press duration with the defined short press time.
if( pressDuration < SHORT_PRESS_TIME ) Serial.println("A short press is detected");

ESP32 Code for detecting the short press

/* * This ESP32 code is created by esp32io.com * * This ESP32 code is released in the public domain * * For more detail (instruction and wiring diagram), visit https://esp32io.com/tutorials/esp32-button-long-press-short-press */ #define BUTTON_PIN 21 // GPIO21 pin connected to button #define SHORT_PRESS_TIME 500 // 500 milliseconds // Variables will change: int lastState = LOW; // the previous state from the input pin int currentState; // the current reading from the input pin unsigned long pressedTime = 0; unsigned long releasedTime = 0; void setup() { Serial.begin(9600); pinMode(BUTTON_PIN, INPUT_PULLUP); } void loop() { // read the state of the switch/button: currentState = digitalRead(BUTTON_PIN); if (lastState == HIGH && currentState == LOW) // button is pressed pressedTime = millis(); else if (lastState == LOW && currentState == HIGH) { // button is released releasedTime = millis(); long pressDuration = releasedTime - pressedTime; if ( pressDuration < SHORT_PRESS_TIME ) Serial.println("A short press is detected"); } // save the the last state lastState = currentState; }

Quick Instructions

COM6
Send
A short press is detected
Autoscroll Show timestamp
Clear output
9600 baud  
Newline  

※ NOTE THAT:

The Serial Monitor may print several short presses for a single press. This is a normal behavior of the button. This behavior is called the “chattering phenomenon”. We will learn how to eliminate this issue later in this tutorial.

How To Detect Long Press

There are two use cases for detecting the long press.

  • The long-press event is detected right after the button is released
  • The long-press event is detected while the button is being pressed.

In the first case:

  • Measure the time duration between the pressed event and released event.
  • If the duration is longer than a pre-defined time, the long-press event is detected.

In the second case: during the time the button is being pressed, do the below process repteatedly:

  • Measure the pressing time.
  • If the duration is longer than the pre-defined time, the long-press event is detected.
  • Otherwise, repeat the process until the button is released

ESP32 Code for detecting long press when released

/* * This ESP32 code is created by esp32io.com * * This ESP32 code is released in the public domain * * For more detail (instruction and wiring diagram), visit https://esp32io.com/tutorials/esp32-button-long-press-short-press */ #define BUTTON_PIN 21 // GPIO21 pin connected to button #define LONG_PRESS_TIME 1000 // 1000 milliseconds // Variables will change: int lastState = LOW; // the previous state from the input pin int currentState; // the current reading from the input pin unsigned long pressedTime = 0; unsigned long releasedTime = 0; void setup() { Serial.begin(9600); pinMode(BUTTON_PIN, INPUT_PULLUP); } void loop() { // read the state of the switch/button: currentState = digitalRead(BUTTON_PIN); if(lastState == HIGH && currentState == LOW) // button is pressed pressedTime = millis(); else if(lastState == LOW && currentState == HIGH) { // button is released releasedTime = millis(); long pressDuration = releasedTime - pressedTime; if( pressDuration > LONG_PRESS_TIME ) Serial.println("A long press is detected"); } // save the the last state lastState = currentState; }

Quick Instructions

  • If this is the first time you use ESP32, see how to setup environment for ESP32 on Arduino IDE.
  • Upload the above code to ESP32 via Arduino IDE
  • Press and release the button after one second.
  • See the result on Serial Monitor. It looks like the below:
COM6
Send
A long press is detected
Autoscroll Show timestamp
Clear output
9600 baud  
Newline  

ESP32 Code for detecting long press during pressing

/* * This ESP32 code is created by esp32io.com * * This ESP32 code is released in the public domain * * For more detail (instruction and wiring diagram), visit https://esp32io.com/tutorials/esp32-button-long-press-short-press */ #define BUTTON_PIN 21 // GPIO21 pin connected to button #define LONG_PRESS_TIME 1000 // 1000 milliseconds // Variables will change: int lastState = LOW; // the previous state from the input pin int currentState; // the current reading from the input pin unsigned long pressedTime = 0; bool isPressing = false; bool isLongDetected = false; void setup() { Serial.begin(9600); pinMode(BUTTON_PIN, INPUT_PULLUP); } void loop() { // read the state of the switch/button: currentState = digitalRead(BUTTON_PIN); if(lastState == HIGH && currentState == LOW) { // button is pressed pressedTime = millis(); isPressing = true; isLongDetected = false; } else if(lastState == LOW && currentState == HIGH) { // button is released isPressing = false; } if(isPressing == true && isLongDetected == false) { long pressDuration = millis() - pressedTime; if( pressDuration > LONG_PRESS_TIME ) { Serial.println("A long press is detected"); isLongDetected = true; } } // save the the last state lastState = currentState; }

Quick Instructions

  • If this is the first time you use ESP32, see how to setup environment for ESP32 on Arduino IDE.
  • Upload the above code to ESP32 via Arduino IDE
  • Press and release the button after several seconds.
  • See the result on Serial Monitor. It looks like the below:
COM6
Send
A long press is detected
Autoscroll Show timestamp
Clear output
9600 baud  
Newline  

How To Detect Both Long Press and Short Press

Short Press and Long Press after released

/* * This ESP32 code is created by esp32io.com * * This ESP32 code is released in the public domain * * For more detail (instruction and wiring diagram), visit https://esp32io.com/tutorials/esp32-button-long-press-short-press */ #define BUTTON_PIN 21 // GPIO21 pin connected to button #define SHORT_PRESS_TIME 1000 // 1000 milliseconds #define LONG_PRESS_TIME 1000 // 1000 milliseconds // Variables will change: int lastState = LOW; // the previous state from the input pin int currentState; // the current reading from the input pin unsigned long pressedTime = 0; unsigned long releasedTime = 0; void setup() { Serial.begin(9600); pinMode(BUTTON_PIN, INPUT_PULLUP); } void loop() { // read the state of the switch/button: currentState = digitalRead(BUTTON_PIN); if (lastState == HIGH && currentState == LOW) // button is pressed pressedTime = millis(); else if (lastState == LOW && currentState == HIGH) { // button is released releasedTime = millis(); long pressDuration = releasedTime - pressedTime; if ( pressDuration < SHORT_PRESS_TIME ) Serial.println("A short press is detected"); if ( pressDuration > LONG_PRESS_TIME ) Serial.println("A long press is detected"); } // save the the last state lastState = currentState; }

Quick Instructions

※ NOTE THAT:

The Serial Monitor may show several short press detection when long press. This is the normal behavior of the button. This behavior is called the “chattering phenomenon”. The issue will be solved in the last part of this tutorial.

Short Press and Long Press During pressing

/* * This ESP32 code is created by esp32io.com * * This ESP32 code is released in the public domain * * For more detail (instruction and wiring diagram), visit https://esp32io.com/tutorials/esp32-button-long-press-short-press */ #define BUTTON_PIN 21 // GPIO21 pin connected to button #define SHORT_PRESS_TIME 1000 // 1000 milliseconds #define LONG_PRESS_TIME 1000 // 1000 milliseconds // Variables will change: int lastState = LOW; // the previous state from the input pin int currentState; // the current reading from the input pin unsigned long pressedTime = 0; unsigned long releasedTime = 0; bool isPressing = false; bool isLongDetected = false; void setup() { Serial.begin(9600); pinMode(BUTTON_PIN, INPUT_PULLUP); } void loop() { // read the state of the switch/button: currentState = digitalRead(BUTTON_PIN); if (lastState == HIGH && currentState == LOW) { // button is pressed pressedTime = millis(); isPressing = true; isLongDetected = false; } else if (lastState == LOW && currentState == HIGH) { // button is released isPressing = false; releasedTime = millis(); long pressDuration = releasedTime - pressedTime; if ( pressDuration < SHORT_PRESS_TIME ) Serial.println("A short press is detected"); } if (isPressing == true && isLongDetected == false) { long pressDuration = millis() - pressedTime; if ( pressDuration > LONG_PRESS_TIME ) { Serial.println("A long press is detected"); isLongDetected = true; } } // save the the last state lastState = currentState; }

Quick Instructions

Long Press and Short Press with Debouncing

It is very important to debounce the button in many applications.

Debouncing is a little complicated, especially when using multiple buttons. To make it simple for newbies, we created a library, called ezButton.

We will use this library in below codes

Short Press and Long Press with debouncing after released

/* * This ESP32 code is created by esp32io.com * * This ESP32 code is released in the public domain * * For more detail (instruction and wiring diagram), visit https://esp32io.com/tutorials/esp32-button-long-press-short-press */ #include <ezButton.h> #define SHORT_PRESS_TIME 1000 // 1000 milliseconds #define LONG_PRESS_TIME 1000 // 1000 milliseconds ezButton button(21); // create ezButton object that attach to pin GPIO21 unsigned long pressedTime = 0; unsigned long releasedTime = 0; void setup() { Serial.begin(9600); button.setDebounceTime(50); // set debounce time to 50 milliseconds } void loop() { button.loop(); // MUST call the loop() function first if (button.isPressed()) pressedTime = millis(); if (button.isReleased()) { releasedTime = millis(); long pressDuration = releasedTime - pressedTime; if ( pressDuration < SHORT_PRESS_TIME ) Serial.println("A short press is detected"); if ( pressDuration > LONG_PRESS_TIME ) Serial.println("A long press is detected"); } }

Quick Instructions

Short Press and Long Press with debouncing During Pressing

/* * This ESP32 code is created by esp32io.com * * This ESP32 code is released in the public domain * * For more detail (instruction and wiring diagram), visit https://esp32io.com/tutorials/esp32-button-long-press-short-press */ #include <ezButton.h> #define SHORT_PRESS_TIME 1000 // 1000 milliseconds #define LONG_PRESS_TIME 1000 // 1000 milliseconds ezButton button(21); // create ezButton object that attach to pin GPIO21 unsigned long pressedTime = 0; unsigned long releasedTime = 0; bool isPressing = false; bool isLongDetected = false; void setup() { Serial.begin(9600); button.setDebounceTime(50); // set debounce time to 50 milliseconds } void loop() { button.loop(); // MUST call the loop() function first if (button.isPressed()) { pressedTime = millis(); isPressing = true; isLongDetected = false; } if (button.isReleased()) { isPressing = false; releasedTime = millis(); long pressDuration = releasedTime - pressedTime; if ( pressDuration < SHORT_PRESS_TIME ) Serial.println("A short press is detected"); } if (isPressing == true && isLongDetected == false) { long pressDuration = millis() - pressedTime; if ( pressDuration > LONG_PRESS_TIME ) { Serial.println("A long press is detected"); isLongDetected = true; } } }

Quick Instructions

Video Tutorial

Making video is a time-consuming work. If the video tutorial is necessary for your learning, please let us know by subscribing to our YouTube channel , If the demand for video is high, we will make the video tutorial.

Why Needs Long Press and Short Press

  • To save the number of buttons and digital input pin. A single button can keep two or more functionalities. For example, short press for turning on the light, long press for turn on the fan.
  • Use the long press instead the short press to avoid pressing by accident. For example, some kinds of devices use the button for factory reset. If the button is pressed by accident, it is dangerous.

※ OUR MESSAGES