ESP32 - OLED

This tutorial instructs you how to use ESP32 to display data on OLED. In detail, we will learn how to print characters and number, draw line and shape, and print image on OLED display.

Hardware Used In This Tutorial

1×ESP-WROOM-32 Dev Module
1×USB Cable Type-C
1×SSD1306 I2C OLED Display 128x64
1×Breadboard
1×Jumper Wires
1×(Optional) DC Power Jack
1×(Recommended) Screw Terminal Expansion Board for ESP32

Or you can buy the following sensor kits:

1×DIYables Sensor Kit (30 sensors/displays)
1×DIYables Sensor Kit (18 sensors/displays)
Disclosure: some of these links are affiliate links. We may earn a commission on your purchase at no extra cost to you. We appreciate it.

Introduction to OLED Display

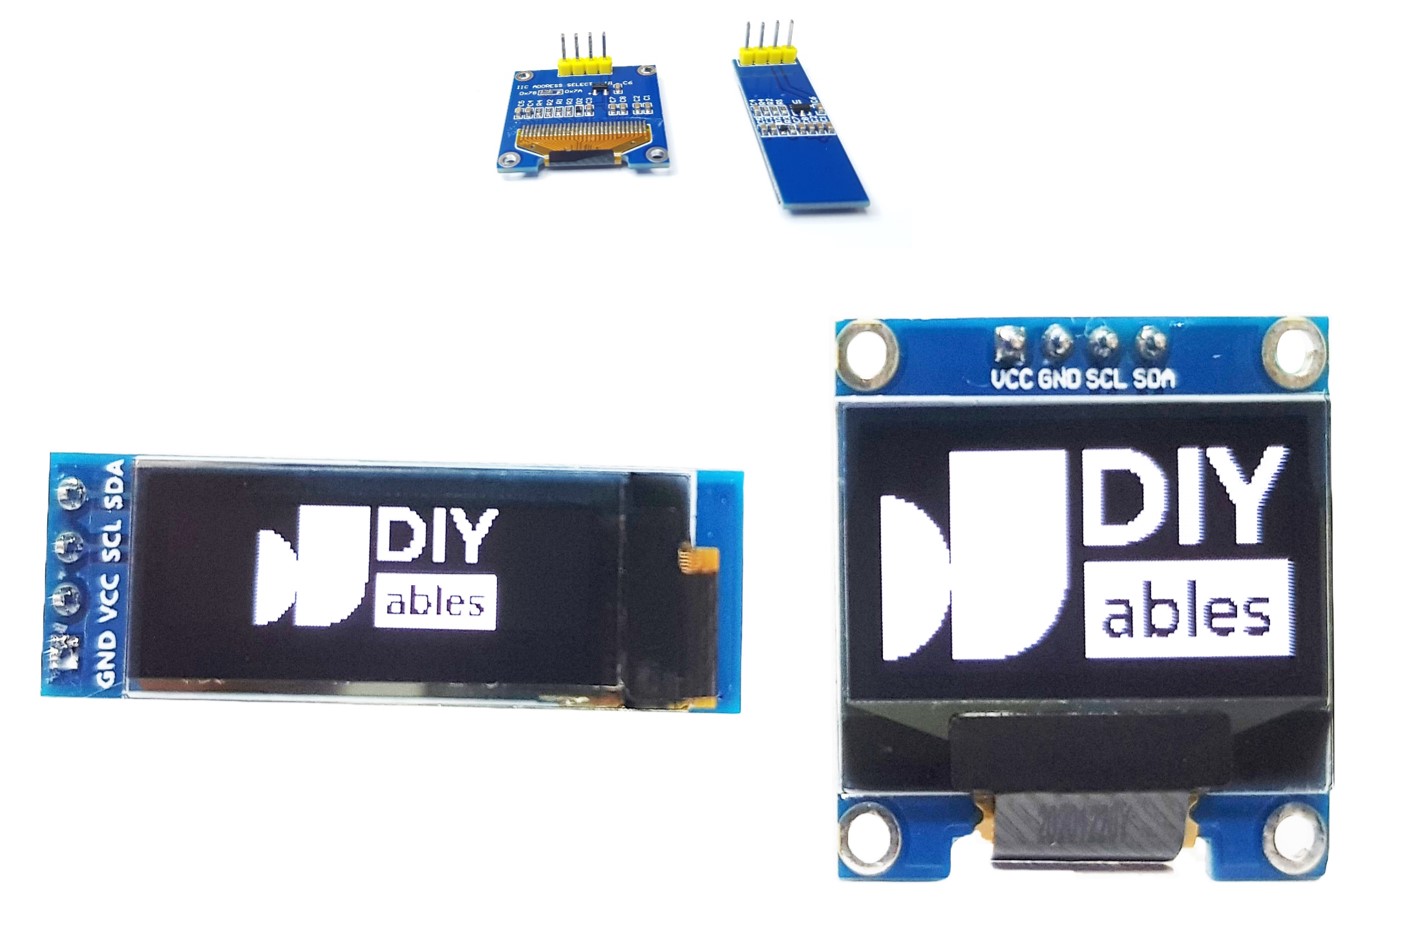
There are several different kinds of OLED display that can work with ESP32. They are different from each other in communication interface ( I2C, SPI), colors (white, blue, dual color...), and sizes (128x64, 128×32...)

ESP32 OLED

This tutorial uses an SSD1306 128x64 I2C OLED Display

I2C OLED Display Pinout

I2C OLED Display includes 4 pins:

  • GND pin: should be connected to the ground of ESP32
  • VCC pin: should be connected to the 5 volts pin of ESP32.
  • SCL pin: is a I2C clock pin.
  • SDA pin: is a I2C data pin.
OLED Pinout

Wiring Diagram

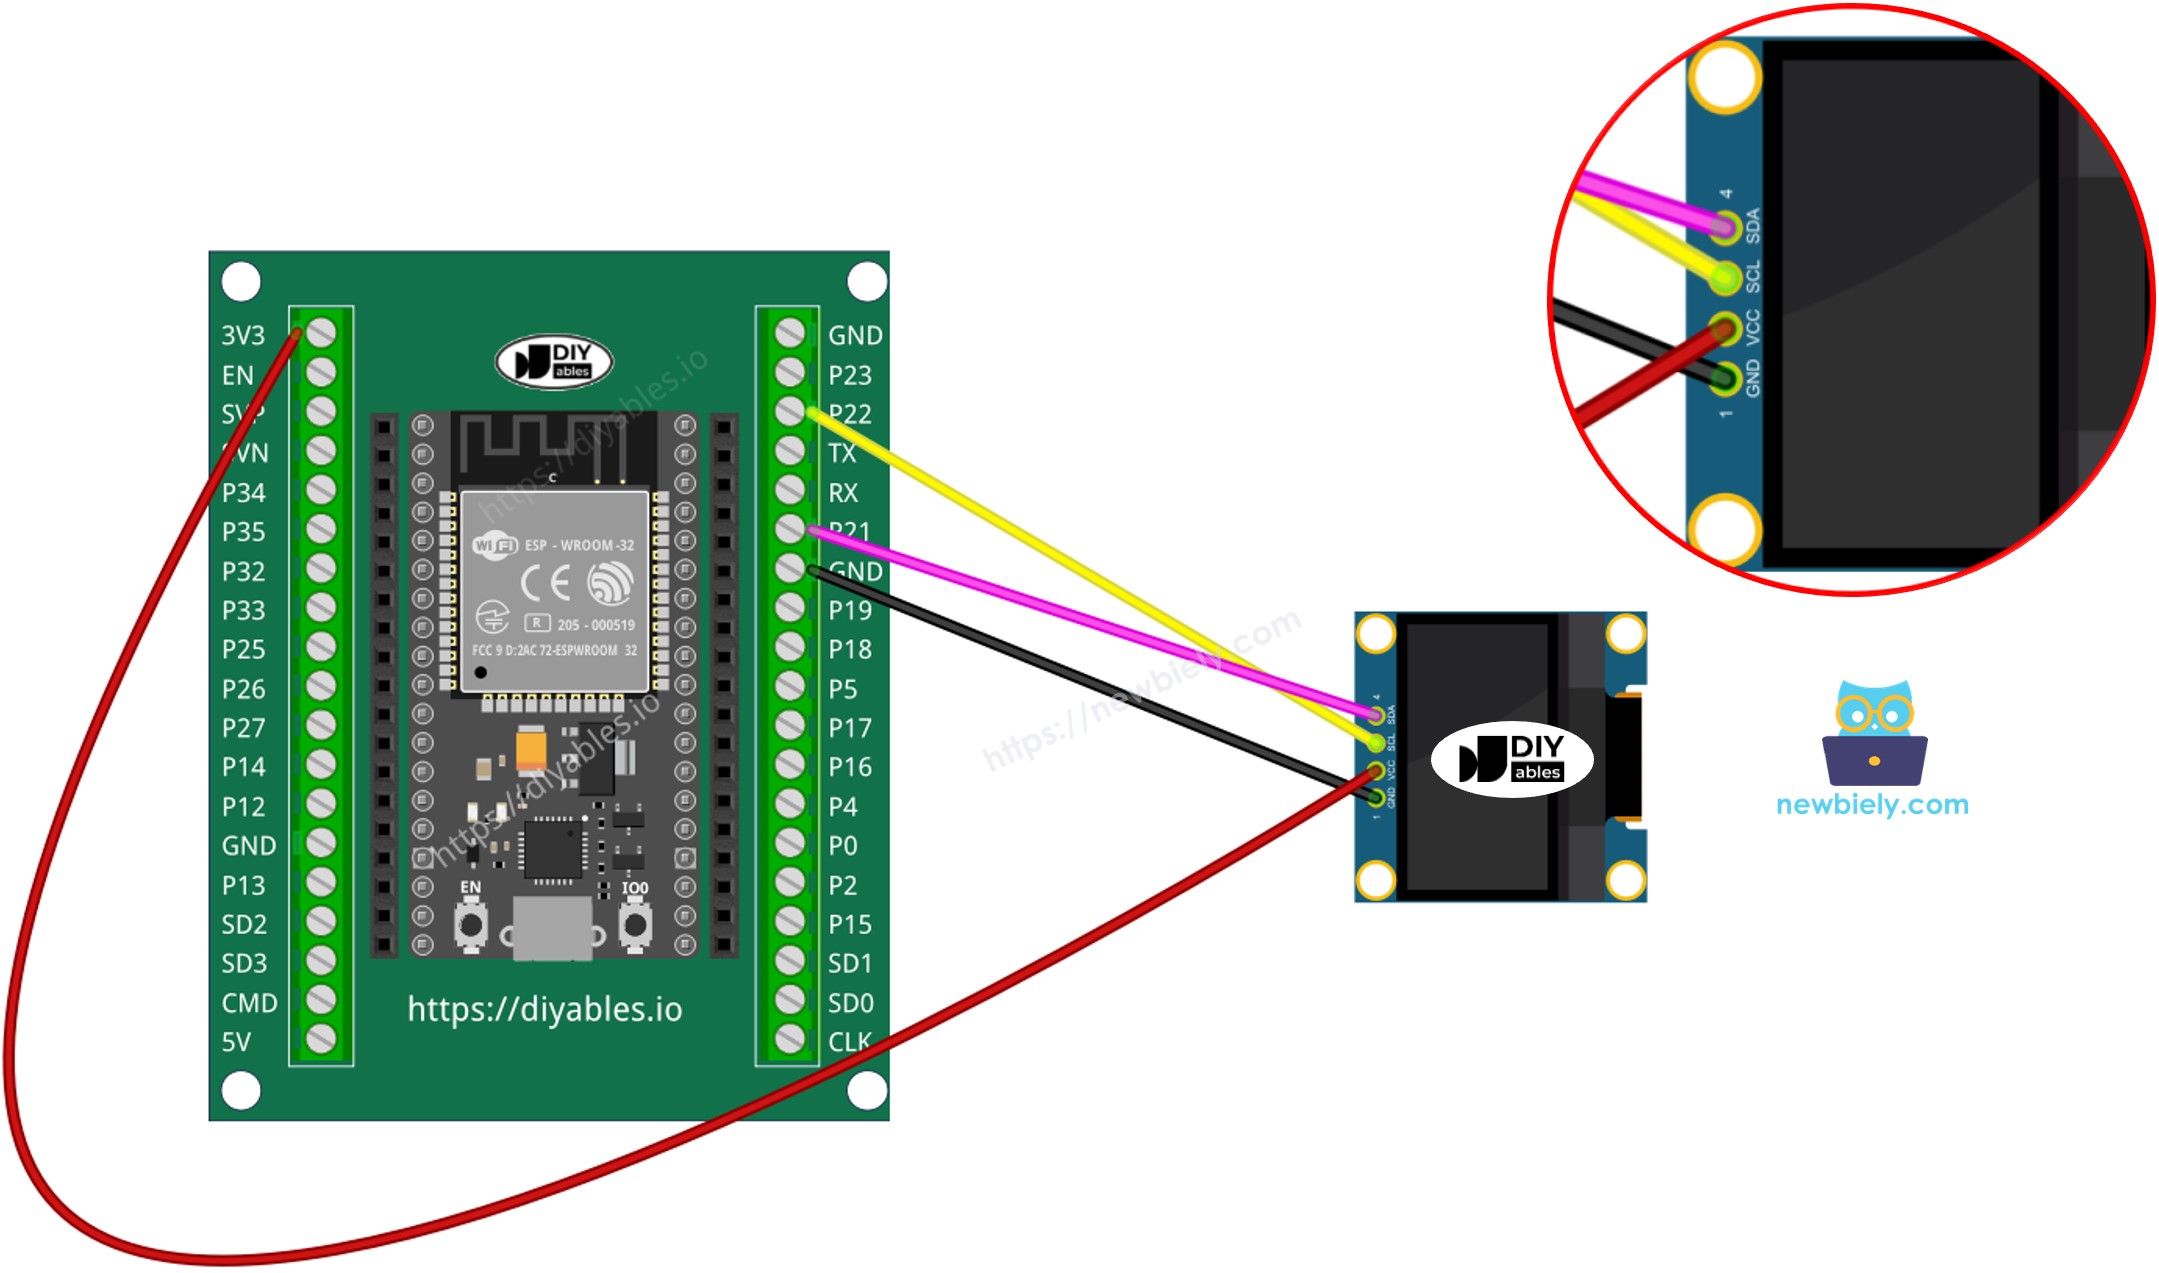
  • How to connect ESP32 to OLED 128x64 display using breadboard
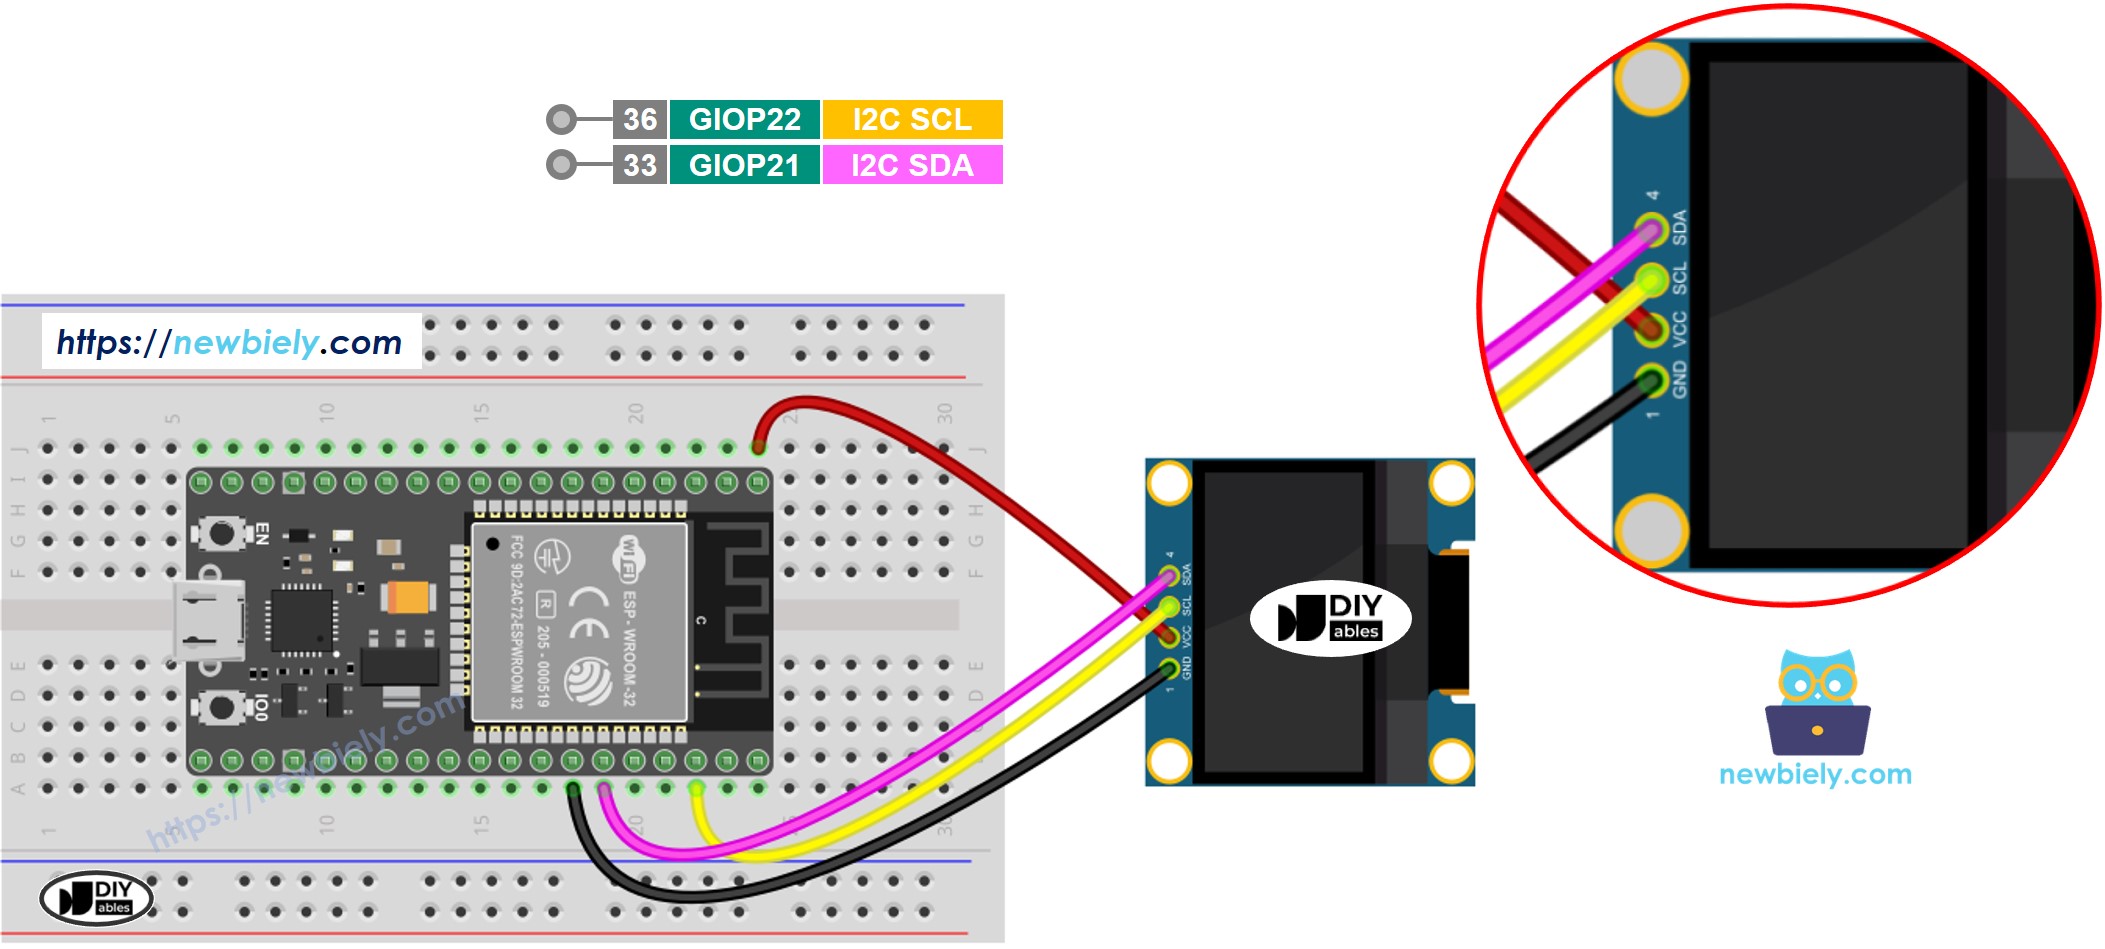
ESP32 OLED 128x64 wiring diagram

This image is created using Fritzing. Click to enlarge image

How to connect ESP32 and oled

※ NOTE THAT:

  • The order of the OLED module's pins can vary between manufacturers. ALWAYS use the labels printed on the OLED module. Look closely!

If you're unfamiliar with how to supply power to the ESP32 and other components, you can find guidance in the following tutorial: How to Power ESP32.

How To Use OLED with ESP32

Install SSD1306 OLED library

  • Click to the Libraries icon on the left bar of the Arduino IDE.
  • Type SSD1306 on the search box, then look for the SSD1306 library by Adafruit
  • Install the library by clicking on Install button.
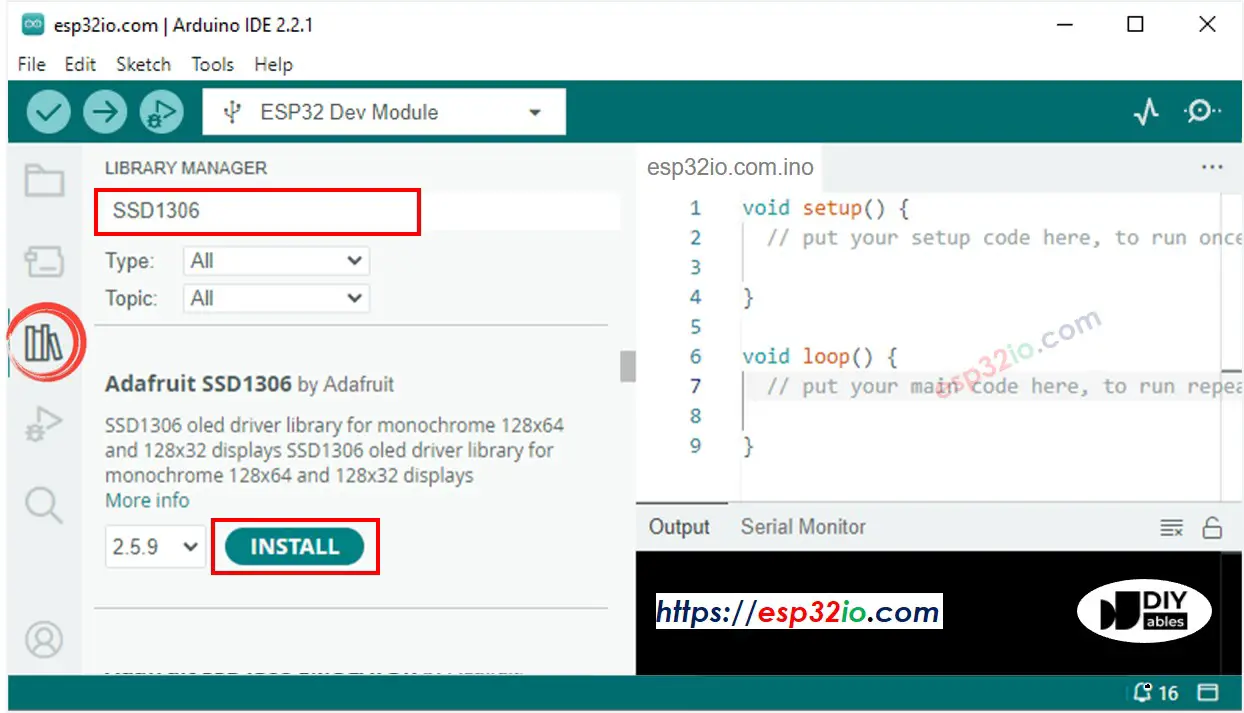
ESP32 OLED library
  • A window appears to ask you to install dependencies for the library
  • Install all dependencies for the library by clicking on Install All button.
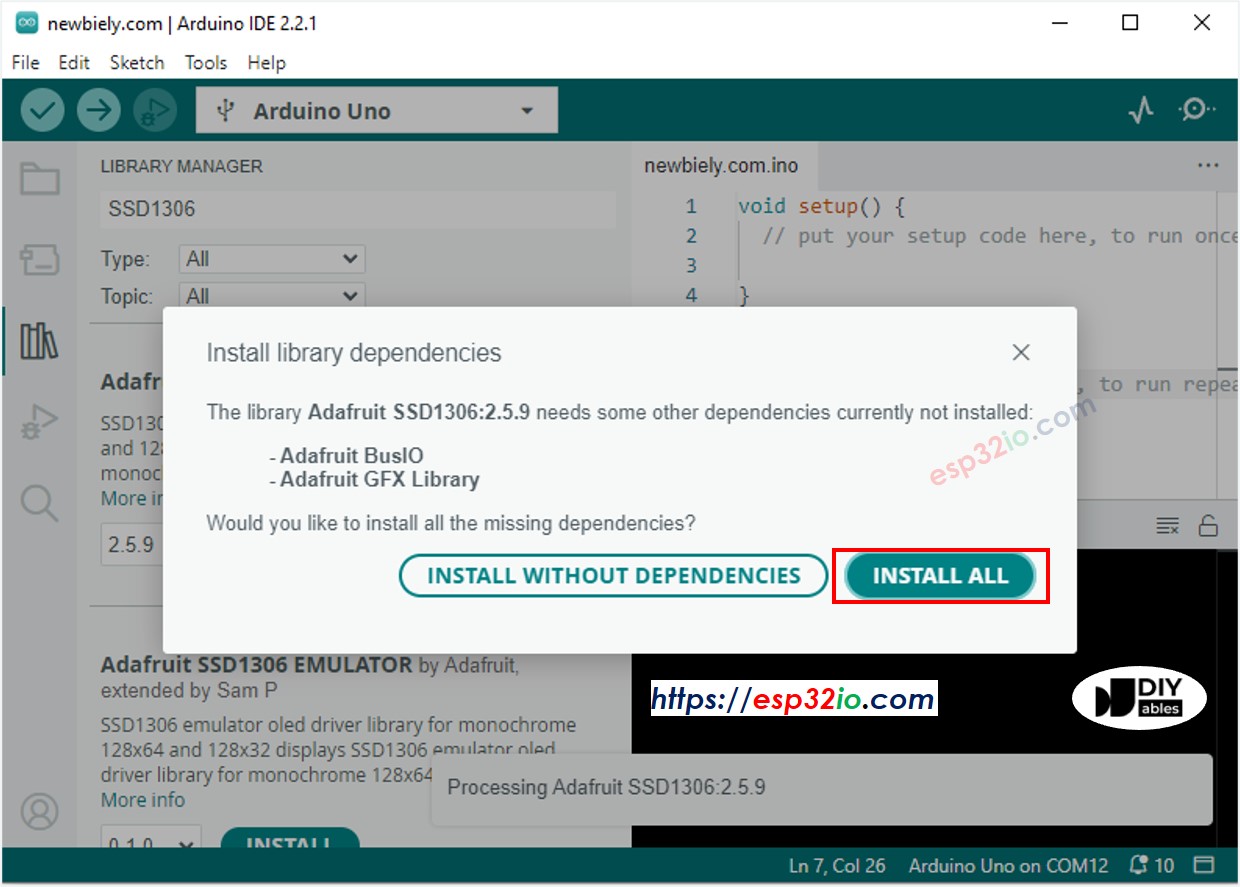
ESP32 Adafruit GFX sensor library

How to program for OLED

  • Include library
#include <Wire.h> #include <Adafruit_GFX.h> #include <Adafruit_SSD1306.h>
  • Define the screen size (123x64 or 128 x32)
#define SCREEN_WIDTH 128 // OLED display width, in pixels #define SCREEN_HEIGHT 64 // OLED display height, in pixels
  • Declare an SSD1306 OLED object
// declare an SSD1306 display object connected to I2C Adafruit_SSD1306 oled(SCREEN_WIDTH, SCREEN_HEIGHT, &Wire, -1);
  • In setup() function, initialize OLED display
// initialize OLED display with address 0x3C for 128x64 if (!oled.begin(SSD1306_SWITCHCAPVCC, 0x3C)) { Serial.println(F("SSD1306 allocation failed")); while (true); }
  • And then you can display text, images, draw line ...

ESP32 Code - Display Text on OLED

The below ESP32 code display a text on OLED

/* * This ESP32 code is created by esp32io.com * * This ESP32 code is released in the public domain * * For more detail (instruction and wiring diagram), visit https://esp32io.com/tutorials/esp32-oled */ #include <Wire.h> #include <Adafruit_GFX.h> #include <Adafruit_SSD1306.h> #define SCREEN_WIDTH 128 // OLED width, in pixels #define SCREEN_HEIGHT 64 // OLED height, in pixels // create an OLED display object connected to I2C Adafruit_SSD1306 oled(SCREEN_WIDTH, SCREEN_HEIGHT, &Wire, -1); void setup() { Serial.begin(9600); // initialize OLED display with I2C address 0x3C if (!oled.begin(SSD1306_SWITCHCAPVCC, 0x3C)) { Serial.println(F("failed to start SSD1306 OLED")); while (1); } delay(2000); // wait two seconds for initializing oled.clearDisplay(); // clear display oled.setTextSize(1); // set text size oled.setTextColor(WHITE); // set text color oled.setCursor(0, 10); // set position to display oled.println("esp32io.com"); // set text oled.display(); // display on OLED } void loop() { }

We can do more by using the following functions:

  • oled.clearDisplay(): this function is used to clear the display
  • oled.setTextSize(n): this function is used to set the font size, supports sizes from 1 to 8
  • oled.setTextColor(WHITE): this function is used to set the text color
  • oled.setCursor(x,y): this function is used to set the coordinates to start displaying text
  • oled.drawPixel(x,y, color): this function is used to plot a pixel in the x,y coordinates
  • oled.setTextColor(BLACK, WHITE): this function is used to set the text color and background color, respectively
  • oled.println("message"): this function is used to print a string
  • oled.println(number): this function is used to print a number
  • oled.println(number, HEX): this function is used to print a number in hex format
  • oled.display(): this function is used to apply the changes
  • oled.startscrollright(start, stop): this function is used to scroll text from the left to the right
  • oled.startscrollleft(start, stop): this function is used to scroll text from the right to the left
  • oled.startscrolldiagright(start, stop): this function is used to scroll text from left bottom corner to right upper corner
  • oled.startscrolldiagleft(start, stop): this function is used to scroll text from right bottom corner to left upper corner
  • oled.stopscroll(): this function is used to stop scrolling

ESP32 Code - Drawing Shapes on OLED

The below code show how to draw several shapes on OLED

/* * This ESP32 code is created by esp32io.com * * This ESP32 code is released in the public domain * * For more detail (instruction and wiring diagram), visit https://esp32io.com/tutorials/esp32-oled */ #include <Wire.h> #include <Adafruit_GFX.h> #include <Adafruit_SSD1306.h> #define SCREEN_WIDTH 128 // OLED width, in pixels #define SCREEN_HEIGHT 64 // OLED height, in pixels // create an OLED display object connected to I2C Adafruit_SSD1306 oled(SCREEN_WIDTH, SCREEN_HEIGHT, &Wire, -1); void setup() { Serial.begin(9600); // initialize OLED display with I2C address 0x3C if (!oled.begin(SSD1306_SWITCHCAPVCC, 0x3C)) { Serial.println(F("failed to start SSD1306 OLED")); while (1); } delay(2000); // wait two seconds for initializing oled.setCursor(0, 0); } void loop() { // draw a circle oled.clearDisplay(); //oled.drawCircle(64, 32, 20, WHITE); oled.fillCircle(64, 32, 20, WHITE); oled.display(); // draw a triangle oled.clearDisplay(); //oled.fillTriangle(80, 62, 128, 62, 104, 32, WHITE); oled.drawTriangle(80, 62, 128, 62, 104, 32, WHITE); oled.display(); // draw a rectangle oled.clearDisplay(); //oled.fillRect(0, 0, 40, 25, WHITE); oled.drawRect(0, 0, 40, 25, WHITE); oled.display(); delay(1000); }

After running the code, you'll see a rectangle, circle, and triangle on the OLED screen.
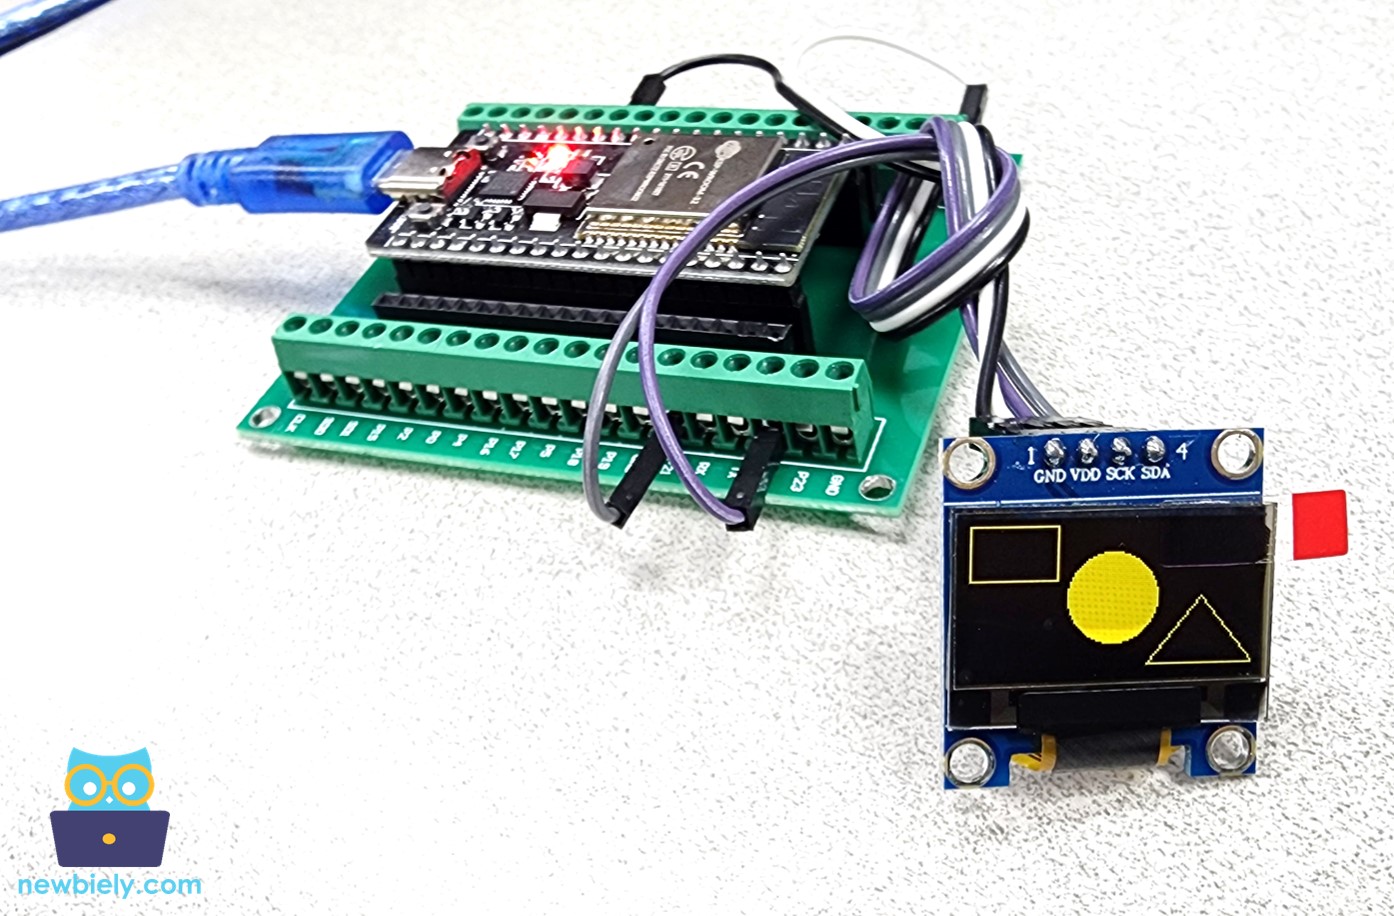
ESP32 draw rectangle, circle, an triagle on OLED

ESP32 Code – Display Image on OLED

To display an image on OLED, it needs to convert the image to the bitmap array. There is a online tool to convert the image to bitmap array. The below image show how to do it. I converted the ESP32 icon to bitmap array.
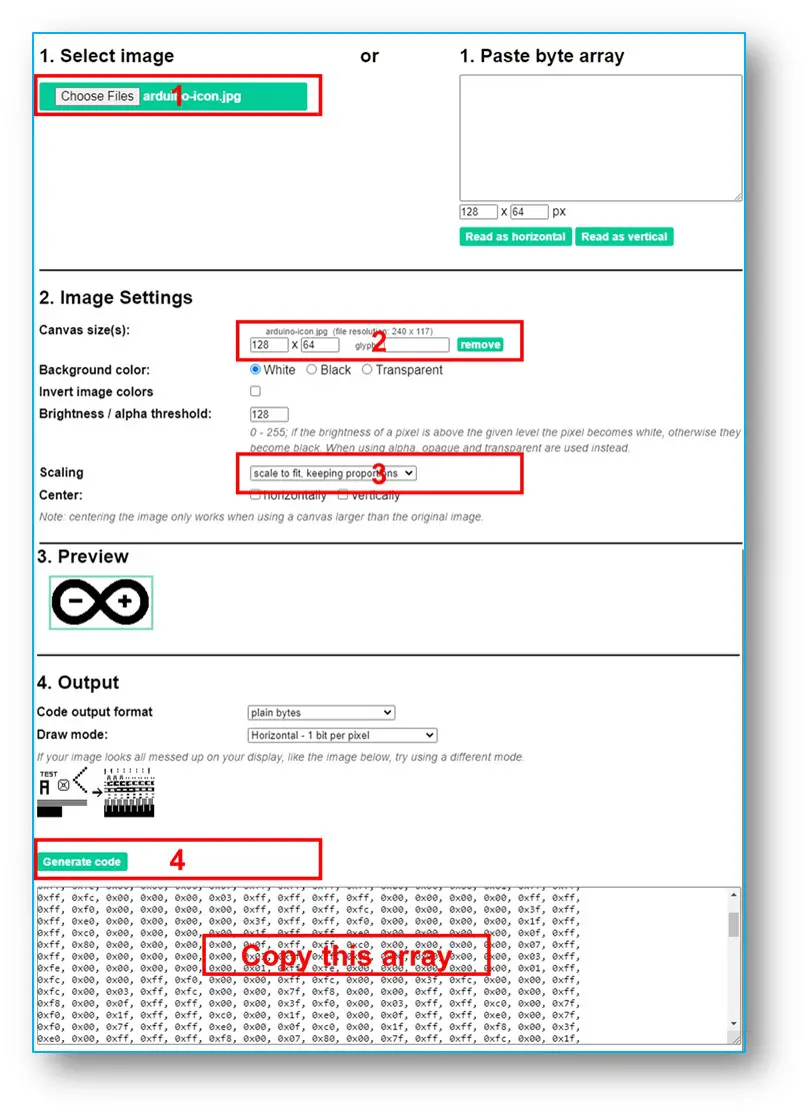
image to bitmap array

After converting, copy the array code and update it in the bitmap_image array in the following code:

/* * This ESP32 code is created by esp32io.com * * This ESP32 code is released in the public domain * * For more detail (instruction and wiring diagram), visit https://esp32io.com/tutorials/esp32-oled */ #include <Wire.h> #include <Adafruit_GFX.h> #include <Adafruit_SSD1306.h> #define SCREEN_WIDTH 128 // OLED width, in pixels #define SCREEN_HEIGHT 64 // OLED height, in pixels // create an OLED display object connected to I2C Adafruit_SSD1306 oled(SCREEN_WIDTH, SCREEN_HEIGHT, &Wire, -1); // bitmap of DIYables-icon image const unsigned char bitmap_image [] PROGMEM = { // 'DIYables-icon', 128x64px 0x00, 0x00, 0x03, 0xff, 0xff, 0xff, 0xff, 0xc0, 0xff, 0xfe, 0x00, 0x03, 0xf1, 0xf8, 0x00, 0x3e, 0x00, 0x00, 0x03, 0xff, 0xff, 0xff, 0xff, 0xc0, 0xff, 0xff, 0xc0, 0x03, 0xf1, 0xf8, 0x00, 0x7e, 0x00, 0x00, 0x03, 0xff, 0xff, 0xff, 0xff, 0xc0, 0xff, 0xff, 0xf0, 0x03, 0xf0, 0xfc, 0x00, 0x7c, 0x00, 0x00, 0x03, 0xff, 0xff, 0xff, 0xff, 0xc0, 0xff, 0xff, 0xf8, 0x03, 0xf0, 0xfc, 0x00, 0xfc, 0x00, 0x00, 0x03, 0xff, 0xff, 0xff, 0xff, 0xc0, 0xff, 0xff, 0xfc, 0x03, 0xf0, 0x7e, 0x00, 0xf8, 0x00, 0x00, 0x03, 0xff, 0xff, 0xff, 0xff, 0xc0, 0xf8, 0x01, 0xfe, 0x03, 0xf0, 0x3f, 0x01, 0xf8, 0x00, 0x00, 0x03, 0xff, 0xff, 0xff, 0xff, 0xc0, 0xf8, 0x00, 0x7f, 0x03, 0xf0, 0x3f, 0x03, 0xf0, 0x00, 0x00, 0x03, 0xff, 0xff, 0xff, 0xff, 0xc0, 0xf8, 0x00, 0x3f, 0x03, 0xf0, 0x1f, 0x83, 0xe0, 0x00, 0x00, 0x03, 0xff, 0xff, 0xff, 0xff, 0xc0, 0xf8, 0x00, 0x3f, 0x83, 0xf0, 0x1f, 0x87, 0xe0, 0x00, 0x00, 0x03, 0xff, 0xff, 0xff, 0xff, 0xc0, 0xf8, 0x00, 0x1f, 0x83, 0xf0, 0x0f, 0xc7, 0xc0, 0x00, 0x00, 0x03, 0xff, 0xff, 0xff, 0xff, 0xc0, 0xf8, 0x00, 0x1f, 0x83, 0xf0, 0x07, 0xef, 0xc0, 0x00, 0x00, 0x03, 0xff, 0xff, 0xff, 0xff, 0xc0, 0xf8, 0x00, 0x1f, 0x83, 0xf0, 0x07, 0xff, 0x80, 0xf0, 0x00, 0x03, 0xff, 0xff, 0xff, 0xff, 0xc0, 0xf8, 0x00, 0x1f, 0x83, 0xf0, 0x03, 0xff, 0x00, 0xfe, 0x00, 0x03, 0xff, 0xff, 0xff, 0xff, 0xc0, 0xf8, 0x00, 0x1f, 0x83, 0xf0, 0x03, 0xff, 0x00, 0xff, 0xc0, 0x03, 0xff, 0xff, 0xff, 0xff, 0xc0, 0xf8, 0x00, 0x1f, 0x83, 0xf0, 0x01, 0xfe, 0x00, 0xff, 0xe0, 0x03, 0xff, 0xff, 0xff, 0xff, 0xc0, 0xf8, 0x00, 0x1f, 0x83, 0xf0, 0x00, 0xfe, 0x00, 0xff, 0xf8, 0x03, 0xff, 0xff, 0xff, 0xff, 0xc0, 0xf8, 0x00, 0x1f, 0x83, 0xf0, 0x00, 0xfc, 0x00, 0xff, 0xfc, 0x03, 0xff, 0xff, 0xff, 0xff, 0xc0, 0xf8, 0x00, 0x3f, 0x03, 0xf0, 0x00, 0xfc, 0x00, 0xff, 0xfe, 0x03, 0xff, 0xff, 0xff, 0xff, 0xc0, 0xf8, 0x00, 0x7f, 0x03, 0xf0, 0x00, 0xfc, 0x00, 0xff, 0xff, 0x03, 0xff, 0xff, 0xff, 0xff, 0xc0, 0xf8, 0x00, 0xff, 0x03, 0xf0, 0x00, 0xfc, 0x00, 0xff, 0xff, 0x83, 0xff, 0xff, 0xff, 0xff, 0xc0, 0xf8, 0x03, 0xfe, 0x03, 0xf0, 0x00, 0xfc, 0x00, 0xff, 0xff, 0xc3, 0xff, 0xff, 0xff, 0xff, 0xc0, 0xff, 0xff, 0xfc, 0x03, 0xf0, 0x00, 0xfc, 0x00, 0xff, 0xff, 0xc3, 0xff, 0xff, 0xff, 0xff, 0xc0, 0xff, 0xff, 0xf8, 0x03, 0xf0, 0x00, 0xfc, 0x00, 0xff, 0xff, 0xe3, 0xff, 0xff, 0xff, 0xff, 0xc0, 0xff, 0xff, 0xe0, 0x03, 0xf0, 0x00, 0xfc, 0x00, 0xff, 0xff, 0xe3, 0xff, 0xff, 0xff, 0xff, 0xc0, 0xff, 0xff, 0x80, 0x03, 0xf0, 0x00, 0xfc, 0x00, 0xff, 0xff, 0xf3, 0xff, 0xff, 0xff, 0xff, 0xc0, 0xff, 0xf8, 0x00, 0x03, 0xe0, 0x00, 0xfc, 0x00, 0xff, 0xff, 0xf3, 0xff, 0xff, 0xff, 0xff, 0xc0, 0x00, 0x00, 0x00, 0x00, 0x00, 0x00, 0x00, 0x00, 0xff, 0xff, 0xfb, 0xff, 0xff, 0xff, 0xff, 0xc0, 0x00, 0x00, 0x00, 0x00, 0x00, 0x00, 0x00, 0x00, 0xff, 0xff, 0xfb, 0xff, 0xff, 0xff, 0xff, 0xc0, 0x00, 0x00, 0x00, 0x00, 0x00, 0x00, 0x00, 0x00, 0xff, 0xff, 0xfb, 0xff, 0xff, 0xff, 0xff, 0xc0, 0x00, 0x00, 0x00, 0x00, 0x00, 0x00, 0x00, 0x00, 0xff, 0xff, 0xfb, 0xff, 0xff, 0xff, 0xff, 0xc0, 0x00, 0x00, 0x00, 0x00, 0x00, 0x00, 0x00, 0x00, 0xff, 0xff, 0xff, 0xff, 0xff, 0xff, 0xff, 0xc0, 0xff, 0xff, 0xff, 0xff, 0xff, 0xff, 0xff, 0xff, 0xff, 0xff, 0xff, 0xff, 0xff, 0xff, 0xff, 0xc0, 0xff, 0xff, 0xff, 0xff, 0xff, 0xff, 0xff, 0xff, 0xff, 0xff, 0xff, 0xff, 0xff, 0xff, 0xff, 0xc0, 0xff, 0xff, 0xff, 0xff, 0xff, 0xff, 0xff, 0xff, 0xff, 0xff, 0xff, 0xff, 0xff, 0xff, 0xff, 0xc0, 0xff, 0xff, 0xff, 0xff, 0xff, 0xff, 0xff, 0xff, 0xff, 0xff, 0xff, 0xff, 0xff, 0xff, 0xff, 0xc0, 0xff, 0xff, 0xff, 0xff, 0xff, 0xff, 0xff, 0xff, 0xff, 0xff, 0xff, 0xff, 0xff, 0xff, 0xff, 0xc0, 0xff, 0xff, 0xc7, 0xff, 0x1f, 0xff, 0xff, 0xff, 0xff, 0xff, 0xff, 0xff, 0xff, 0xff, 0xff, 0xc0, 0xff, 0xff, 0xc7, 0xff, 0x1f, 0xff, 0xff, 0xff, 0xff, 0xff, 0xfb, 0xff, 0xff, 0xff, 0xff, 0x80, 0xff, 0xff, 0xc7, 0xff, 0x1f, 0xff, 0xff, 0xff, 0xff, 0xff, 0xfb, 0xff, 0xff, 0xff, 0xff, 0x80, 0xff, 0xff, 0xc7, 0xff, 0x1f, 0xff, 0xff, 0xff, 0xff, 0xff, 0xfb, 0xff, 0xff, 0xff, 0xff, 0x80, 0xff, 0x9f, 0xc6, 0x7f, 0x1f, 0xdf, 0xf9, 0xff, 0xff, 0xff, 0xfb, 0xff, 0xff, 0xff, 0xff, 0x00, 0xfc, 0x03, 0xc0, 0x0f, 0x1e, 0x03, 0xe0, 0x3f, 0xff, 0xff, 0xf3, 0xff, 0xff, 0xff, 0xff, 0x00, 0xfc, 0x03, 0xc0, 0x07, 0x1c, 0x01, 0xc0, 0x3f, 0xff, 0xff, 0xf3, 0xff, 0xff, 0xff, 0xfe, 0x00, 0xfd, 0xf1, 0xc3, 0xc7, 0x18, 0xf8, 0x8f, 0xff, 0xff, 0xff, 0xe3, 0xff, 0xff, 0xff, 0xfe, 0x00, 0xff, 0xf1, 0xc7, 0xe3, 0x18, 0xf8, 0x8f, 0xff, 0xff, 0xff, 0xe3, 0xff, 0xff, 0xff, 0xfc, 0x00, 0xfe, 0x01, 0xc7, 0xe3, 0x18, 0x00, 0xc0, 0xff, 0xff, 0xff, 0xc3, 0xff, 0xff, 0xff, 0xfc, 0x00, 0xfc, 0x01, 0xc7, 0xe3, 0x18, 0x00, 0xe0, 0x3f, 0xff, 0xff, 0xc3, 0xff, 0xff, 0xff, 0xf8, 0x00, 0xf8, 0xf1, 0xc7, 0xe3, 0x18, 0xff, 0xfe, 0x1f, 0xff, 0xff, 0x83, 0xff, 0xff, 0xff, 0xf0, 0x00, 0xf8, 0xf1, 0xc3, 0xc7, 0x18, 0xff, 0xff, 0x1f, 0xff, 0xff, 0x03, 0xff, 0xff, 0xff, 0xe0, 0x00, 0xf8, 0x61, 0xc0, 0x07, 0x1c, 0x01, 0xc0, 0x3f, 0xff, 0xfe, 0x03, 0xff, 0xff, 0xff, 0xc0, 0x00, 0xfc, 0x01, 0xc0, 0x0f, 0x1e, 0x01, 0x80, 0x3f, 0xff, 0xfc, 0x03, 0xff, 0xff, 0xff, 0x80, 0x00, 0xfe, 0x19, 0xc4, 0x3f, 0x1f, 0x87, 0xe0, 0xff, 0xff, 0xf8, 0x03, 0xff, 0xff, 0xff, 0x00, 0x00, 0xff, 0xff, 0xff, 0xff, 0xff, 0xff, 0xff, 0xff, 0xff, 0xe0, 0x03, 0xff, 0xff, 0xfc, 0x00, 0x00, 0xff, 0xff, 0xff, 0xff, 0xff, 0xff, 0xff, 0xff, 0xff, 0xc0, 0x03, 0xff, 0xff, 0xf0, 0x00, 0x00, 0xff, 0xff, 0xff, 0xff, 0xff, 0xff, 0xff, 0xff, 0xff, 0x00, 0x03, 0xff, 0xff, 0xc0, 0x00, 0x00, 0xff, 0xff, 0xff, 0xff, 0xff, 0xff, 0xff, 0xff, 0xf0, 0x00, 0x03, 0xff, 0xfc, 0x00, 0x00, 0x00, 0xff, 0xff, 0xff, 0xff, 0xff, 0xff, 0xff, 0xff }; void setup() { Serial.begin(9600); // initialize OLED display with I2C address 0x3C if (!oled.begin(SSD1306_SWITCHCAPVCC, 0x3C)) { Serial.println(F("failed to start SSD1306 OLED")); while (1); } delay(2000); // wait two seconds for initializing oled.setCursor(0, 0); } void loop() { oled.clearDisplay(); // display bitmap oled.drawBitmap(0, 0, bitmap_image, 128, 57, WHITE); oled.display(); delay(1000); // invert display oled.invertDisplay(1); delay(1000); }

By running the above code, you'll see the image displayed on the OLED as shown below.
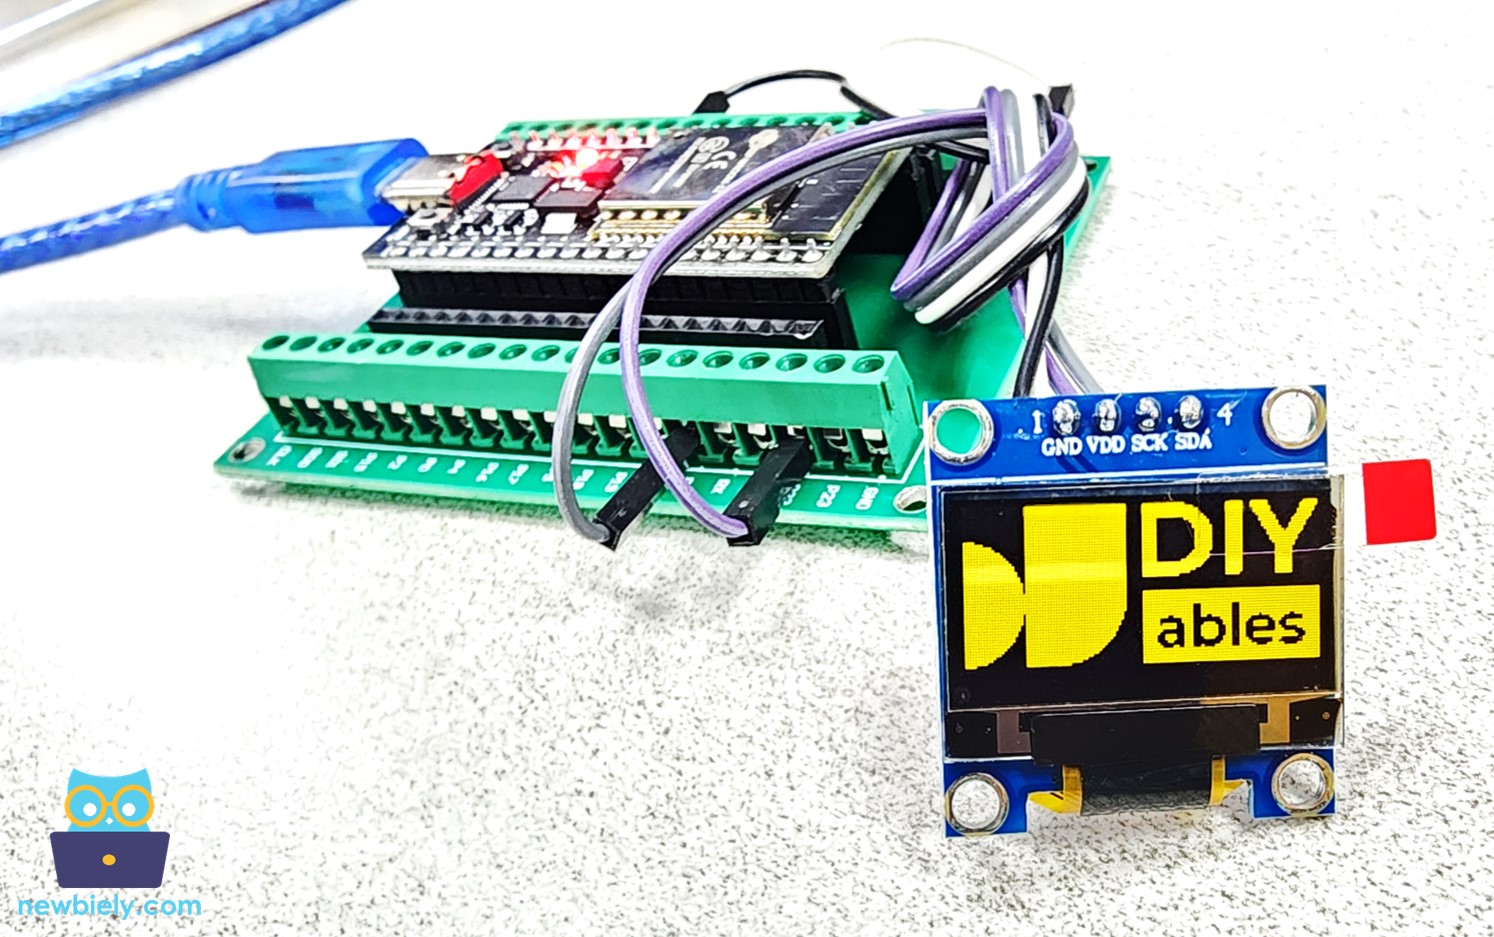
ESP32 display image on OLED

OLED Troubleshooting

See OLED Troubleshooting

※ OUR MESSAGES