ESP32 - Gmail

In this tutorial, we will learn how to program the ESP32 to send an email from your Gmail account. The email sender will be a Gmail account, and the recipient can be any type of email account.

ESP32 Gmail

Hardware Used In This Tutorial

1×ESP-WROOM-32 Dev Module
1×USB Cable Type-C
1×(Recommended) ESP32 Screw Terminal Adapter

Or you can buy the following sensor kits:

1×DIYables Sensor Kit (30 sensors/displays)
1×DIYables Sensor Kit (18 sensors/displays)
Disclosure: some of these links are affiliate links. We may earn a commission on your purchase at no extra cost to you. We appreciate it.

Pre-Preparation

We need a Gmail account and its corresponding app password to be used in the code. Here are the key points to note:

  • Do not use your current Gmail account. Create a new one specifically for testing to avoid any potential issues.
  • The password used in the ESP32 code is not the same as the one you use to log in to Gmail via a web browser. You need to follow certain steps to obtain an "App Password" from your Google Account.

Here is a step-by-step guide:

Gmail security
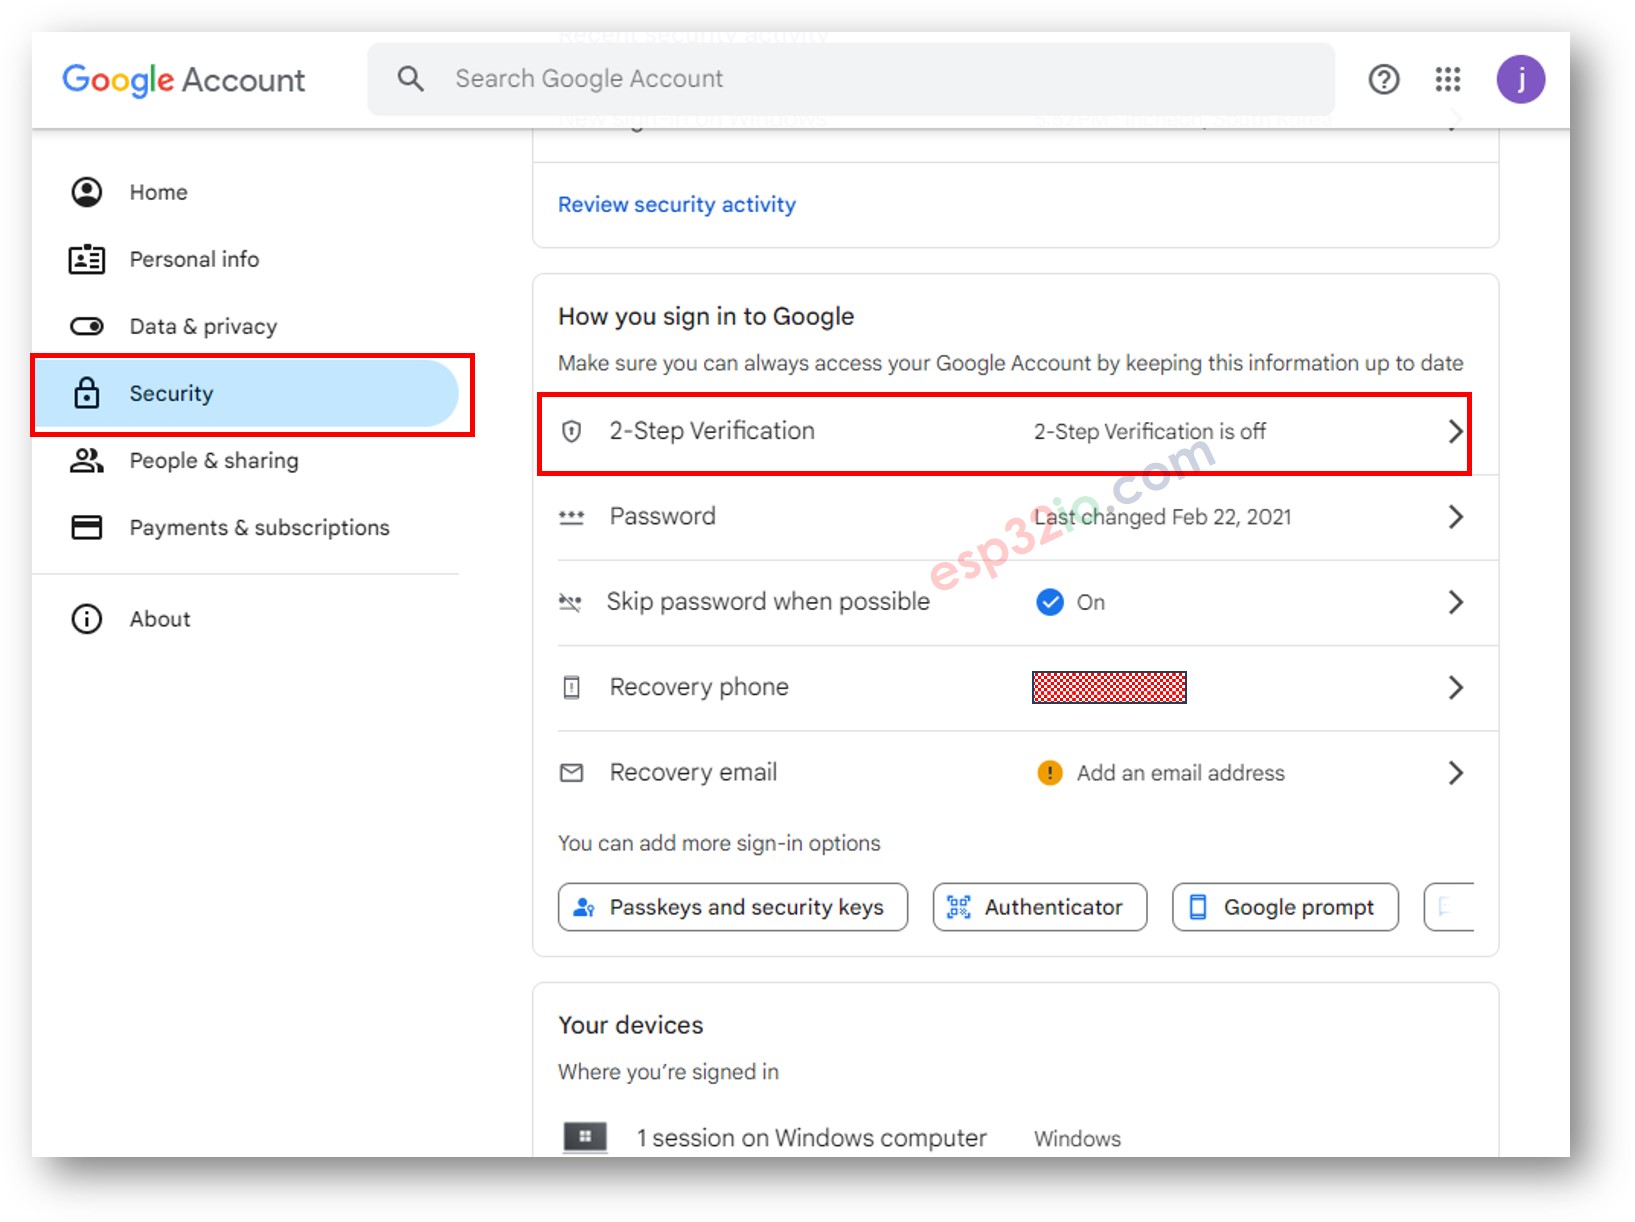
  • Enable 2-Step Verification (App passwords can only be used with accounts that have 2-Step Verification turned on).
  • Visit the Google App Passwords page and create an app password. You can give it any name.
Google App Passwords
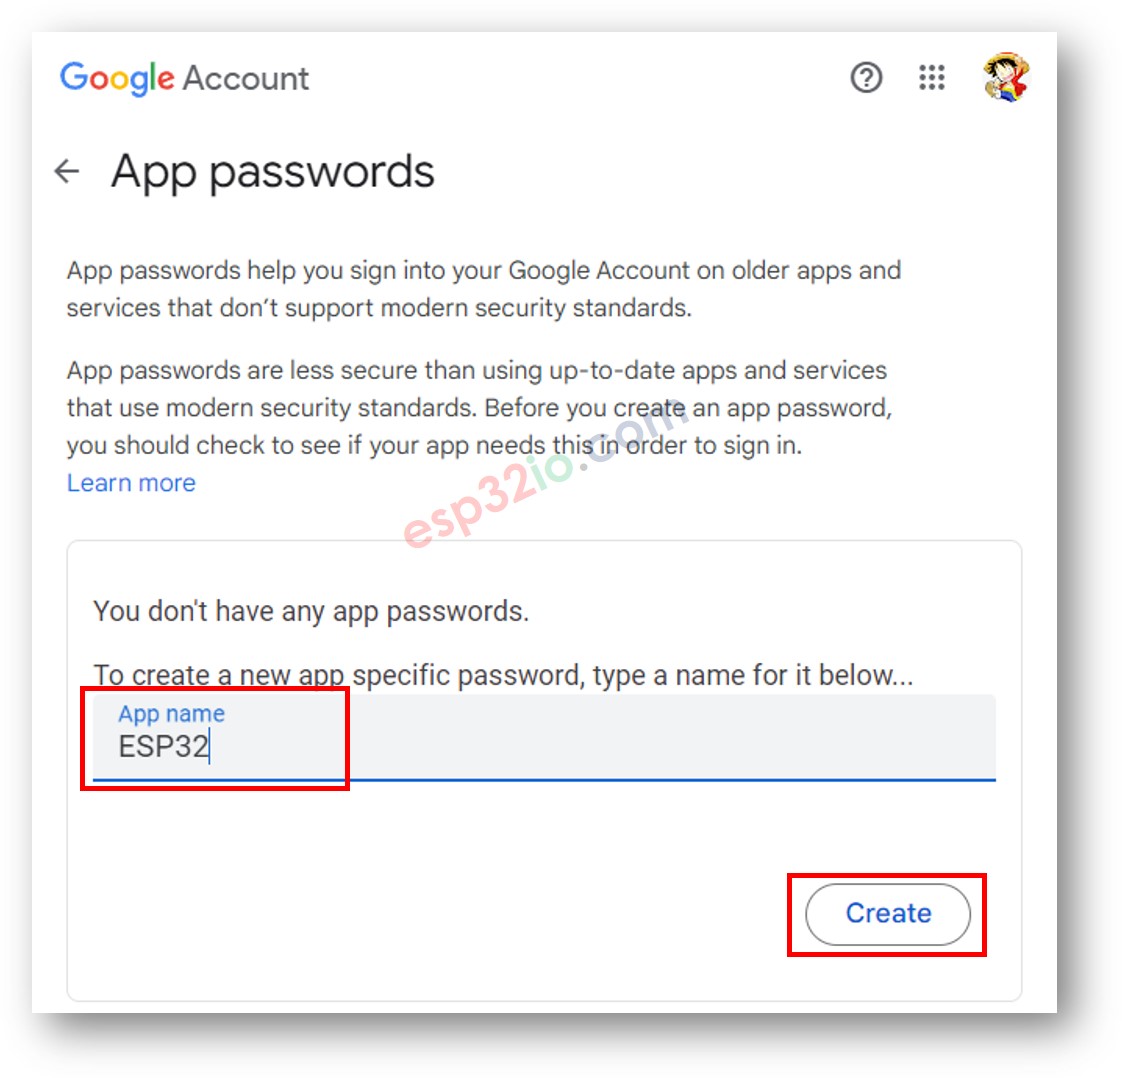
  • Click the Create button. You will receive a 16-digit password that looks like this:
Gmail App Passwords
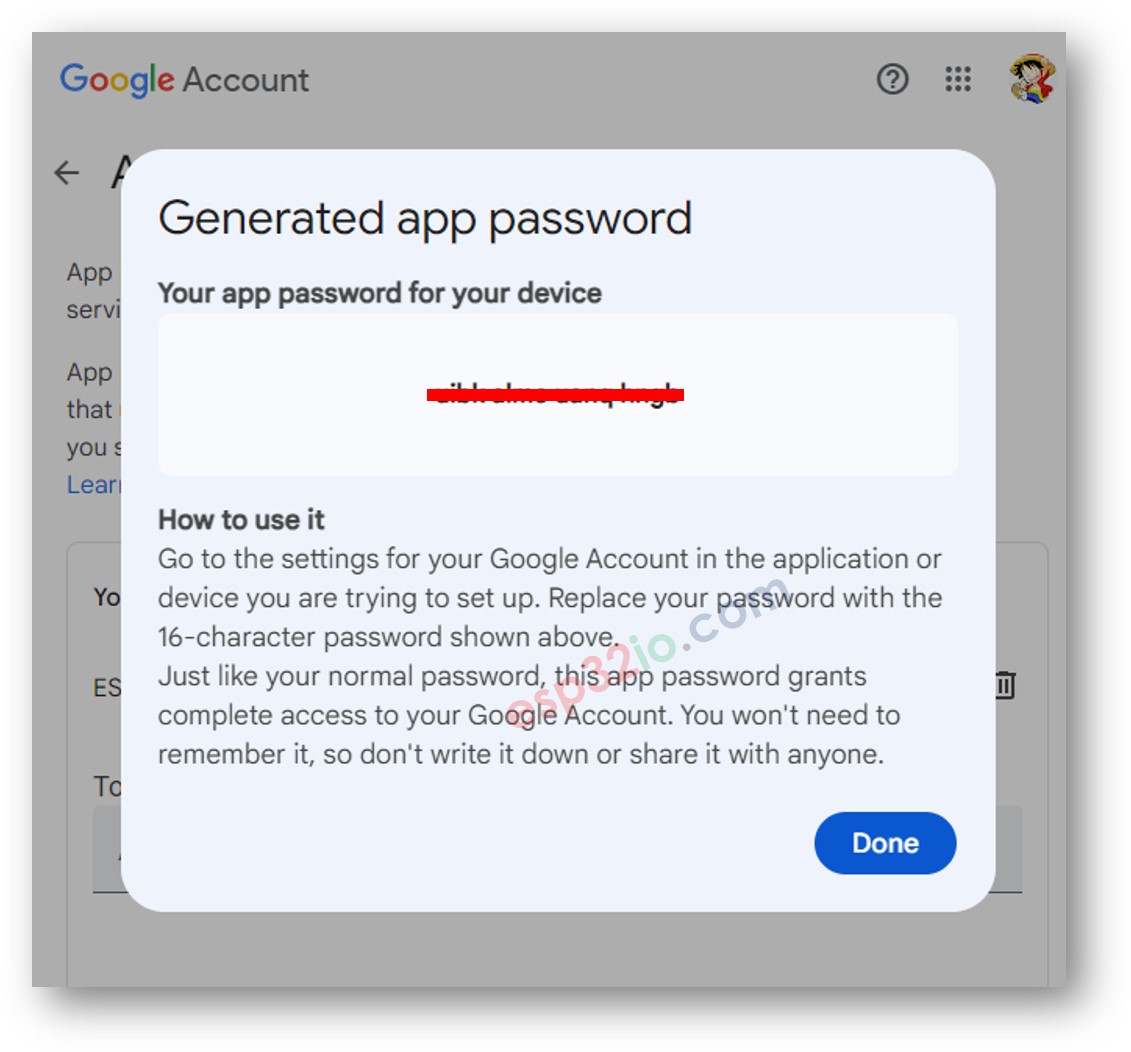
  • Copy and store this 16-digit number. It will be used in the ESP32 code in the next part.

※ NOTE THAT:

Google may change its user interface over time. If you follow the steps above but cannot obtain the "App Passwords," try searching for "How to get Google App Passwords" for the latest instructions.

ESP32 Code

/* * This ESP32 code is created by esp32io.com * * This ESP32 code is released in the public domain * * For more detail (instruction and wiring diagram), visit https://esp32io.com/tutorials/esp32-gmail */ #include <WiFi.h> #include <ESP_Mail_Client.h> #define WIFI_SSID "YOUR_WIFI_SSID" // CHANGE IT #define WIFI_PASSWORD "YOUR_WIFI_PASSWORD" // CHANGE IT // the sender email credentials #define SENDER_EMAIL "xxxxxx@gmail.com" // CHANGE IT #define SENDER_PASSWORD "xxxx xxxx xxxx xxxx" // CHANGE IT to your Google App password #define RECIPIENT_EMAIL "xxxxxx@gmail.com" // CHANGE IT #define SMTP_HOST "smtp.gmail.com" #define SMTP_PORT 587 SMTPSession smtp; void setup() { Serial.begin(9600); WiFi.begin(WIFI_SSID, WIFI_PASSWORD); Serial.print("Connecting to Wi-Fi"); while (WiFi.status() != WL_CONNECTED) { Serial.print("."); delay(300); } Serial.println(); Serial.print("Connected with IP: "); Serial.println(WiFi.localIP()); Serial.println(); String subject = "Email Notification from ESP32"; String textMsg = "This is an email sent from ESP32.\n"; textMsg += "Sensor value: "; textMsg += "15"; // OR replace this value read from a sensor gmail_send(subject, textMsg); } void loop() { // YOUR OTHER CODE HERE } void gmail_send(String subject, String textMsg) { // set the network reconnection option MailClient.networkReconnect(true); smtp.debug(1); smtp.callback(smtpCallback); Session_Config config; // set the session config config.server.host_name = SMTP_HOST; config.server.port = SMTP_PORT; config.login.email = SENDER_EMAIL; config.login.password = SENDER_PASSWORD; config.login.user_domain = F("127.0.0.1"); config.time.ntp_server = F("pool.ntp.org,time.nist.gov"); config.time.gmt_offset = 3; config.time.day_light_offset = 0; // declare the message class SMTP_Message message; // set the message headers message.sender.name = F("ESP32"); message.sender.email = SENDER_EMAIL; message.subject = subject; message.addRecipient(F("To Whom It May Concern"), RECIPIENT_EMAIL); message.text.content = textMsg; message.text.transfer_encoding = "base64"; message.text.charSet = F("utf-8"); message.priority = esp_mail_smtp_priority::esp_mail_smtp_priority_low; // set the custom message header message.addHeader(F("Message-ID: <abcde.fghij@gmail.com>")); // connect to the server if (!smtp.connect(&config)) { Serial.printf("Connection error, Status Code: %d, Error Code: %d, Reason: %s\n", smtp.statusCode(), smtp.errorCode(), smtp.errorReason().c_str()); return; } if (!smtp.isLoggedIn()) { Serial.println("Not yet logged in."); } else { if (smtp.isAuthenticated()) Serial.println("Successfully logged in."); else Serial.println("Connected with no Auth."); } // start sending Email and close the session if (!MailClient.sendMail(&smtp, &message)) Serial.printf("Error, Status Code: %d, Error Code: %d, Reason: %s\n", smtp.statusCode(), smtp.errorCode(), smtp.errorReason().c_str()); } // callback function to get the Email sending status void smtpCallback(SMTP_Status status) { // print the current status Serial.println(status.info()); // print the sending result if (status.success()) { Serial.println("----------------"); Serial.printf("Message sent success: %d\n", status.completedCount()); Serial.printf("Message sent failed: %d\n", status.failedCount()); Serial.println("----------------\n"); for (size_t i = 0; i < smtp.sendingResult.size(); i++) { // get the result item SMTP_Result result = smtp.sendingResult.getItem(i); Serial.printf("Message No: %d\n", i + 1); Serial.printf("Status: %s\n", result.completed ? "success" : "failed"); Serial.printf("Date/Time: %s\n", MailClient.Time.getDateTimeString(result.timestamp, "%B %d, %Y %H:%M:%S").c_str()); Serial.printf("Recipient: %s\n", result.recipients.c_str()); Serial.printf("Subject: %s\n", result.subject.c_str()); } Serial.println("----------------\n"); // free the memory smtp.sendingResult.clear(); } }

Quick Instructions

  • If this is the first time you use ESP32, see how to setup environment for ESP32 on Arduino IDE.
  • Connect the ESP32 board to your PC via a USB cable
  • Open Arduino IDE on your PC.
  • Select the right ESP32 board (e.g. ESP32 Dev Module) and COM port.
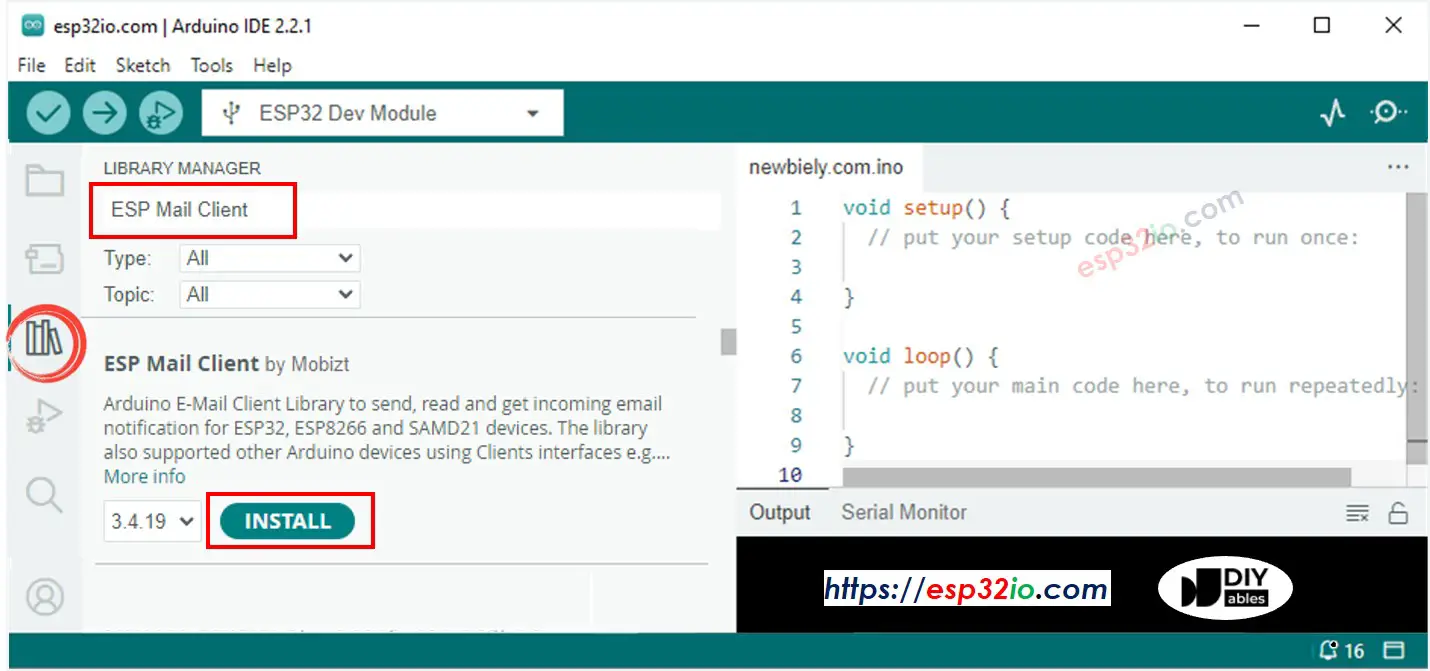
  • Open the Library Manager by clicking on the Library Manager icon on the left navigation bar of Arduino IDE.
  • Search ESP Mail Client, then find the ESP Mail Client created by Mobizt.
  • Click Install button to install ESP Mail Client library.
ESP32 ESP Mail Client library
  • Copy the above code and open with Arduino IDE
  • Change the WiFi information (SSID and password) in the code to yours by changing two contanst WIFI_SSID and WIFI_PASSWORD
  • Change the sender email and password in the code to yours by changing two contanst SENDER_EMAIL and SENDER_PASSWORD
  • Change the recipient email in the code to yours by changing two contanst RECIPIENT_EMAIL. recipient email can be the same as sender

※ NOTE THAT:

  • Sender email MUST be Gmail
  • Sender password is the App passwords you got from previous step
  • Recipient email can be any type of email
  • Click Upload button on Arduino IDE to upload code to ESP32
  • Open the Serial Monitor
  • Check out the result on Serial Monitor.
COM6
Send
#### Message sent successfully > C: message sent successfully ---------------- Message sent success: 1 Message sent failed: 0 ---------------- Message No: 1 Status: success Date/Time: May 27, 2024 04:42:50 Recipient: xxxxxx@gmail.com Subject: Email Notification from ESP32 ----------------
Autoscroll Show timestamp
Clear output
9600 baud  
Newline  
  • Check your recipient email box. You will get an email as below:
ESP32 sends email

Video Tutorial

Making video is a time-consuming work. If the video tutorial is necessary for your learning, please let us know by subscribing to our YouTube channel , If the demand for video is high, we will make the video tutorial.

※ OUR MESSAGES