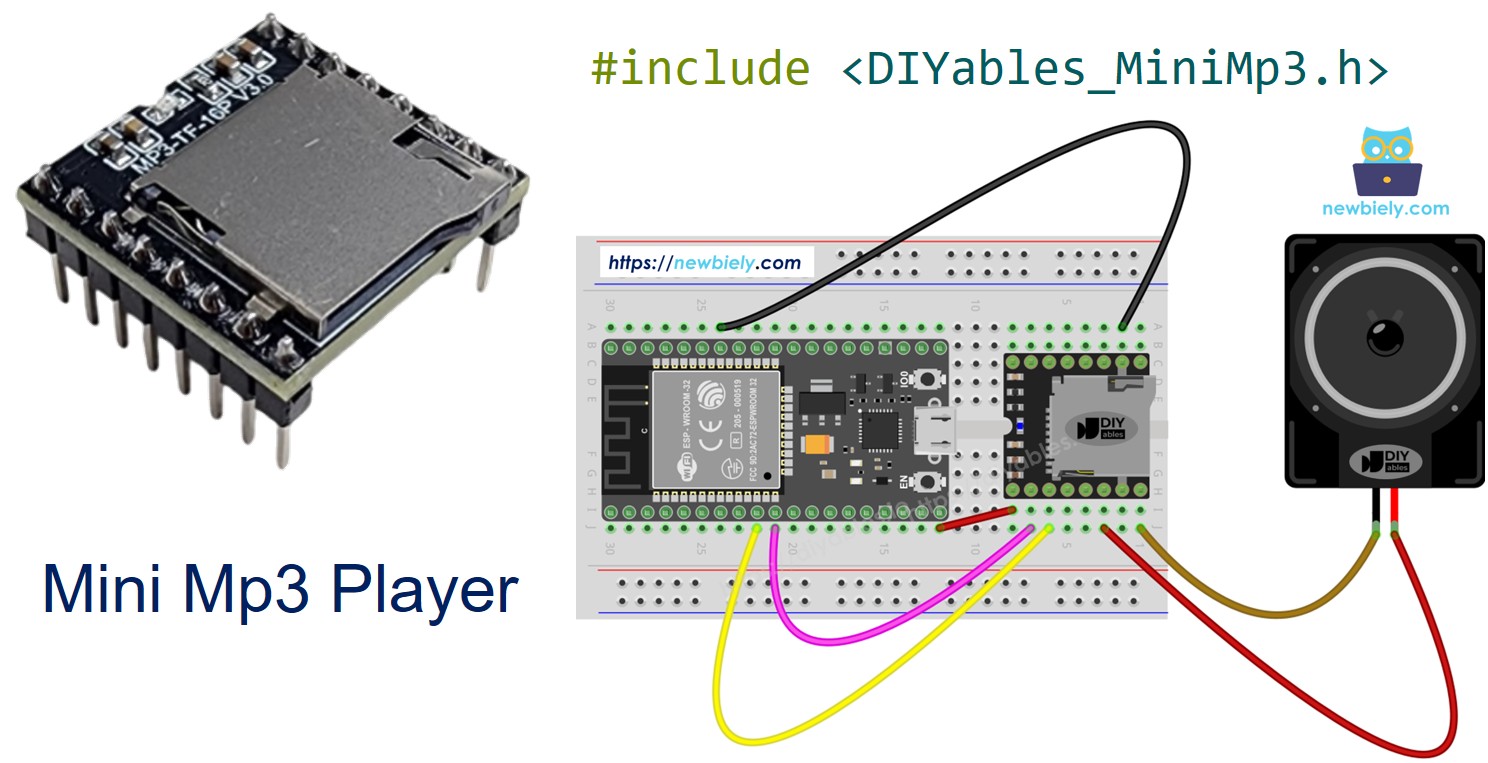
ESP32 - Mini Mp3 Player Module

The ESP32 is a versatile 3.3V microcontroller with WiFi, Bluetooth, and multiple hardware serial ports. Combined with the DIYables Mini Mp3 Player module, you can build anything from a simple sound effect board to a WiFi-controlled jukebox.

This tutorial walks you through:

ESP32 Mini Mp3 Player

Components Needed

1×ESP-WROOM-32 Dev Module
1×Alternatively, ESP32 Uno-form board
1×Alternatively, ESP32 S3 Uno-form board
1×USB Cable Type-A to Type-C (for USB-A PC)
1×USB Cable Type-C to Type-C (for USB-C PC)
1×DIYables Mini Mp3 Player module
1×Micro SD Card
1×Speaker
1×Breadboard
1×Jumper Wires
1×Recommended: Screw Terminal Expansion Board for ESP32
1×Recommended: Breakout Expansion Board for ESP32
1×Recommended: Power Splitter for ESP32

Or you can buy the following kits:

1×DIYables ESP32 Starter Kit (ESP32 included)
1×DIYables Sensor Kit (30 sensors/displays)
1×DIYables Sensor Kit (18 sensors/displays)
Disclosure: Some of the links in this section are Amazon affiliate links, meaning we may earn a commission at no additional cost to you if you make a purchase through them. Additionally, some links direct you to products from our own brand, DIYables .

No resistor required. The ESP32 operates at 3.3V — the same voltage the Mini Mp3 Player's UART expects.

The Mini Mp3 Player Module

The DIYables Mini Mp3 Player is a tiny board built on the YX5200-24SS chip. It decodes mp3 files from a micro SD card, and can directly drive a speaker through its built-in 3W amplifier. Alternatively, use the DAC pins to feed an external amplifier for louder output.

Everything is controlled via serial commands at 9600 baud:

  • Transport: play, pause, resume, stop, next, previous
  • Volume: 31 levels (0–30)
  • Equalizer: Normal, Pop, Rock, Jazz, Classic, Bass
  • Repeat: loop single track, loop folder, loop all tracks, random shuffle
  • Folders: play from numbered directories on the card
  • Advertisements: temporarily interrupt playback, then continue
  • Queries: read track number, volume, play state, track count
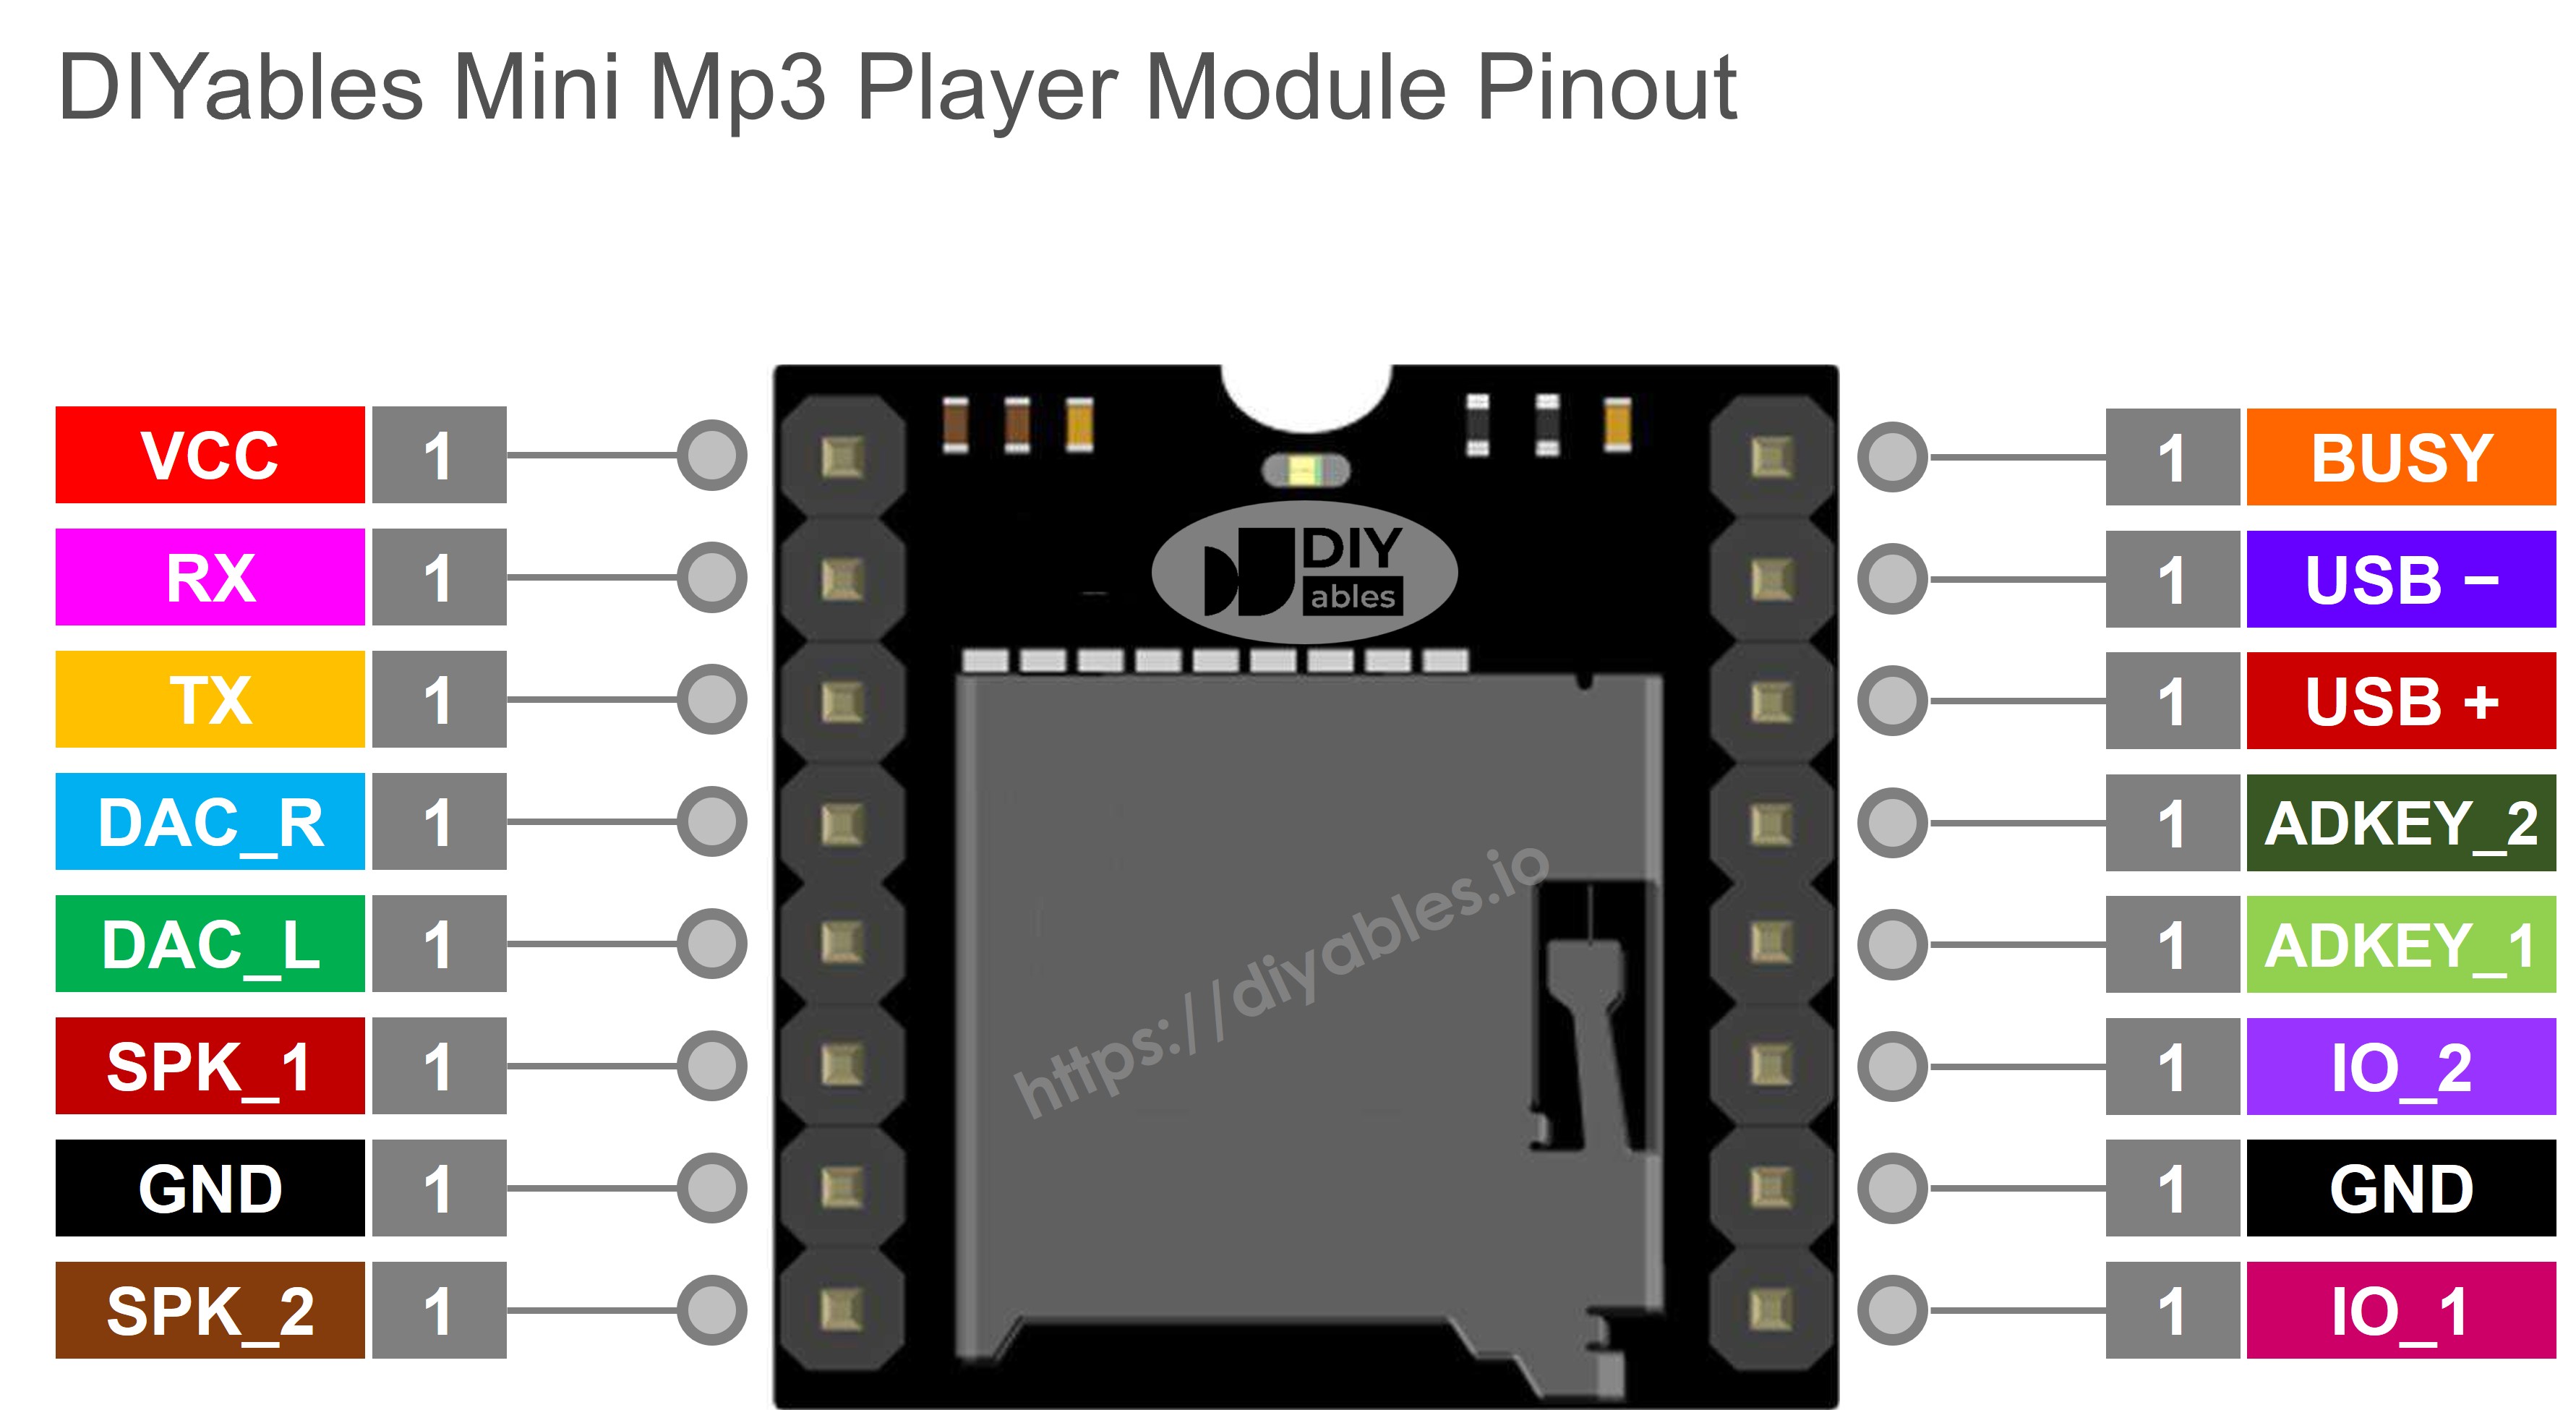
Pin Description

Pin Purpose
VCC 3.2V to 5.0V power input
GND Ground
RX Serial data input (connect to ESP32 TX pin)
TX Serial data output (connect to ESP32 RX pin)
SPK_1 Speaker + (built-in amp, 3W max)
SPK_2 Speaker −
DAC_R Right channel line output
DAC_L Left channel line output
BUSY LOW = playing, HIGH = stopped
IO_1 Short press → prev track; long press → vol down
IO_2 Short press → next track; long press → vol up
Mini Mp3 Player Pinout

Wiring

The ESP32 uses 3.3V logic natively, so you wire the serial lines directly — no level shifting or resistors needed.

We recommend using Serial2 (available by default on most ESP32 DevKit boards):

Mini Mp3 Player ESP32 Notes
VCC 3.3V Or 5V from VIN if available
GND GND
RX GPIO 17 (TX2) Direct connection
TX GPIO 16 (RX2) Direct connection
SPK_1 Speaker +
SPK_2 Speaker −
ESP32 Mini Mp3 Player wiring diagram

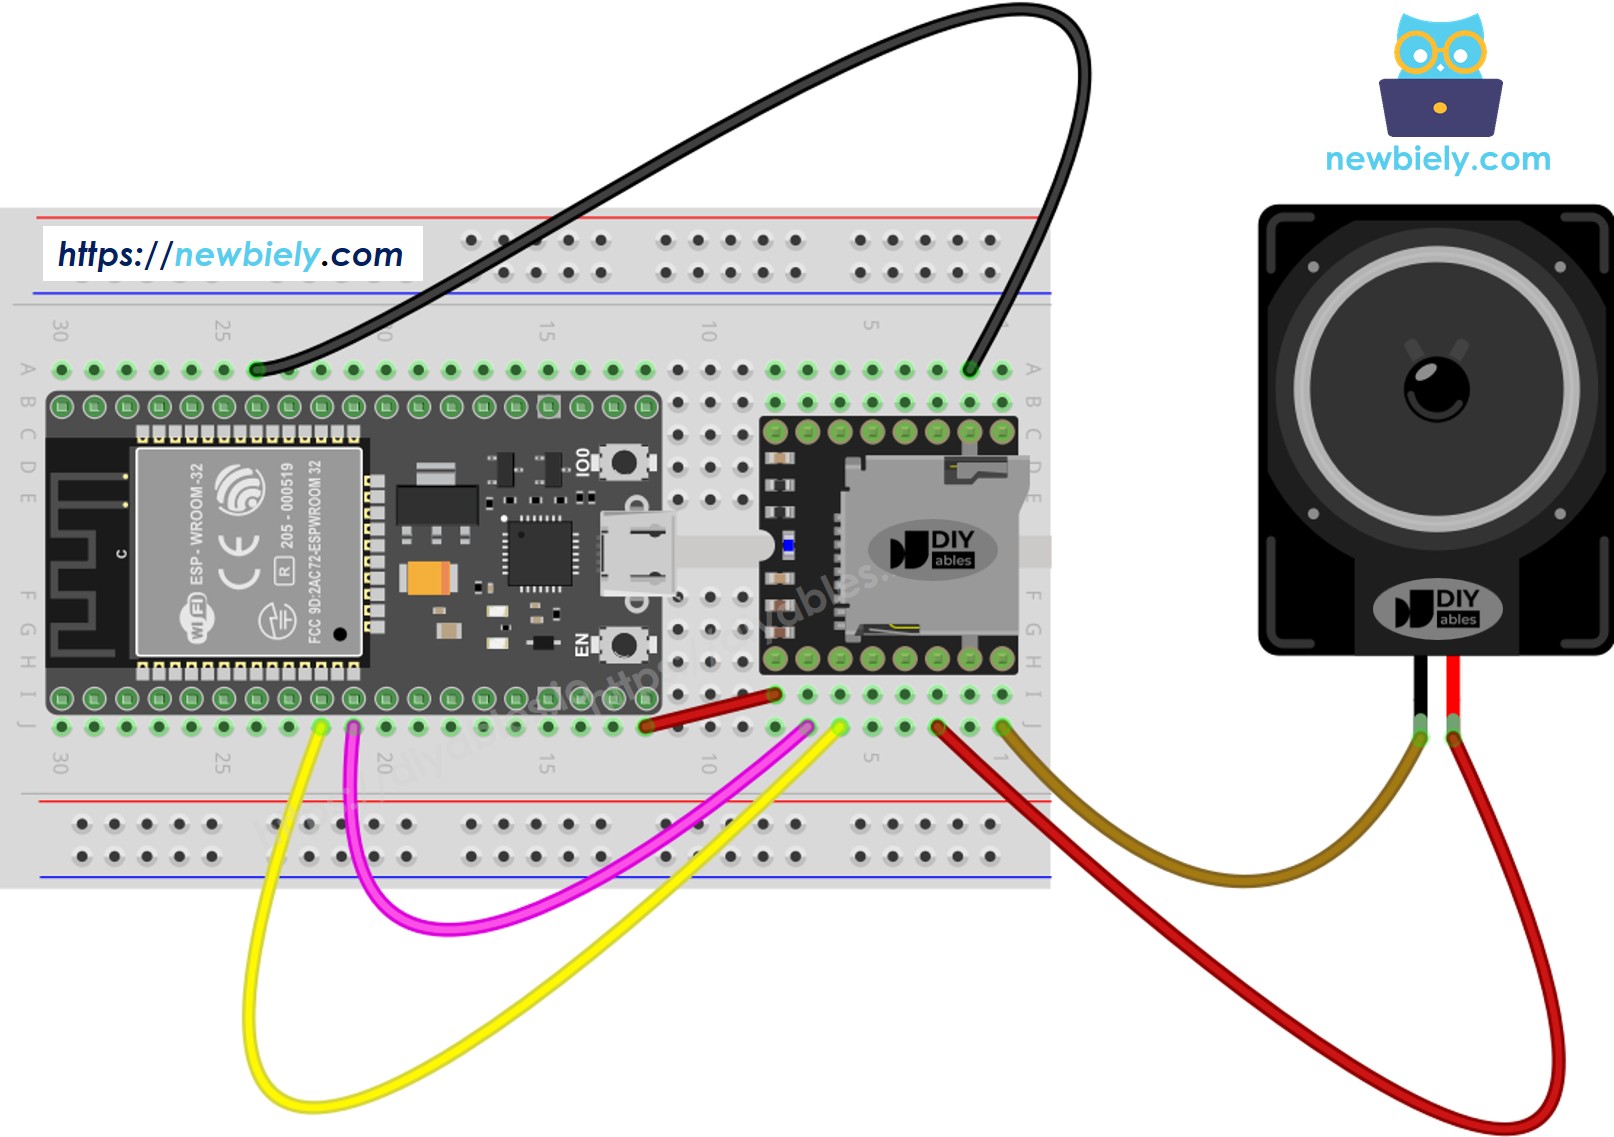
This image is created using Fritzing. Click to enlarge image

Tip: If your ESP32 variant does not expose GPIO 16/17 (some DevKit-C V4 boards use them for PSRAM), you can reassign Serial2 pins in code:

Serial2.begin(9600, SERIAL_8N1, 4, 5); // RX=GPIO4, TX=GPIO5

If you're unfamiliar with how to supply power to the ESP32 and other components, you can find guidance in the following tutorial: The best way to Power ESP32 and sensors/displays.

Getting the SD Card Ready

  1. Format as FAT16 or FAT32.
  2. Place mp3 files at the root:
/001.mp3 /002.mp3 /003.mp3
  1. For organized playback, use numbered folders:
/01/001.mp3 /01/002.mp3 /02/001.mp3

Critical notes:

  • Track numbers start at 1.
  • The module indexes tracks by the order they were copied to the card, not by filename. Always format first, then copy sequentially.
  • Folder names: 01–99 (2-digit), file names: 001–255 (3-digit).

Installing the Library

  • Connect the ESP32 to your computer.
  • In the Arduino IDE, select your ESP32 board variant and the correct port.
  • Open the Libraries manager.
  • Search "DIYables_MiniMp3" and install the library by DIYables.
ESP32 Mini Mp3 Player library

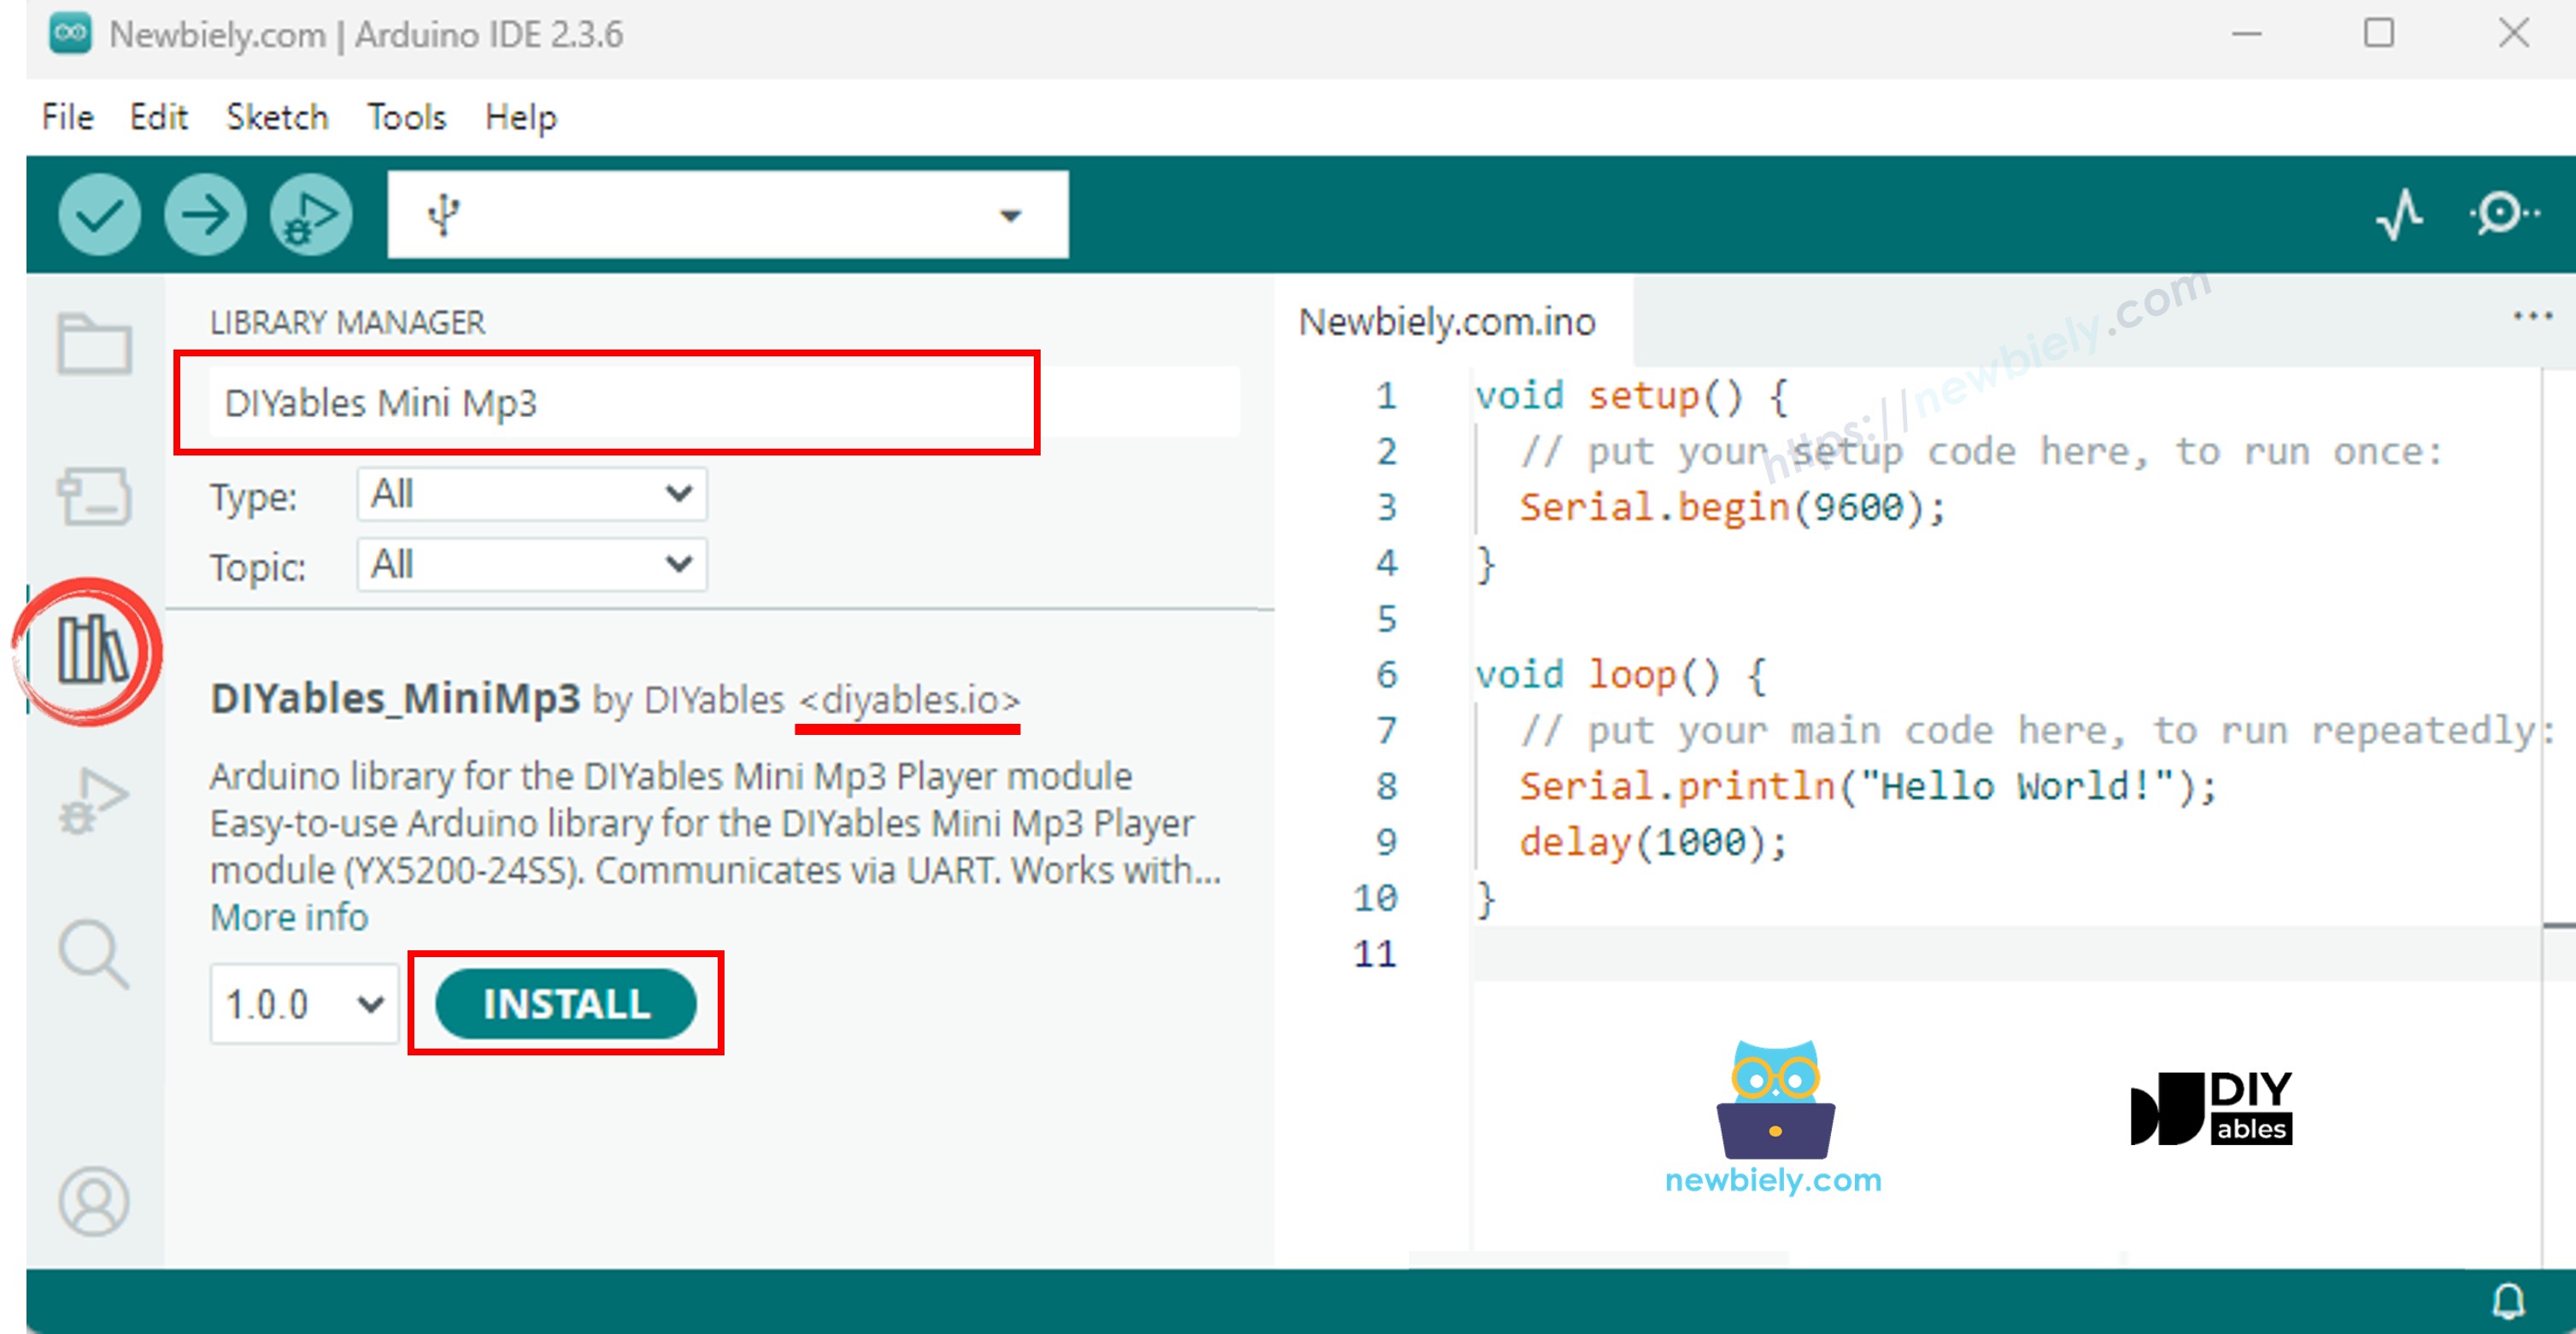
Zero dependencies — works out of the box.

Starter Code Template

#include <DIYables_MiniMp3.h> DIYables_MiniMp3 mp3; void setup() { Serial.begin(115200); // Debug output Serial2.begin(9600); // Mp3 module communication mp3.begin(Serial2); delay(1000); mp3.setVolume(25); // 0 = silence, 30 = maximum } void loop() { // Add your logic }

ESP32 Code — Play a Track

/* * DIYables Mini Mp3 Player - Play One Track * * Product: DIYables Mini Mp3 Player Module * https://diyables.io/products/mini-mp3-player-module * * Plays track 001 once, then stops. * * Wiring (Arduino Uno): * Mini Mp3 RX -> ESP32 pin GPIO26 * Mini Mp3 TX -> ESP32 pin GPIO25 * Mini Mp3 VCC -> 5V * Mini Mp3 GND -> GND * Speaker connected to SPK_1 and SPK_2 pins * * SD Card: Put mp3 files in root, named 001.mp3, 002.mp3, etc. */ #include <DIYables_MiniMp3.h> #include <SoftwareSerial.h> SoftwareSerial mp3Serial(25, 26); // RX, TX DIYables_MiniMp3 mp3; void setup() { Serial.begin(9600); mp3Serial.begin(9600); mp3.begin(mp3Serial); delay(1000); // Wait for the module to initialize mp3.setVolume(25); // Set volume (0 to 30) Serial.println("Playing track 1..."); mp3.play(1); // Play track 001.mp3 } void loop() { // Nothing to do here }

Try It

  • Load the SD card, wire the module, connect the ESP32 via USB.
  • Select your ESP32 board in the IDE and upload.

Playback Control

Method What Happens Code Example
play(n) Plays track number n mp3.play(1)
playNext() Moves to the next track mp3.playNext()
playPrevious() Goes back one track mp3.playPrevious()
pause() Freezes playback mp3.pause()
resume() Picks up where you left off mp3.resume()
stop() Ends playback completely mp3.stop()

ESP32 Code — Multiple Tracks

/* * DIYables Mini Mp3 Player - Play Multiple Tracks * * Product: DIYables Mini Mp3 Player Module * https://diyables.io/products/mini-mp3-player-module * * Plays tracks one after another with a delay between them. * * Wiring (Arduino Uno): * Mini Mp3 RX -> ESP32 pin GPIO26 * Mini Mp3 TX -> ESP32 pin GPIO25 * Mini Mp3 VCC -> 5V * Mini Mp3 GND -> GND * Speaker connected to SPK_1 and SPK_2 pins * * SD Card: Put mp3 files in root, named 001.mp3, 002.mp3, 003.mp3 */ #include <DIYables_MiniMp3.h> #include <SoftwareSerial.h> SoftwareSerial mp3Serial(25, 26); // RX, TX DIYables_MiniMp3 mp3; int currentTrack = 1; int totalTracks = 3; // Change this to match your SD card unsigned long lastTrackTime = 0; unsigned long trackDuration = 5000; // Wait 5 seconds between tracks (adjust as needed) void setup() { Serial.begin(9600); mp3Serial.begin(9600); mp3.begin(mp3Serial); delay(1000); mp3.setVolume(20); Serial.println("Playing track 1..."); mp3.play(currentTrack); lastTrackTime = millis(); } void loop() { // After trackDuration, play the next track if (millis() - lastTrackTime >= trackDuration) { currentTrack++; if (currentTrack > totalTracks) currentTrack = 1; // Loop back to first track Serial.print("Playing track "); Serial.println(currentTrack); mp3.play(currentTrack); lastTrackTime = millis(); } }

ESP32 Code — Volume Buttons

/* * DIYables Mini Mp3 Player - Volume Control * * Product: DIYables Mini Mp3 Player Module * https://diyables.io/products/mini-mp3-player-module * * Use two buttons to increase/decrease the volume. * Press button on pin GPIO1 to volume up, pin GPIO3 to volume down. * * Wiring (Arduino Uno): * Mini Mp3 RX -> ESP32 pin GPIO26 * Mini Mp3 TX -> ESP32 pin GPIO25 * Mini Mp3 VCC -> 5V * Mini Mp3 GND -> GND * Speaker connected to SPK_1 and SPK_2 pins * Button UP -> Pin GPIO1 (other leg to GND) * Button DOWN -> Pin GPIO3 (other leg to GND) * * SD Card: Put mp3 files in root, named 001.mp3, 002.mp3, etc. */ #include <DIYables_MiniMp3.h> #include <SoftwareSerial.h> SoftwareSerial mp3Serial(25, 26); // RX, TX DIYables_MiniMp3 mp3; const int BUTTON_VOL_UP = 1; const int BUTTON_VOL_DOWN = 3; int volume = 15; // Start at half volume void setup() { Serial.begin(9600); mp3Serial.begin(9600); pinMode(BUTTON_VOL_UP, INPUT_PULLUP); pinMode(BUTTON_VOL_DOWN, INPUT_PULLUP); mp3.begin(mp3Serial); delay(1000); mp3.setVolume(volume); mp3.loopTrack(1); // Play track 1 on repeat Serial.print("Volume: "); Serial.println(volume); } void loop() { // Volume Up button (pressed = LOW because of INPUT_PULLUP) if (digitalRead(BUTTON_VOL_UP) == LOW) { if (volume < 30) { volume++; mp3.setVolume(volume); Serial.print("Volume: "); Serial.println(volume); } delay(200); // Simple debounce } // Volume Down button if (digitalRead(BUTTON_VOL_DOWN) == LOW) { if (volume > 0) { volume--; mp3.setVolume(volume); Serial.print("Volume: "); Serial.println(volume); } delay(200); // Simple debounce } }

Volume API

Method Action Example
setVolume(v) Jump to level v mp3.setVolume(20)
volumeUp() Increment by 1 mp3.volumeUp()
volumeDown() Decrement by 1 mp3.volumeDown()
getVolume() Read current level mp3.getVolume()

ESP32 Code — Next/Previous

/* * DIYables Mini Mp3 Player - Next/Previous with Buttons * * Product: DIYables Mini Mp3 Player Module * https://diyables.io/products/mini-mp3-player-module * * Use two buttons to play next/previous tracks. * Displays the current track number on the Serial Monitor. * * Wiring (Arduino Uno): * Mini Mp3 RX -> ESP32 pin GPIO26 * Mini Mp3 TX -> ESP32 pin GPIO25 * Mini Mp3 VCC -> 5V * Mini Mp3 GND -> GND * Speaker connected to SPK_1 and SPK_2 pins * Button NEXT -> Pin GPIO1 (other leg to GND) * Button PREV -> Pin GPIO3 (other leg to GND) * * SD Card: Put mp3 files in root, named 001.mp3, 002.mp3, etc. */ #include <DIYables_MiniMp3.h> #include <SoftwareSerial.h> SoftwareSerial mp3Serial(25, 26); // RX, TX DIYables_MiniMp3 mp3; const int BUTTON_NEXT = 1; const int BUTTON_PREV = 3; void setup() { Serial.begin(9600); mp3Serial.begin(9600); pinMode(BUTTON_NEXT, INPUT_PULLUP); pinMode(BUTTON_PREV, INPUT_PULLUP); mp3.begin(mp3Serial); delay(1000); mp3.setVolume(20); mp3.play(1); // Start with track 1 Serial.println("Press NEXT or PREV button to change track"); } void loop() { if (digitalRead(BUTTON_NEXT) == LOW) { Serial.println("Next track"); mp3.playNext(); delay(300); // Simple debounce } if (digitalRead(BUTTON_PREV) == LOW) { Serial.println("Previous track"); mp3.playPrevious(); delay(300); // Simple debounce } }

ESP32 Code — Pause/Resume

/* * DIYables Mini Mp3 Player - Pause and Resume * * Product: DIYables Mini Mp3 Player Module * https://diyables.io/products/mini-mp3-player-module * * Demonstrates pausing and resuming playback using a single button. * Press the button to toggle between pause and resume. * * Wiring (Arduino Uno): * Mini Mp3 RX -> ESP32 pin GPIO26 * Mini Mp3 TX -> ESP32 pin GPIO25 * Mini Mp3 VCC -> 5V * Mini Mp3 GND -> GND * Speaker connected to SPK_1 and SPK_2 pins * Button -> Pin GPIO1 (other leg to GND) * * SD Card: Put mp3 files in root, named 001.mp3, 002.mp3, etc. */ #include <DIYables_MiniMp3.h> #include <SoftwareSerial.h> SoftwareSerial mp3Serial(25, 26); // RX, TX DIYables_MiniMp3 mp3; const int BUTTON_PIN = 1; bool paused = false; void setup() { Serial.begin(9600); mp3Serial.begin(9600); pinMode(BUTTON_PIN, INPUT_PULLUP); mp3.begin(mp3Serial); delay(1000); mp3.setVolume(20); mp3.play(1); Serial.println("Playing. Press button to pause/resume."); } void loop() { if (digitalRead(BUTTON_PIN) == LOW) { if (paused) { mp3.resume(); Serial.println("Resumed"); } else { mp3.pause(); Serial.println("Paused"); } paused = !paused; delay(300); // Simple debounce } }

ESP32 Code — Loop a Track

/* * DIYables Mini Mp3 Player - Loop Track * * Product: DIYables Mini Mp3 Player Module * https://diyables.io/products/mini-mp3-player-module * * Loops (repeats) a track continuously with EQ setting. * * Wiring (Arduino Uno): * Mini Mp3 RX -> ESP32 pin GPIO26 * Mini Mp3 TX -> ESP32 pin GPIO25 * Mini Mp3 VCC -> 5V * Mini Mp3 GND -> GND * Speaker connected to SPK_1 and SPK_2 pins * * SD Card file structure: * /001.mp3 * /002.mp3 * ... */ #include <DIYables_MiniMp3.h> #include <SoftwareSerial.h> SoftwareSerial mp3Serial(25, 26); // RX, TX DIYables_MiniMp3 mp3; void setup() { Serial.begin(9600); mp3Serial.begin(9600); mp3.begin(mp3Serial); delay(1000); // Wait for the module to initialize mp3.setVolume(25); // Volume: 0 to 30 mp3.setEQ(DIYables_MiniMp3::EQ_NORMAL); Serial.println("Playing track 1 on loop..."); mp3.loopTrack(1); } void loop() { // Your code here }

Repeat & Shuffle

Method Behavior Example
loopTrack(n) Endlessly repeat track n mp3.loopTrack(1)
loopFolder(f) Repeat all tracks in folder f mp3.loopFolder(1)
loopAll() Repeat all tracks mp3.loopAll()
stopLoop() Cancel active loop mp3.stopLoop()
shuffle() Randomize playback mp3.shuffle()

ESP32 Code — Folder Playback

/* * DIYables Mini Mp3 Player - Play from Folder * * Product: DIYables Mini Mp3 Player Module * https://diyables.io/products/mini-mp3-player-module * * Plays tracks from specific folders on the SD card. * * Wiring (Arduino Uno): * Mini Mp3 RX -> ESP32 pin GPIO26 * Mini Mp3 TX -> ESP32 pin GPIO25 * Mini Mp3 VCC -> 5V * Mini Mp3 GND -> GND * Speaker connected to SPK_1 and SPK_2 pins * * SD Card file structure: * /01/001.mp3 <- playFolder(1, 1) * /01/002.mp3 <- playFolder(1, 2) * /02/001.mp3 <- playFolder(2, 1) * /02/002.mp3 <- playFolder(2, 2) * * IMPORTANT: * - Numbering starts from 1, NOT 0 * - Folder names must be 2-digit zero-padded (01-99) * - Track names must be 3-digit zero-padded (001-255) * - Format SD card as FAT32, then copy files one by one in order * - Track order is determined by the order files were copied, * NOT by filename. So copy them in the correct sequence. */ #include <DIYables_MiniMp3.h> #include <SoftwareSerial.h> SoftwareSerial mp3Serial(25, 26); // RX, TX DIYables_MiniMp3 mp3; void setup() { Serial.begin(9600); mp3Serial.begin(9600); mp3.begin(mp3Serial); delay(1000); mp3.setVolume(20); // Play track 1 from folder 01 Serial.println("Playing folder 01, track 001..."); mp3.playFolder(1, 1); delay(5000); // Play track 2 from folder 01 Serial.println("Playing folder 01, track 002..."); mp3.playFolder(1, 2); delay(5000); // Play track 1 from folder 02 Serial.println("Playing folder 02, track 001..."); mp3.playFolder(2, 1); } void loop() { // Nothing to do here }

Folder API

Method Description Example
playFolder(f, t) Play track t from folder f mp3.playFolder(1, 1)
playLargeFolder(f, t) Large folder (15 folders, 3000 tracks) mp3.playLargeFolder(1, 2000)
playFromMP3Folder(t) Play from /mp3 folder mp3.playFromMP3Folder(1)

ESP32 Code — Serial Monitor Control

/* * DIYables Mini Mp3 Player - Serial Command Control * * Product: DIYables Mini Mp3 Player Module * https://diyables.io/products/mini-mp3-player-module * * Control the Mp3 player by typing commands in the Serial Monitor. * Great for testing all functions without extra hardware. * * Commands (type in Serial Monitor, then press Enter): * 1-9 Play track 1 to 9 * + Volume up * - Volume down * p Pause * r Resume * s Stop * n Next track * b Previous track (back) * ? Show current status * * Wiring (Arduino Uno): * Mini Mp3 RX -> ESP32 pin GPIO26 * Mini Mp3 TX -> ESP32 pin GPIO25 * Mini Mp3 VCC -> 5V * Mini Mp3 GND -> GND * Speaker connected to SPK_1 and SPK_2 pins * * SD Card: Put mp3 files in root, named 001.mp3, 002.mp3, etc. */ #include <DIYables_MiniMp3.h> #include <SoftwareSerial.h> SoftwareSerial mp3Serial(25, 26); // RX, TX DIYables_MiniMp3 mp3; void setup() { Serial.begin(9600); mp3Serial.begin(9600); mp3.begin(mp3Serial); delay(1000); mp3.setVolume(20); Serial.println("=== DIYables Mini Mp3 Player ==="); Serial.println("Commands:"); Serial.println(" 1-9 Play track number"); Serial.println(" + Volume up"); Serial.println(" - Volume down"); Serial.println(" p Pause"); Serial.println(" r Resume"); Serial.println(" s Stop"); Serial.println(" n Next track"); Serial.println(" b Previous track"); Serial.println(" ? Show status"); Serial.println("================================"); } void loop() { if (Serial.available()) { char cmd = Serial.read(); switch (cmd) { case '1': case '2': case '3': case '4': case '5': case '6': case '7': case '8': case '9': Serial.print("Playing track "); Serial.println(cmd - '0'); mp3.play(cmd - '0'); break; case '+': Serial.println("Volume up"); mp3.volumeUp(); break; case '-': Serial.println("Volume down"); mp3.volumeDown(); break; case 'p': Serial.println("Paused"); mp3.pause(); break; case 'r': Serial.println("Resumed"); mp3.resume(); break; case 's': Serial.println("Stopped"); mp3.stop(); break; case 'n': Serial.println("Next track"); mp3.playNext(); break; case 'b': Serial.println("Previous track"); mp3.playPrevious(); break; case '?': { Serial.println("--- Status ---"); int16_t vol = mp3.getVolume(); Serial.print("Volume: "); Serial.println(vol); int16_t track = mp3.getCurrentTrack(); Serial.print("Current track: "); Serial.println(track); bool playing = mp3.isPlaying(); Serial.print("Playing: "); Serial.println(playing ? "Yes" : "No"); int16_t total = mp3.getTrackCount(); Serial.print("Total tracks: "); Serial.println(total); Serial.println("--------------"); break; } default: break; } } }
Command Effect
1–9 Play track
+ / − Volume
p / r / s Pause / Resume / Stop
n / b Next / Previous
? Status

Equalizer Options

Constant ID Character
DIYables_MiniMp3EQ_NORMAL 0 Neutral
DIYables_MiniMp3EQ_POP 1 Bright
DIYables_MiniMp3EQ_ROCK 2 Punchy
DIYables_MiniMp3EQ_JAZZ 3 Warm
DIYables_MiniMp3EQ_CLASSIC 4 Balanced
DIYables_MiniMp3EQ_BASS 5 Deep
mp3.setEQ(DIYables_MiniMp3::EQ_BASS);

Checking Module Status

These functions block for up to 100 ms while waiting for the module's reply. They return −1 if no response arrives.

Function Return Description
isPlaying() bool true during active playback
getVolume() int16_t Current volume (0–30)
getEQ() int16_t Active EQ (0–5)
getTrackCount() int16_t Total tracks on SD
getCurrentTrack() int16_t Track number playing now
getFolderCount() int16_t Total folders on SD
getTrackCountInFolder(f) int16_t Tracks in folder f

※ OUR MESSAGES