DIYables ESP32 Web Apps Web Table
Overview
The WebTable example provides a web-based two-column data table interface for displaying real-time information from your ESP32 projects. Designed for ESP32 educational platform with advanced data visualization capabilities, intelligent value change highlighting, and seamless integration with the educational ecosystem.
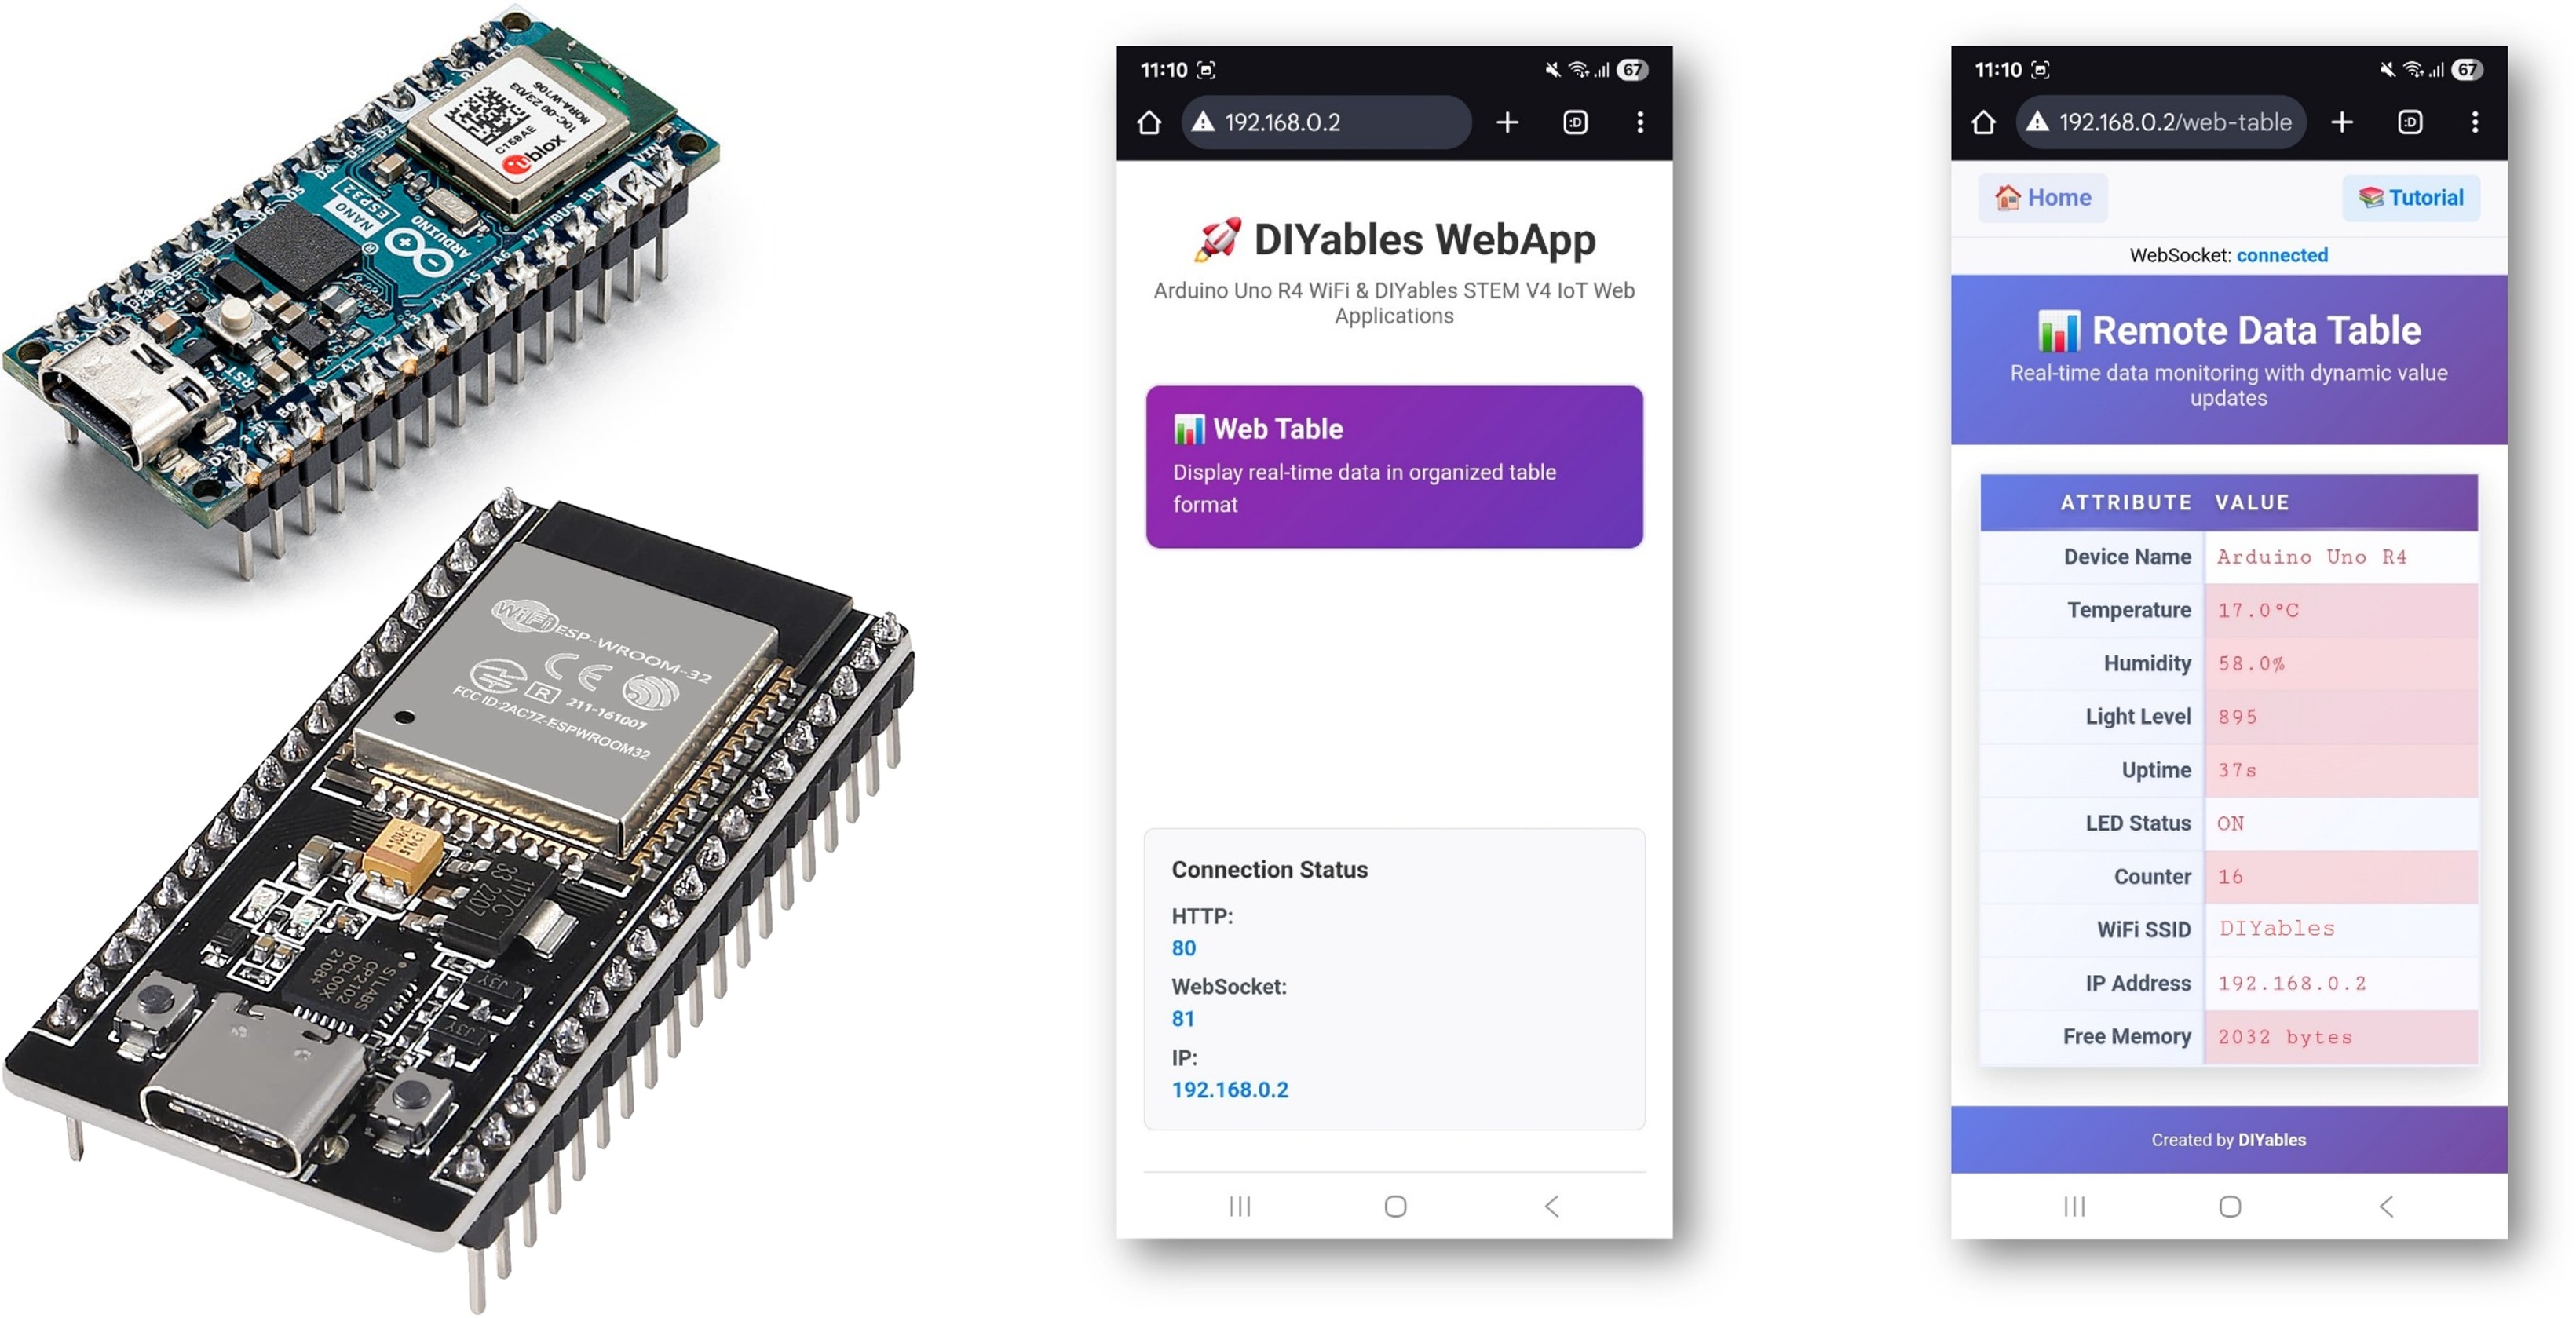
Key Features
Core Functionality
- Two-Column Data Table: Clean attribute-value pairs for organized data display
- Real-time Value Updates: WebSocket-based instant data refresh without page reload
- Memory Efficient Design: No value storage in ESP32 memory - all tracking in web interface
- Dynamic Configuration: Set up table structure once in ESP32 setup() function
- Interactive Controls: Refresh button for manual data requests and auto-reconnect capability
Intelligent Highlighting System
- Smart Change Detection: Automatically detects which values actually change over time
- Automatic Value Tracking: Compares current vs previous values automatically
- Dual-Level Highlighting:
- Red highlighting: For values that are actively changing
- Blue highlighting: For values that remain stable over time
- No Setup Required: System automatically learns which values change without any configuration
- Visual Feedback: Smooth animations provide clear visual feedback for value updates
Modern Web Interface
- Responsive Design: Works seamlessly on desktop, tablet, and mobile devices
- Professional Styling: Card-style layout with hover effects and modern aesthetics
- Connection Status: Visual indicators for WebSocket connection state
- Footer Integration: Consistent styling matching other DIYables web apps
- Empty State Handling: User-friendly messages when no data is available
Hardware Used In This Tutorial
Or you can buy the following kits:
| 1 | × | DIYables ESP32 Starter Kit (ESP32 included) | |
| 1 | × | DIYables Sensor Kit (30 sensors/displays) | |
| 1 | × | DIYables Sensor Kit (18 sensors/displays) |
Setup Instructions
Quick Instructions
Follow these instructions step by step:
- If this is your first time using the ESP32, refer to the tutorial on setting up the environment for ESP32 in the Arduino IDE.
- Connect the ESP32 board to your computer using a USB cable.
- Launch the Arduino IDE on your computer.
- Select the appropriate ESP32 board (e.g. ESP32 Dev Module) and COM port.
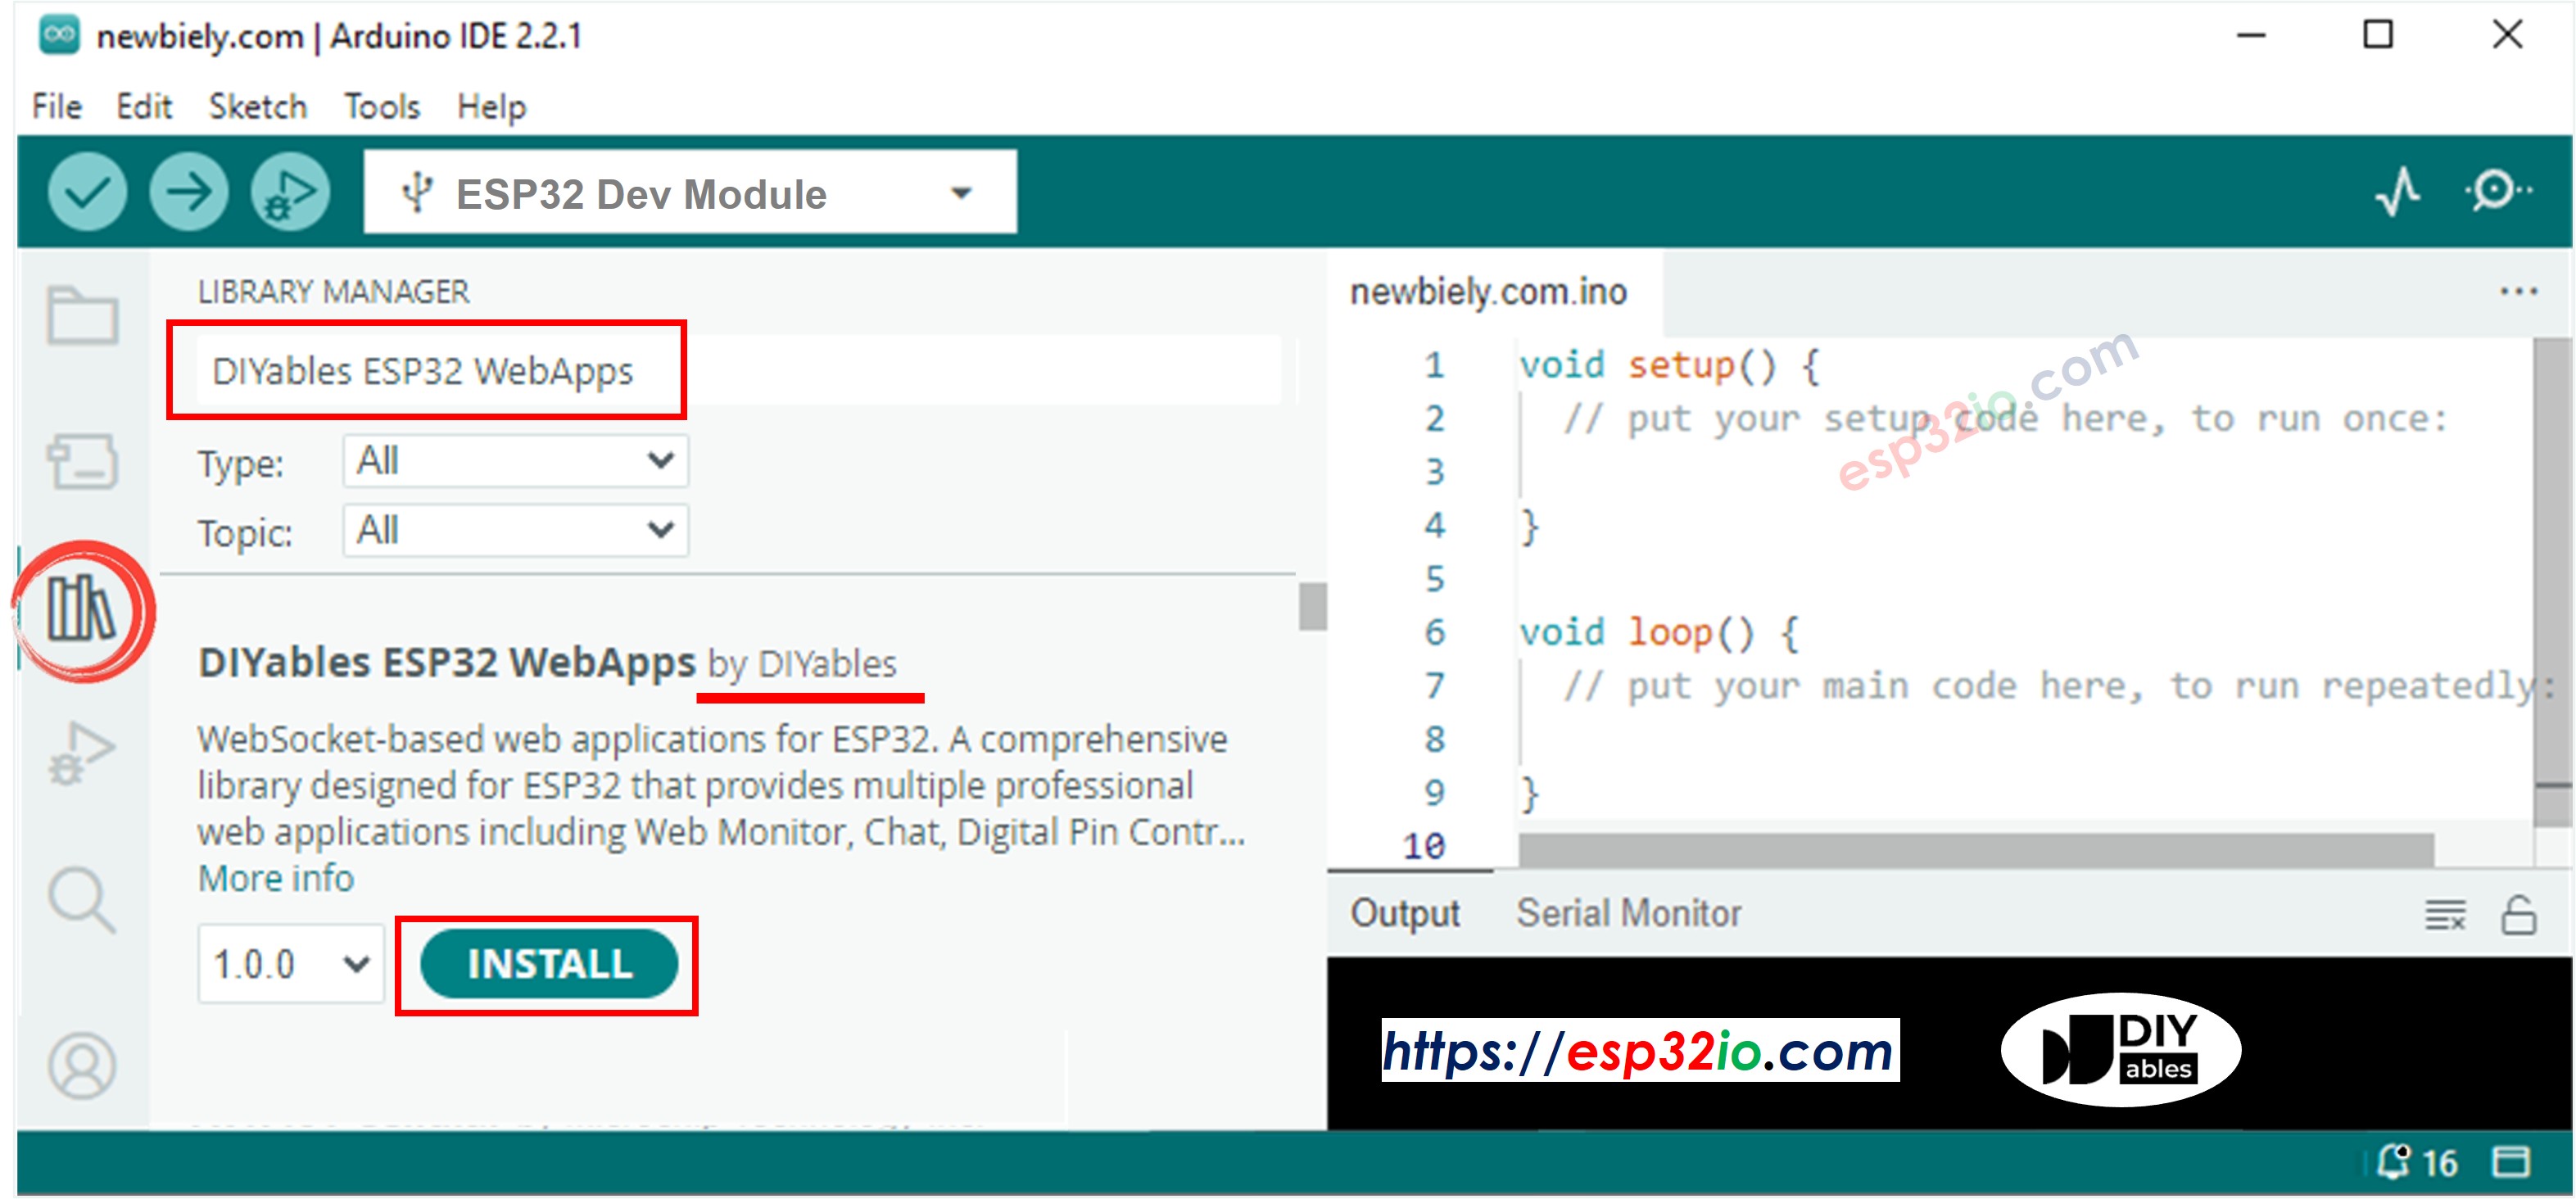
- Navigate to the Libraries icon on the left bar of the Arduino IDE.
- Search "DIYables ESP32 WebApps", then find the DIYables ESP32 WebApps Library by DIYables
- Click Install button to install the library.
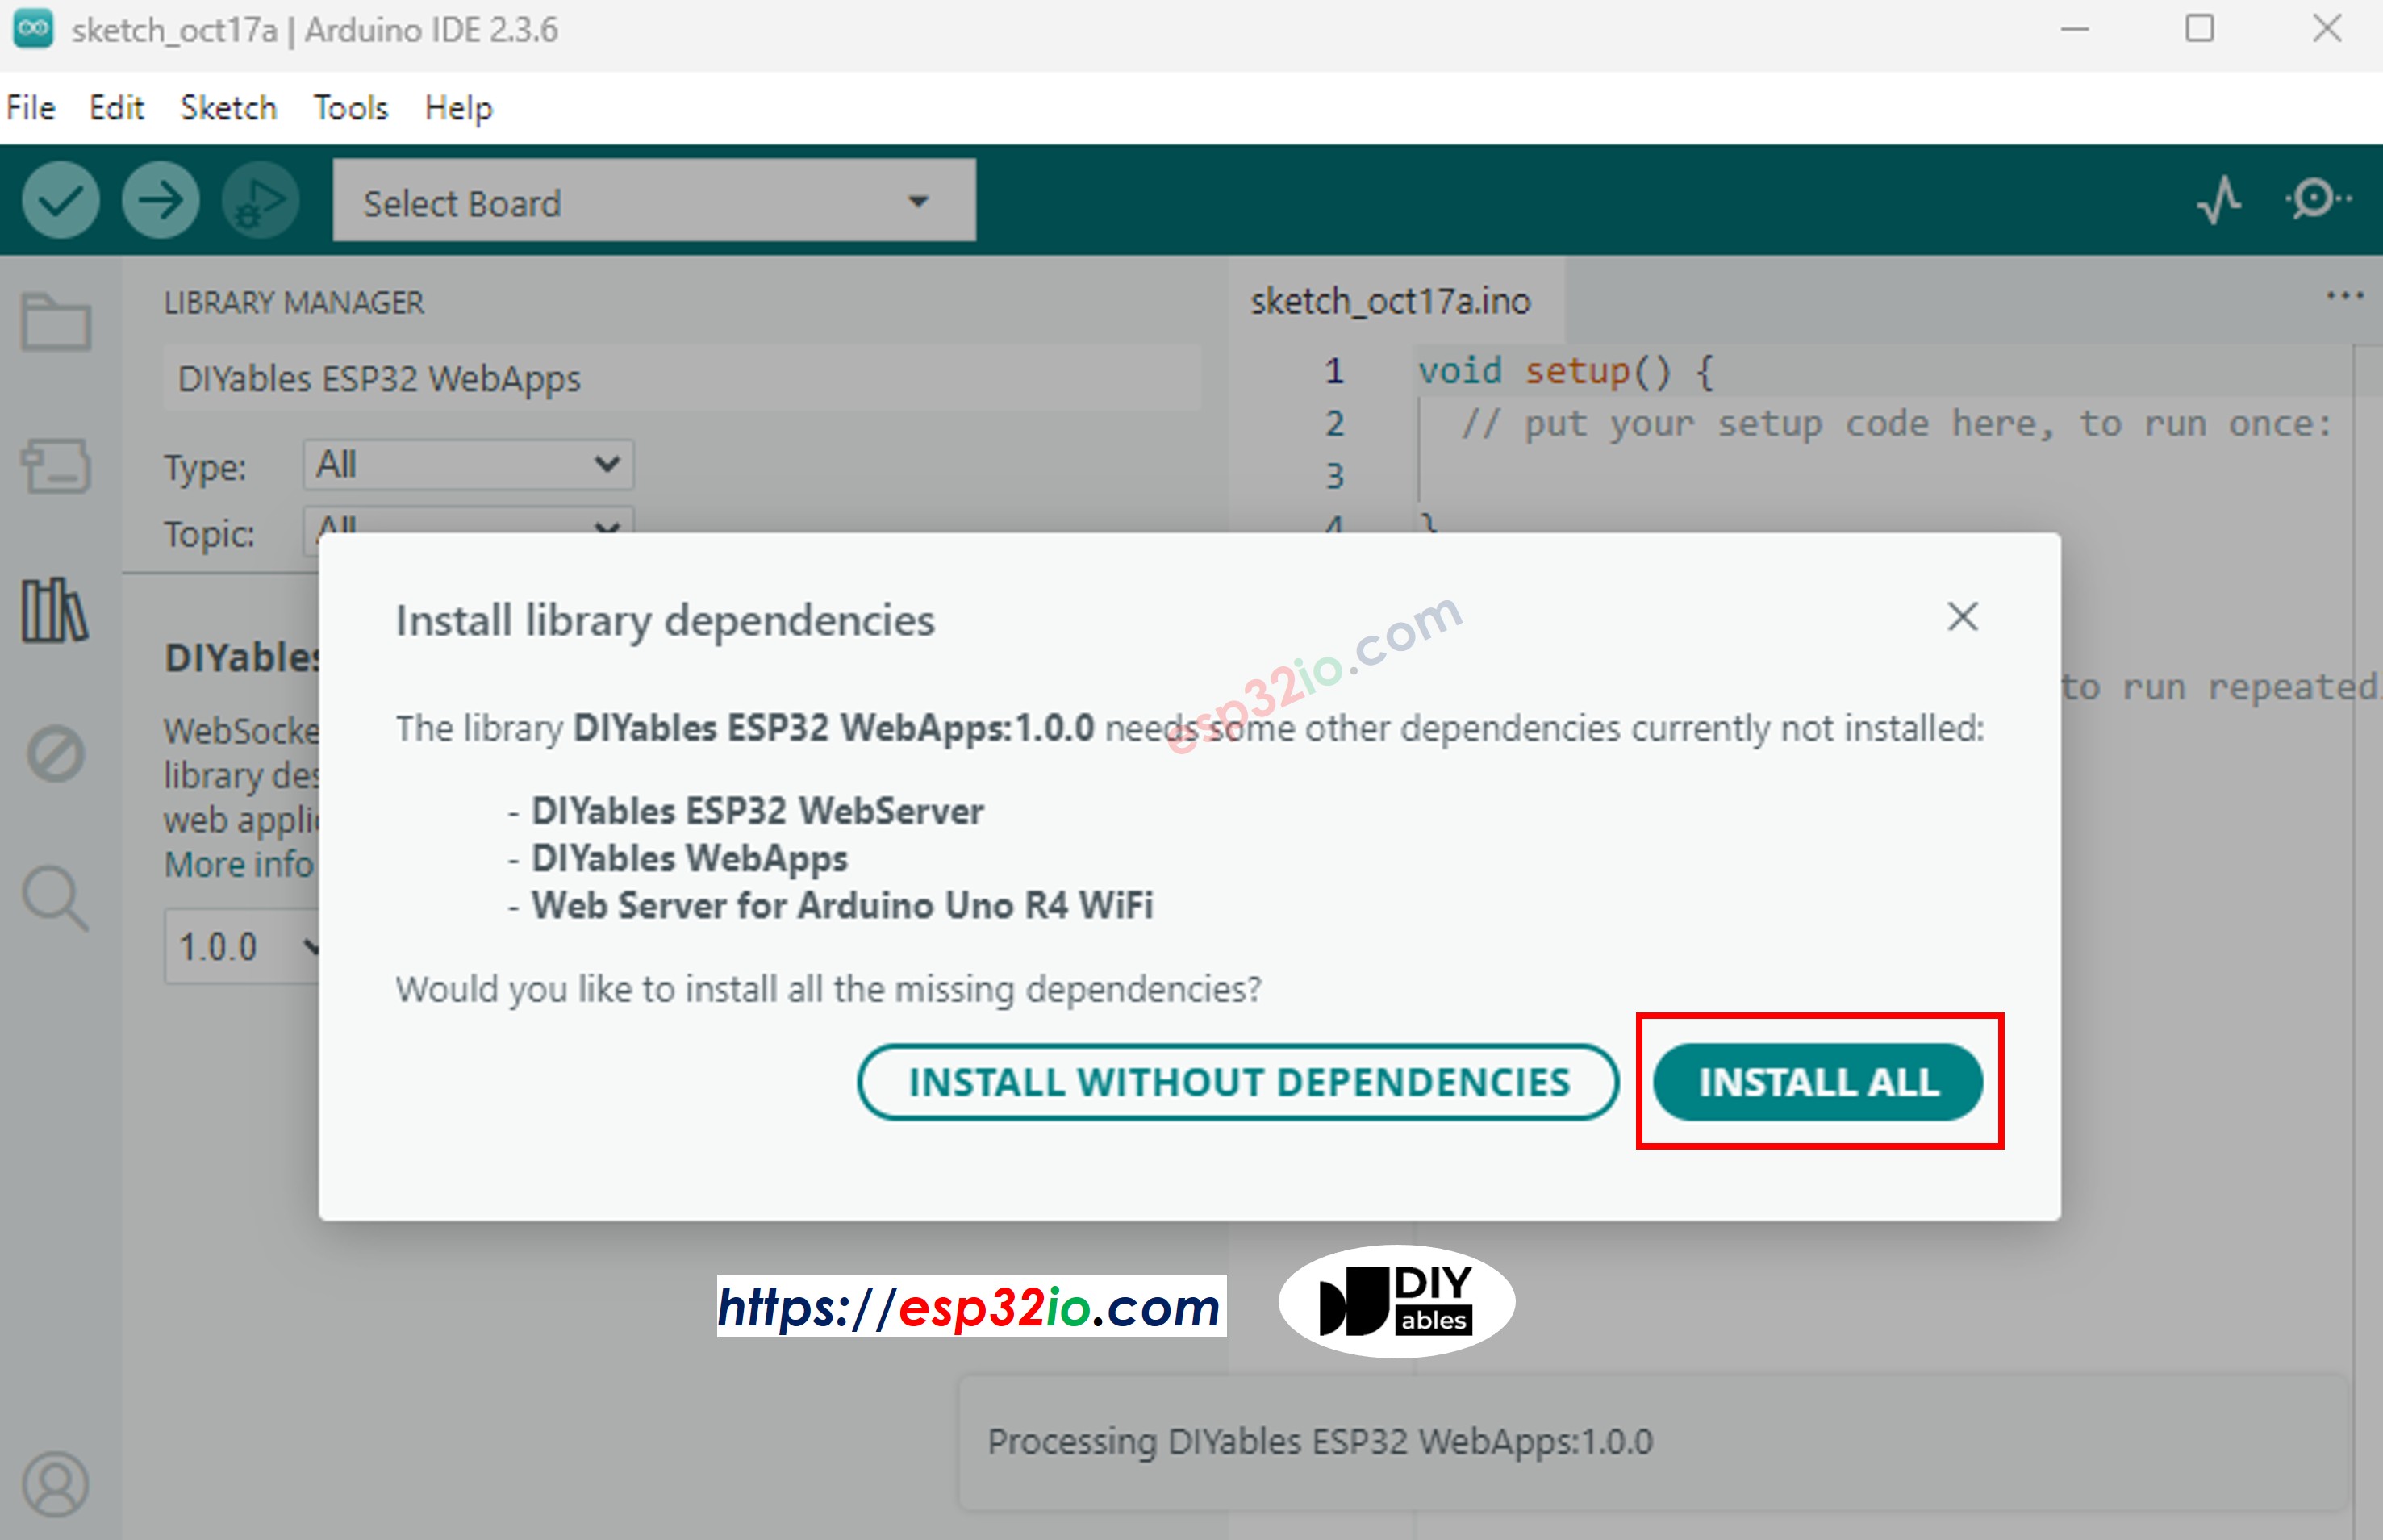
- You will be asked for installing some other library dependencies
- Click Install All button to install all library dependencies.
- On Arduino IDE, Go to File Examples DIYables ESP32 WebApps WebTable example, or copy the code and paste it to the editor of Arduino IDE
WiFi Configuration
Configure WiFi credentials in the code by updating these lines:
- Click Upload button on Arduino IDE to upload code to ESP32
- Open the Serial Monitor
- Check out the result on Serial Monitor. It looks like the below
- If you do not see anything, reboot ESP32 board.
Using the Web Interface
- Open a web browser on your computer or mobile device connected to the same WiFi network
- Type the IP address shown in the Serial Monitor to the web browser
- Example: http://192.168.1.100
- You will see the home page like below image:
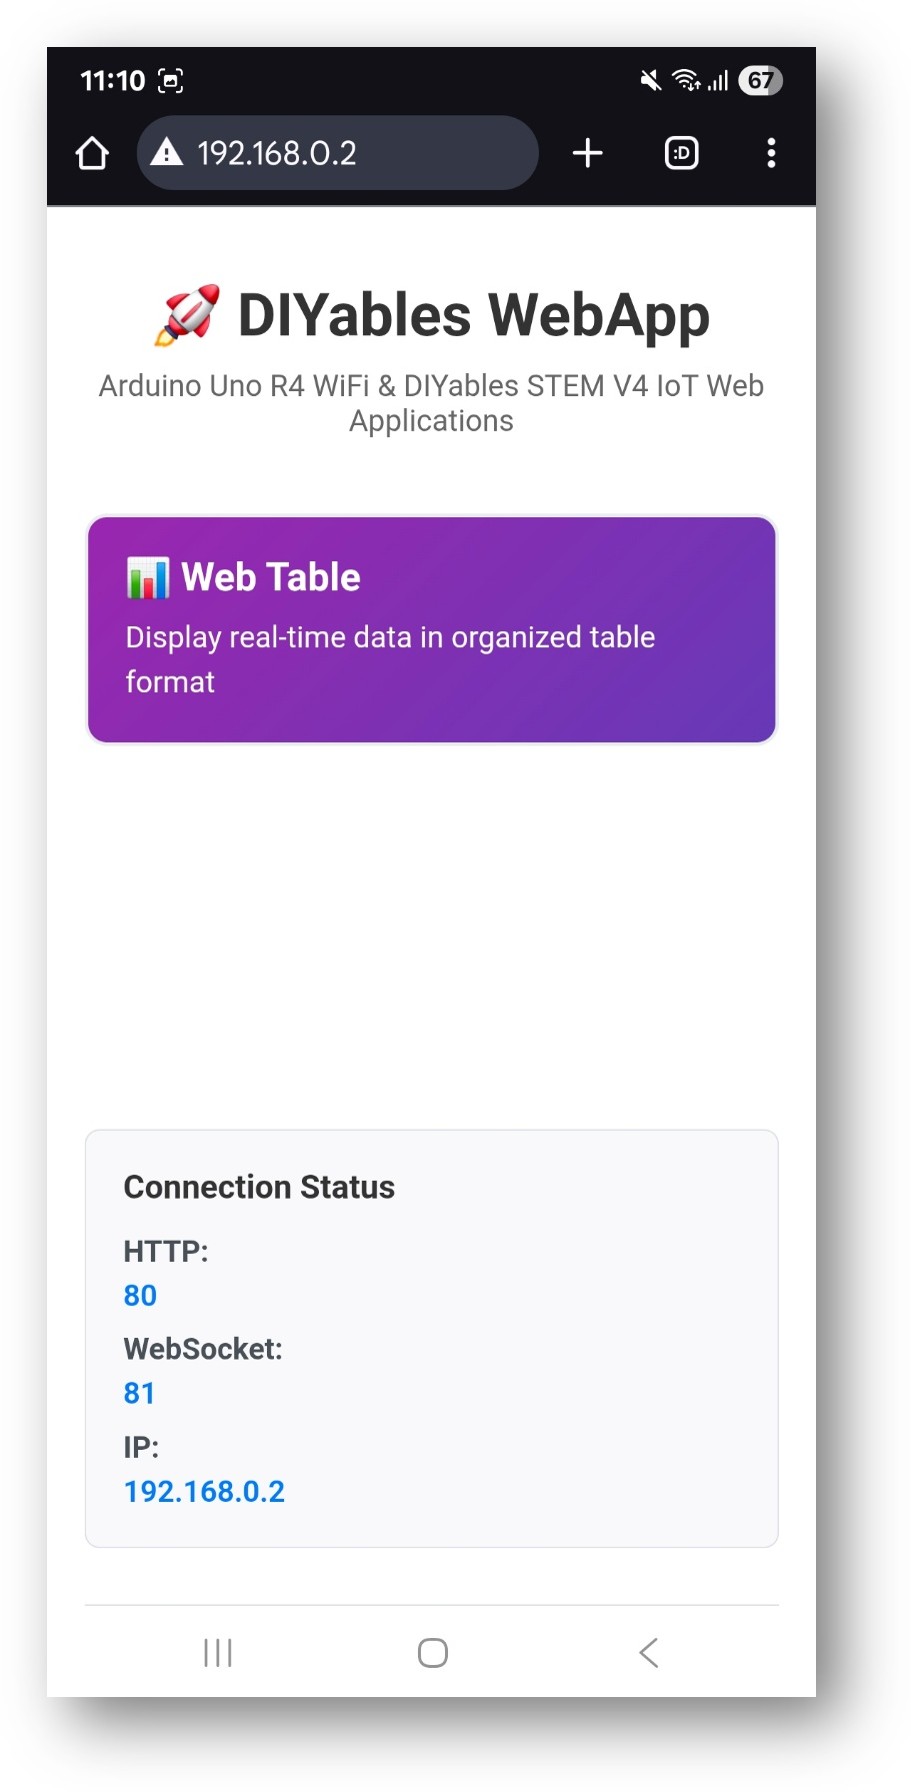
- Click to the Web Table link, you will see the Web Table app's UI like the below:
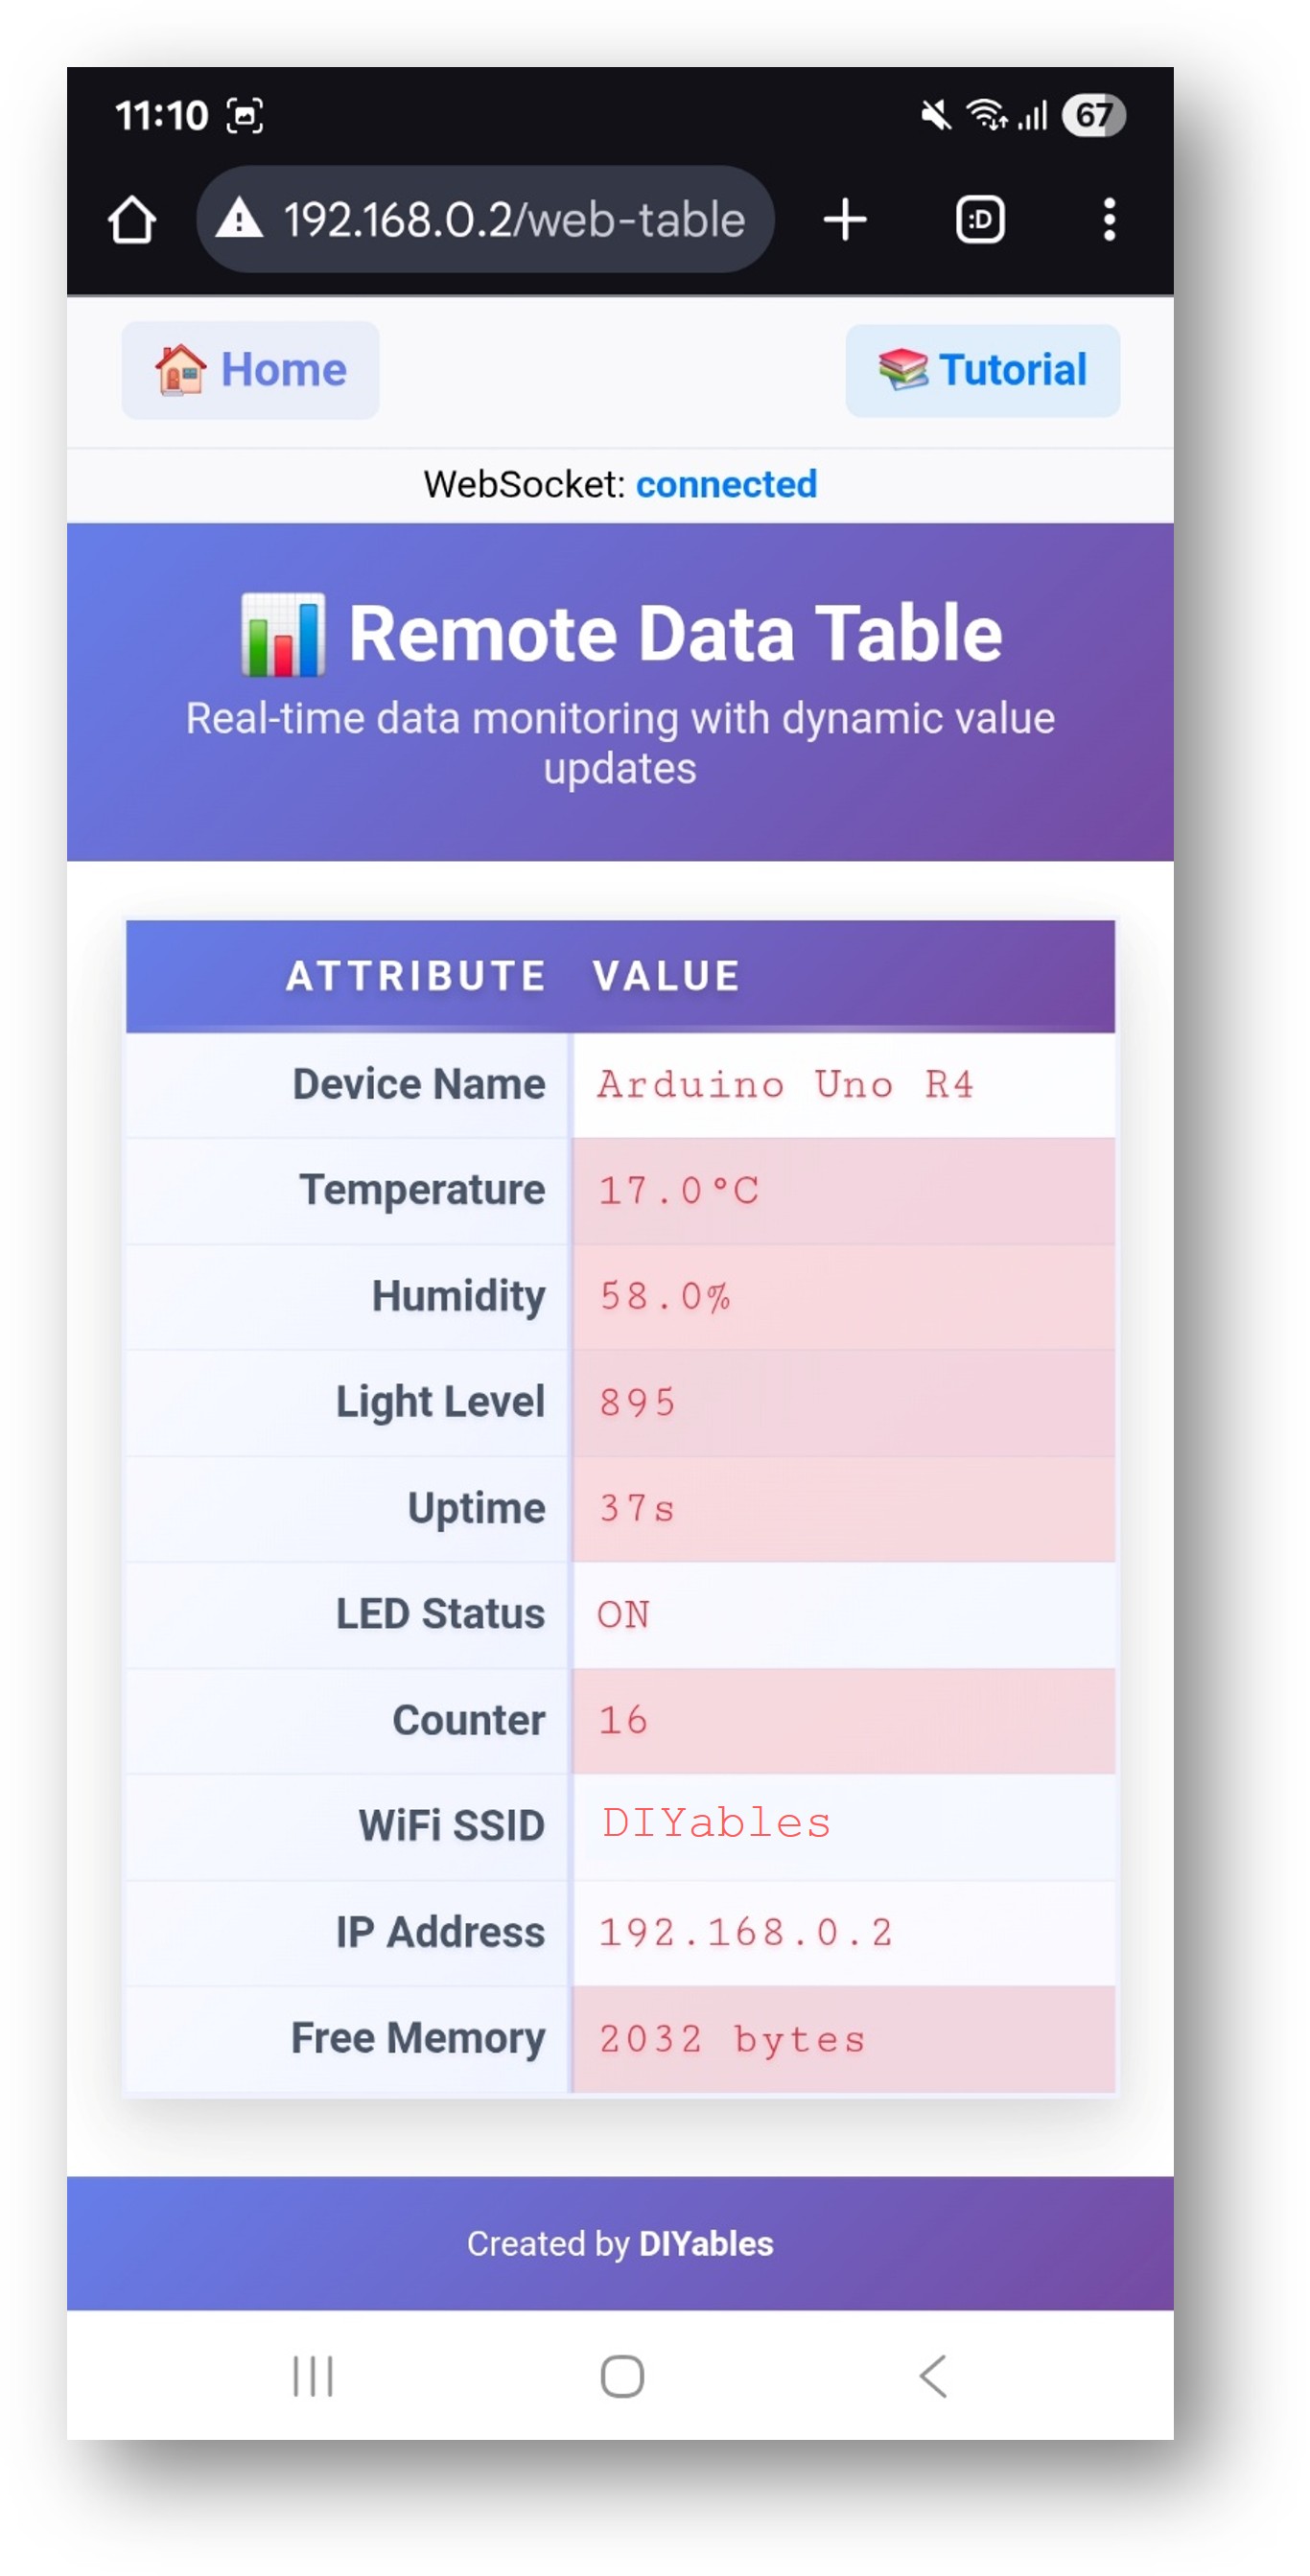
- Or you can also access the page directly by IP address followed by /web-table. For example: http://192.168.1.100/web-table
- You will see the Web Table interface showing:
- Real-time Data Table: Two-column table with attributes and their current values
- Intelligent Highlighting: Automatic color-coding of changing vs stable values
- Connection Status: Visual indicator showing WebSocket connection state
- Refresh Button: Manual refresh capability for latest data
- Automatic Updates: Values update in real-time via WebSocket
Intelligent Highlighting System
How It Works
The WebTable features an advanced highlighting system that automatically detects which values change over time without requiring any configuration in your ESP32 code.
Automatic Change Detection
The web interface automatically tracks your data and provides visual feedback:
- Red highlighting: Applied to values that change frequently (like sensor readings, counters, timers)
- Blue highlighting: Applied to values that remain stable (like device names, IP addresses, configuration settings)
- No setup required: The system learns automatically as your ESP32 sends updates
What You See
- Values that change over time (temperature, uptime, sensor readings) will be highlighted in red
- Static information (device name, WiFi SSID, IP address) will be highlighted in blue
- This helps you quickly identify which data is actively changing vs stable information
Key Benefits
- No Configuration Required: Just use sendValueUpdate() and highlighting works automatically
- Visual Learning: Easily see which parts of your system are active
- Beginner Friendly: Works without any web programming knowledge
- Memory Efficient: All highlighting happens in the web browser, not on your Arduino
- Real-time Updates: Highlighting changes immediately as values update
Table Structure Configuration
The table structure is configured once in the setup() function using the addRow() method:
Real-time Value Updates
Values are updated during runtime using sendValueUpdate() method:
Direct Update Method (Recommended)
Benefits of Direct Updates
- Memory Efficient: No value storage in ESP32 memory
- Real-time: Instant updates to web interface
- Automatic Highlighting: Web interface automatically detects changes
- Simplified Code: No need to manage local value storage
Code Explanation
Key Components
Setup Function
Real-time Updates in Loop
Callback Function
Value Update Functions
API Methods
DIYablesWebTablePage Class Methods
addRow(attribute, initialValue)
- Adds a new row to the table structure
- Parameters:
- attribute: String - The attribute name (left column)
- initialValue: String - Initial value (right column, optional)
- Usage: Called in setup() to configure table structure
updateValue(attribute, value)
- Updates a value by attribute name (local storage only)
- Parameters:
- attribute: String - The attribute name to update
- value: String - New value to set
- Usage: Updates local table data
updateValue(index, value)
- Updates a value by row index (local storage only)
- Parameters:
- index: int - Row index (0-based)
- value: String - New value to set
- Usage: Updates local table data by position
sendValueUpdate(attribute, value)
- Sends value update to web clients by attribute name
- Parameters:
- attribute: String - The attribute name to update
- value: String - New value to send
- Usage: Real-time update to web interface
sendValueUpdate(index, value)
- Sends value update to web clients by row index
- Parameters:
- index: int - Row index (0-based)
- value: String - New value to send
- Usage: Real-time update to web interface by position
sendTableData()
- Sends complete table data to web clients
- Usage: Refresh entire table on web interface
clearTable()
- Clears all table data and resets row count
- Usage: Reset table structure (rarely needed)
getRowCount()
- Returns the number of rows in the table
- Returns: int - Current row count
- Usage: Get table size information
getAttribute(index)
- Gets attribute name by row index
- Parameters: index: int - Row index (0-based)
- Returns: String - Attribute name
- Usage: Access table structure information
getValue(index)
- Gets value by row index
- Parameters: index: int - Row index (0-based)
- Returns: String - Current value
- Usage: Access current table values
onTableValueRequest(callback)
- Sets callback function for data requests from web clients
- Parameter: void (*callback)() - Function to call when data is requested
- Usage: Handle web client data requests
WebSocket Communication
Messages from Web to Arduino
- TABLE:GET_DATA - Request complete table data
- TABLE:UPDATE:attribute:value - Update value for specific attribute
Messages from ESP32 to Web
- TABLE_DATA:attr1:val1|attr2:val2|... - Send complete table data
- VALUE_UPDATE:attribute:value - Send single value update
Troubleshooting
Common Issues
1. Table Not Displaying Data
- Issue: Empty table or "No Data Available" message
- Cause: Table structure not configured or WiFi connection issues
- Solution:
- Verify setupTableStructure() is called in setup()
- Check WiFi connection status
- Click refresh button to manually request data
- Check Serial Monitor for error messages
- Issue: Table shows old values despite ESP32 updates
- Cause: WebSocket connection lost or update functions not called
- Solution:
- Check connection status indicator on web page
- Refresh the web page
- Verify sendValueUpdate() is called properly
- Check network stability
- Issue: Values don't show red or blue highlighting
- Cause: JavaScript not detecting value changes properly
- Solution:
- Refresh the web page to reset change detection
- Ensure values are actually changing (check Serial Monitor)
- Clear browser cache if highlighting seems stuck
- Values need multiple updates to trigger highlighting system
- Issue: Error when clicking refresh button
- Cause: WebSocket connection failed
- Solution:
- Verify ESP32 IP address is correct
- Check if ESP32 is on same WiFi network
- Restart ESP32 and refresh web page
- Check firewall settings
- Issue: Error when clicking refresh button
- Cause: WebSocket connection failed
- Solution:
- Verify ESP32 IP address is correct
- Check if ESP32 is on same WiFi network
- Restart ESP32 and refresh web page
- Check firewall settings
- Issue: Added/removed rows don't appear on web interface
- Cause: Table structure is configured in setup() only
- Solution:
- Restart ESP32 to apply structure changes
- Use clearTable() and addRow() if dynamic changes needed
- Refresh web page after ESP32 restart
2. Values Not Updating in Real-time
3. Highlighting Not Working
4. "Not connected to Arduino" Error
3. "Not connected to Arduino" Error
4. Table Structure Changes Not Reflected
Debug Tips
Enable Serial Debugging:
Monitor Value Updates:
Check Connection Status:
Advanced Usage Examples
Sensor Monitoring with Smart Highlighting
System Status Dashboard
Conditional Status Updates
Multiple Web Apps Integration
Applications and Use Cases
Educational Projects
- Sensor Monitoring: Display real-time sensor readings with automatic change highlighting
- System Status Dashboard: Show ESP32 system information with visual feedback
- IoT Data Visualization: Present live data with intelligent highlighting for active vs static values
- Learning Tool: Demonstrate data visualization and real-time communication concepts
Real-World Applications
- Environmental Monitoring: Temperature, humidity, air quality with change detection
- Home Automation: System status, device states, and operational parameters
- Industrial Monitoring: Equipment status, alerts, and performance metrics
- Agricultural Systems: Soil conditions, weather data, and irrigation status
Key Benefits for STEM Education
- Visual Learning: See which data changes over time through automatic highlighting
- Real-time Systems: Experience WebSocket communication and live data updates
- No Configuration Needed: Intelligent highlighting works automatically
- Modern Web Interface: Learn contemporary web development techniques
Technical Specifications
Memory Usage (Optimized Design)
- Flash Memory: ~8KB for WebTable functionality (including intelligent highlighting)
- SRAM Usage: ~1KB during operation (no value storage in Arduino)
- WebSocket Buffer: ~1KB for message handling
- Maximum Rows: 20 (configurable via MAX_TABLE_ROWS)
- Memory Efficiency: Values tracked in web browser, not ESP32 memory
Performance Characteristics
- Update Frequency: Real-time via WebSocket (no polling)
- Response Time: <50ms for value updates
- Highlighting Speed: Instant visual feedback on value changes
- Network Overhead: ~30-50 bytes per value update
- Change Detection: Automatic comparison of values over time
Intelligent Highlighting Features
- Automatic Detection: Identifies which values change over time without any setup
- Two-Level System: Red for changing values, blue for stable values
- No Configuration: Works without any manual setup or ESP32 coding
- Memory Efficient: All tracking done in web browser, not on Arduino
- Professional Appearance: Smooth animations provide clear visual feedback
Summary
The WebTable example demonstrates how to:
- Create structured data displays with attribute-value pairs
- Implement real-time value updates via WebSocket communication
- Utilize intelligent highlighting that automatically detects value changes
- Build memory-efficient systems without storing values in Arduino
- Configure table structure once in setup() for consistent organization
- Handle web client requests with automatic data refresh capabilities
- Provide visual feedback through smart change detection algorithms
- Create responsive web interfaces for modern data monitoring applications
Key Innovation: Intelligent Highlighting
The standout feature of this WebTable implementation is its intelligent highlighting system that:
- Learns automatically which values change without any hard-coding
- Adapts dynamically as data patterns change over time
- Provides visual feedback through two-level color coding
- Operates efficiently without consuming ESP32 memory
- Works universally for any type of data without configuration
This example is perfect for projects requiring organized data display, real-time monitoring dashboards with visual feedback, system status interfaces with automatic change detection, and educational demonstrations of advanced data visualization techniques in IoT applications.
