ESP32 - MQ3 Alcohol Sensor
This tutorial guides you through interfacing the MQ3 alcohol sensor with ESP32 to detect and measure ethanol and alcohol vapor concentrations in the surrounding air. The MQ3 sensor serves as a fundamental component for breathalyzer projects, alcohol detection systems, and air quality monitoring applications.
In this guide, we will cover:
- Connecting the MQ3 alcohol sensor to ESP32
- Programming ESP32 to read and interpret alcohol vapor levels
This tutorial shows how to program the ESP32 using the Arduino language (C/C++) via the Arduino IDE. If you’d like to learn how to program the ESP32 with MicroPython, visit this ESP32 MicroPython - MQ3 Alcohol Sensor tutorial.
Hardware Used In This Tutorial
Or you can buy the following kits:
| 1 | × | DIYables ESP32 Starter Kit (ESP32 included) | |
| 1 | × | DIYables Sensor Kit (18 sensors/displays) |
Introduction to MQ3 Alcohol Sensor
Classified as a Chemiresistor, the MQ3 utilizes Metal Oxide Semiconductor (MOS) technology to sense alcohol through resistance variations in its detection layer. This sensor demonstrates exceptional sensitivity to ethanol vapor across varying concentration levels.
The sensor's heart consists of Tin Dioxide (SnO2) coated onto an Aluminum Oxide ceramic substrate. Heating this material enables it to interact with alcohol molecules. A protective stainless steel mesh (anti-explosion screen) encases the sensor element, safeguarding the heating component while allowing gas diffusion into the sensing chamber.
Common applications include breathalyzer devices, DUI detection equipment, alcohol alarm systems, and environmental alcohol vapor monitoring.
Technical Specifications
- Operating Voltage: 5V DC
- Load Resistance: 200 KΩ
- Heater Resistance: 33Ω ± 5%
- Heating Consumption: < 800mW
- Sensing Resistance: 1 MΩ – 8 MΩ
- Detection Range: 25 – 500 ppm (parts per million)
- Preheat Time: 24-48 hours for first use
About ppm: Parts-per-million (ppm) expresses the concentration ratio of target molecules to total gas molecules. For instance, a 500 ppm reading means 500 alcohol molecules exist per 1,000,000 total molecules, with 999,500 being other atmospheric components.
Pinout
The MQ3 sensor module features four connection pins:
- VCC pin: Connect to +5V power supply.
- GND pin: Connect to ground (0V).
- DO pin: Digital output—goes LOW when alcohol exceeds threshold, HIGH otherwise. Adjust threshold via the onboard potentiometer.
- AO pin: Analog output—voltage varies with alcohol concentration. Higher alcohol produces higher voltage.
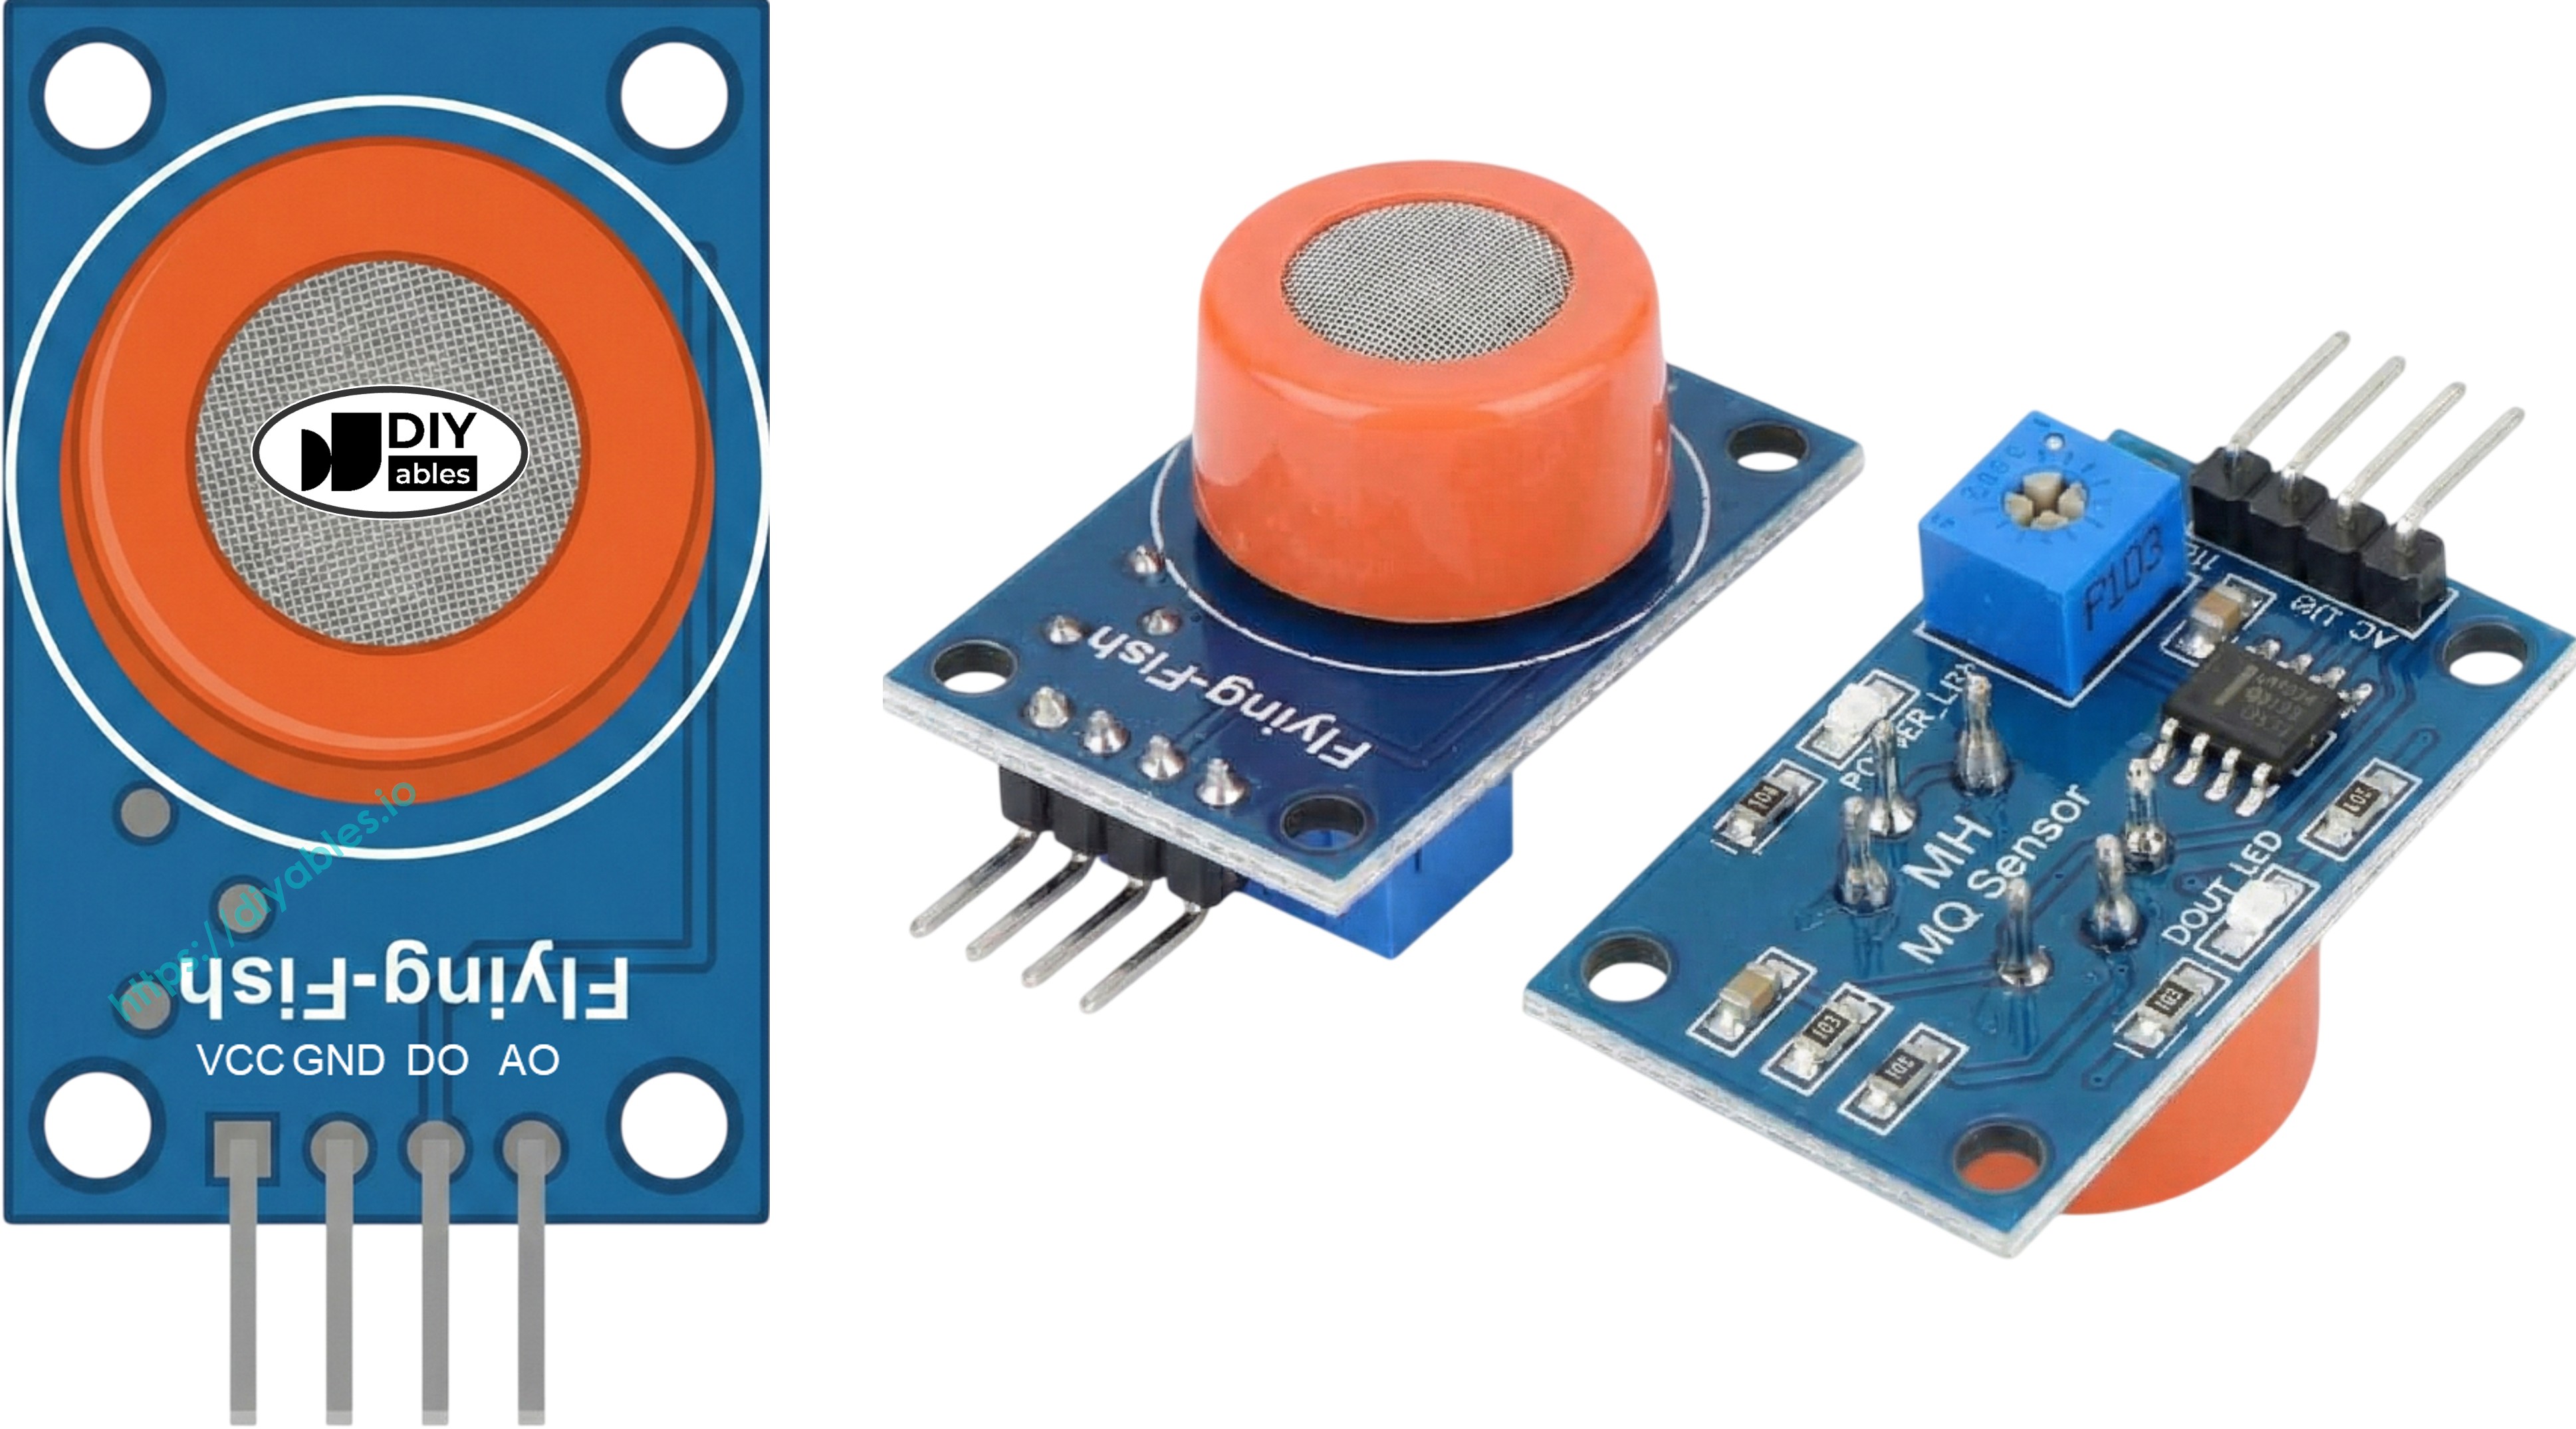
Visual indicators include two LEDs:
- PWR-LED: Lights up when the module receives power.
- DO-LED: Mirrors the digital output state—illuminates during alcohol detection, stays dark otherwise.
How It Works
The MQ3 operates through resistance changes in its Tin Dioxide (SnO2) semiconductor material:
Clean air state: Heating the SnO2 causes oxygen molecules to adhere to its surface, capturing electrons and forming a depletion layer. This electron capture creates a conductivity barrier, maintaining high resistance.
Alcohol presence: Alcohol molecules react with surface oxygen, breaking bonds and releasing trapped electrons back into the tin dioxide. This boosts conductivity—higher alcohol levels mean lower resistance.
The sensor provides two output modes:
Digital Output (DO pin):
- Threshold setting via onboard potentiometer.
- DO outputs LOW (LED on) when alcohol surpasses threshold.
- DO outputs HIGH (LED off) when alcohol stays below threshold.
Analog Output (AO pin):
- Voltage output proportional to alcohol concentration.
- Increased alcohol = increased voltage output.
- Decreased alcohol = decreased voltage output.
- Note: Potentiometer affects only digital output, not analog readings.
Warm-up and Calibration
Pre-heating Requirements
The MQ3 requires heating before producing accurate measurements:
- First use or long storage (30+ days): Maintain power for 24-48 hours for sensor stabilization and measurement accuracy.
- Frequent use: A 5-10 minute warm-up suffices. Early readings may spike but will stabilize.
Simply connect VCC and GND to 5V power or your ESP32's power pins for the warm-up period.
Determining Threshold Values
Heater-based sensors like the MQ3 can drift during storage. Establish accurate breathalyzer thresholds through this calibration:
- Clean air baseline: Run sensor in fresh air and record analog values (typically 100-150).
- Alcohol exposure: Position isopropyl alcohol or hand sanitizer near (not touching) the sensor, allowing only vapors to reach it. Note the elevated readings (usually 400-900 depending on vapor strength).
- Establish ranges: Use recorded values to define zones:
- Sober state: Below baseline + 20 (e.g., < 120)
- Light consumption: Mid-range values (e.g., 120-400)
- Heavy consumption: Above moderate threshold (e.g., > 400)
Critical: Sensor characteristics vary between units and environments. Always calibrate with your specific hardware before use.
Adjusting Digital Threshold
Set the DO pin trigger level using the trim potentiometer:
- Expose sensor to alcohol vapor.
- Turn potentiometer clockwise until LED activates.
- Turn counterclockwise slowly until LED just deactivates.
- Threshold is now calibrated.
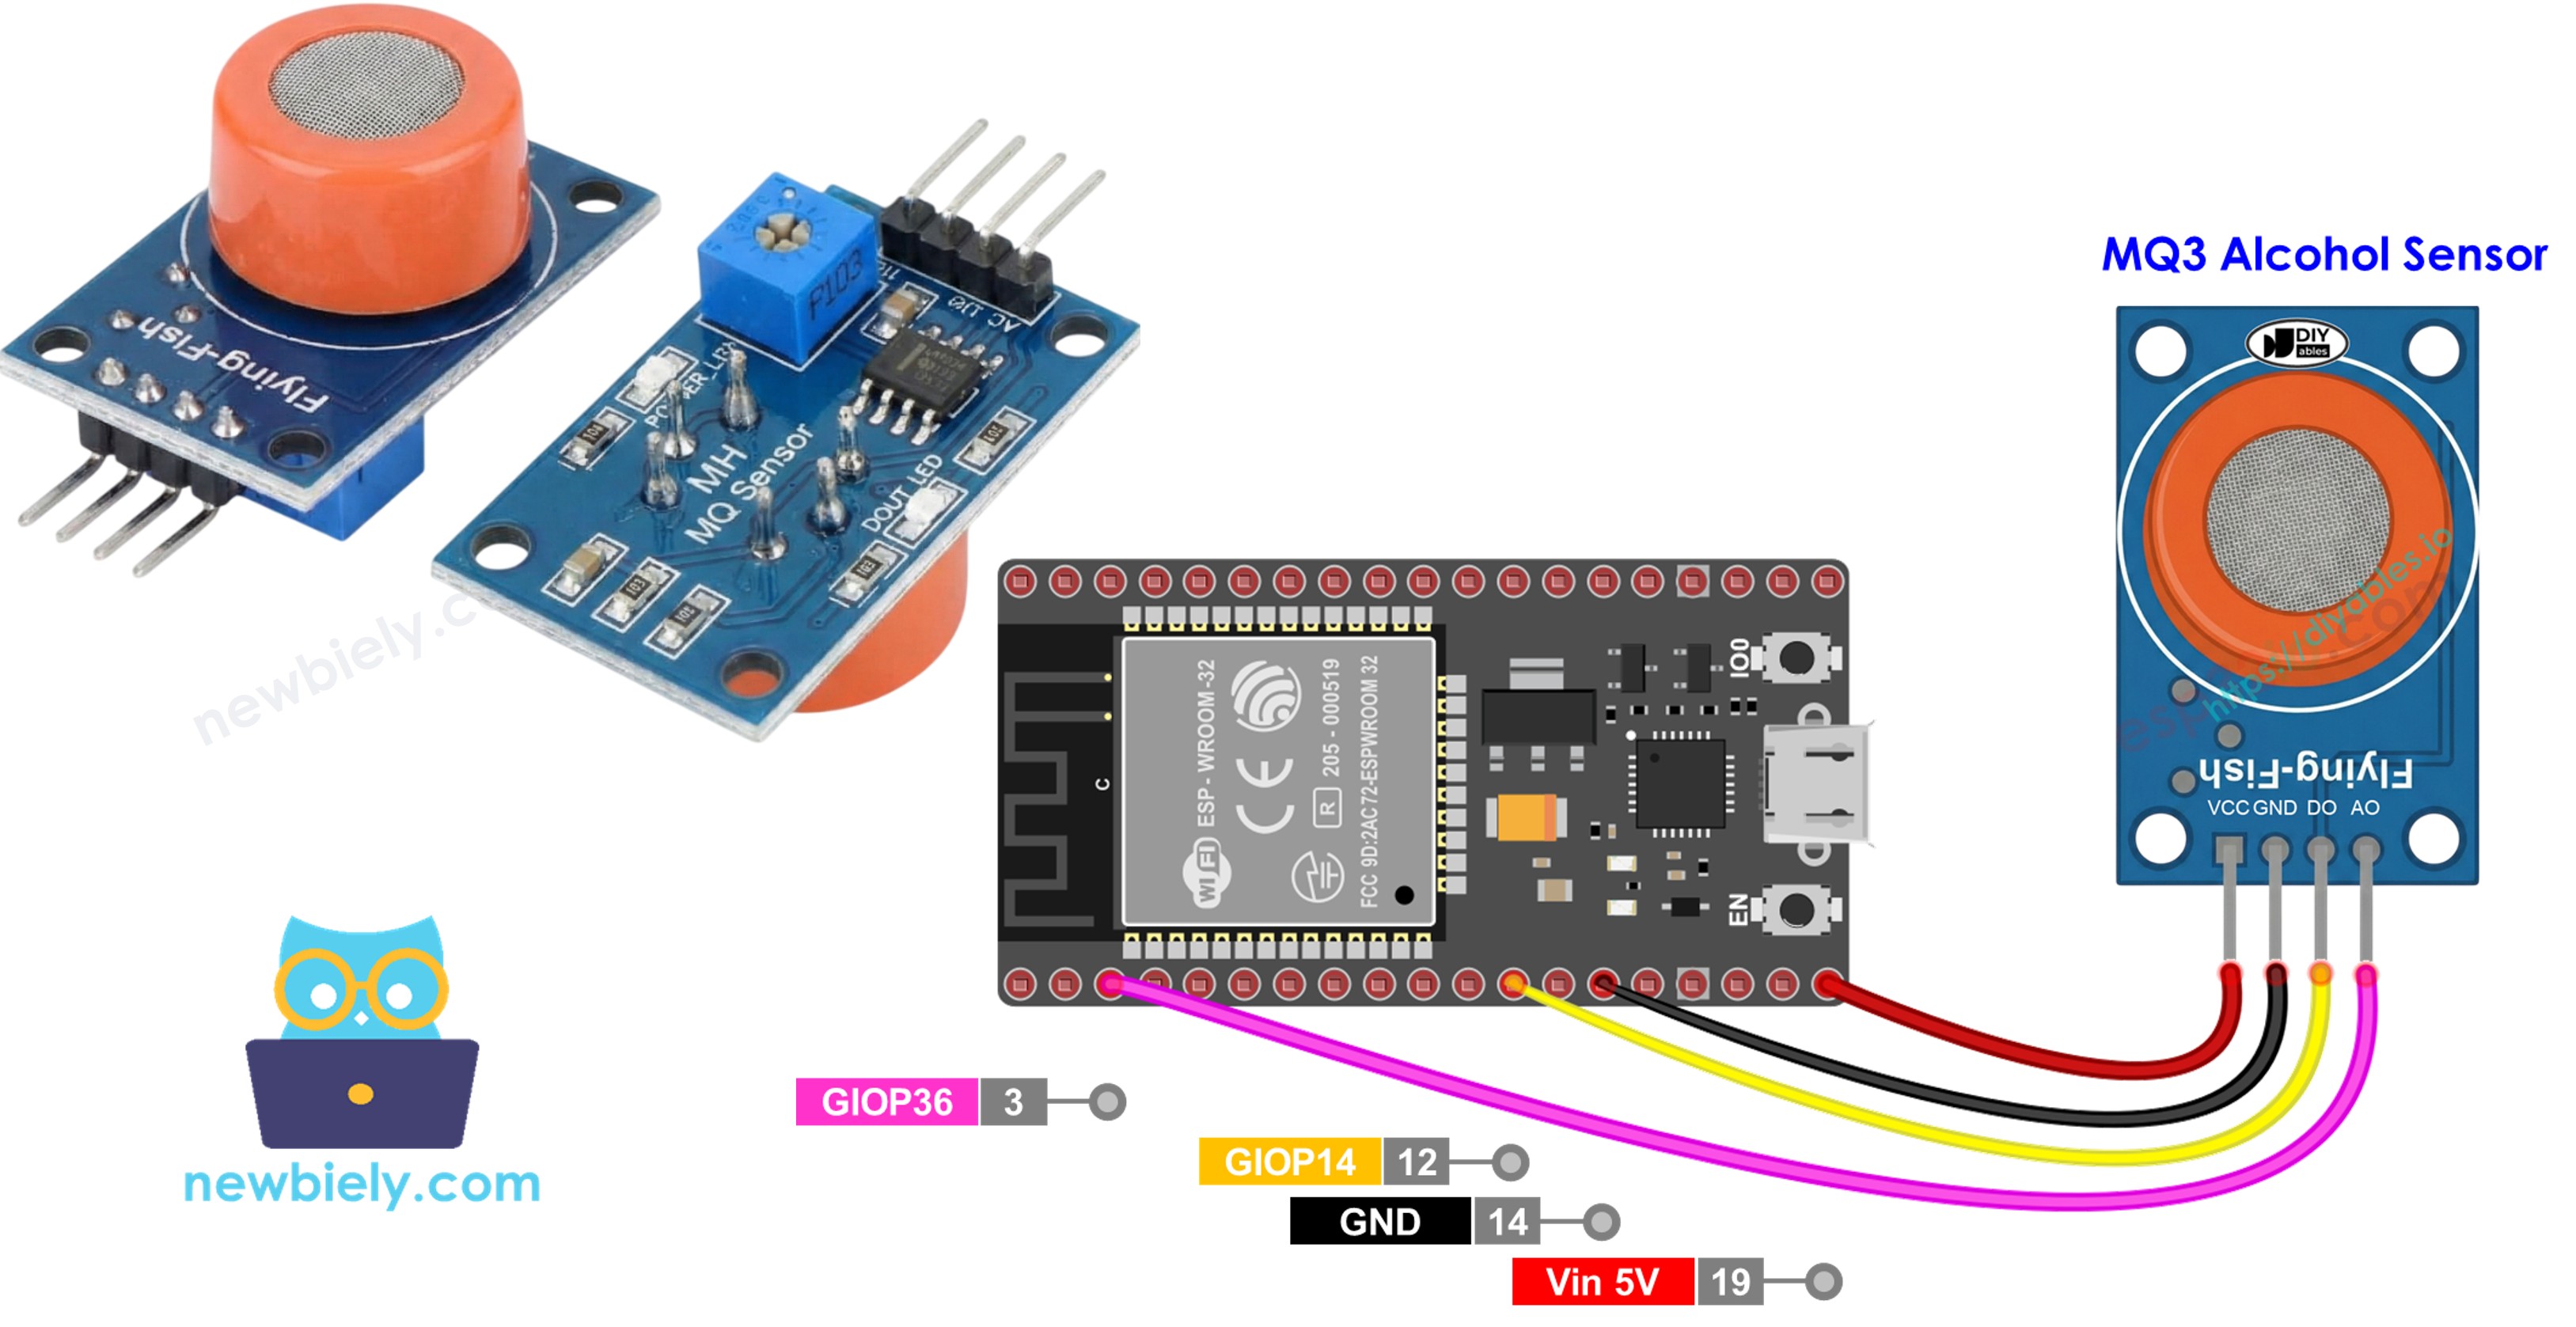
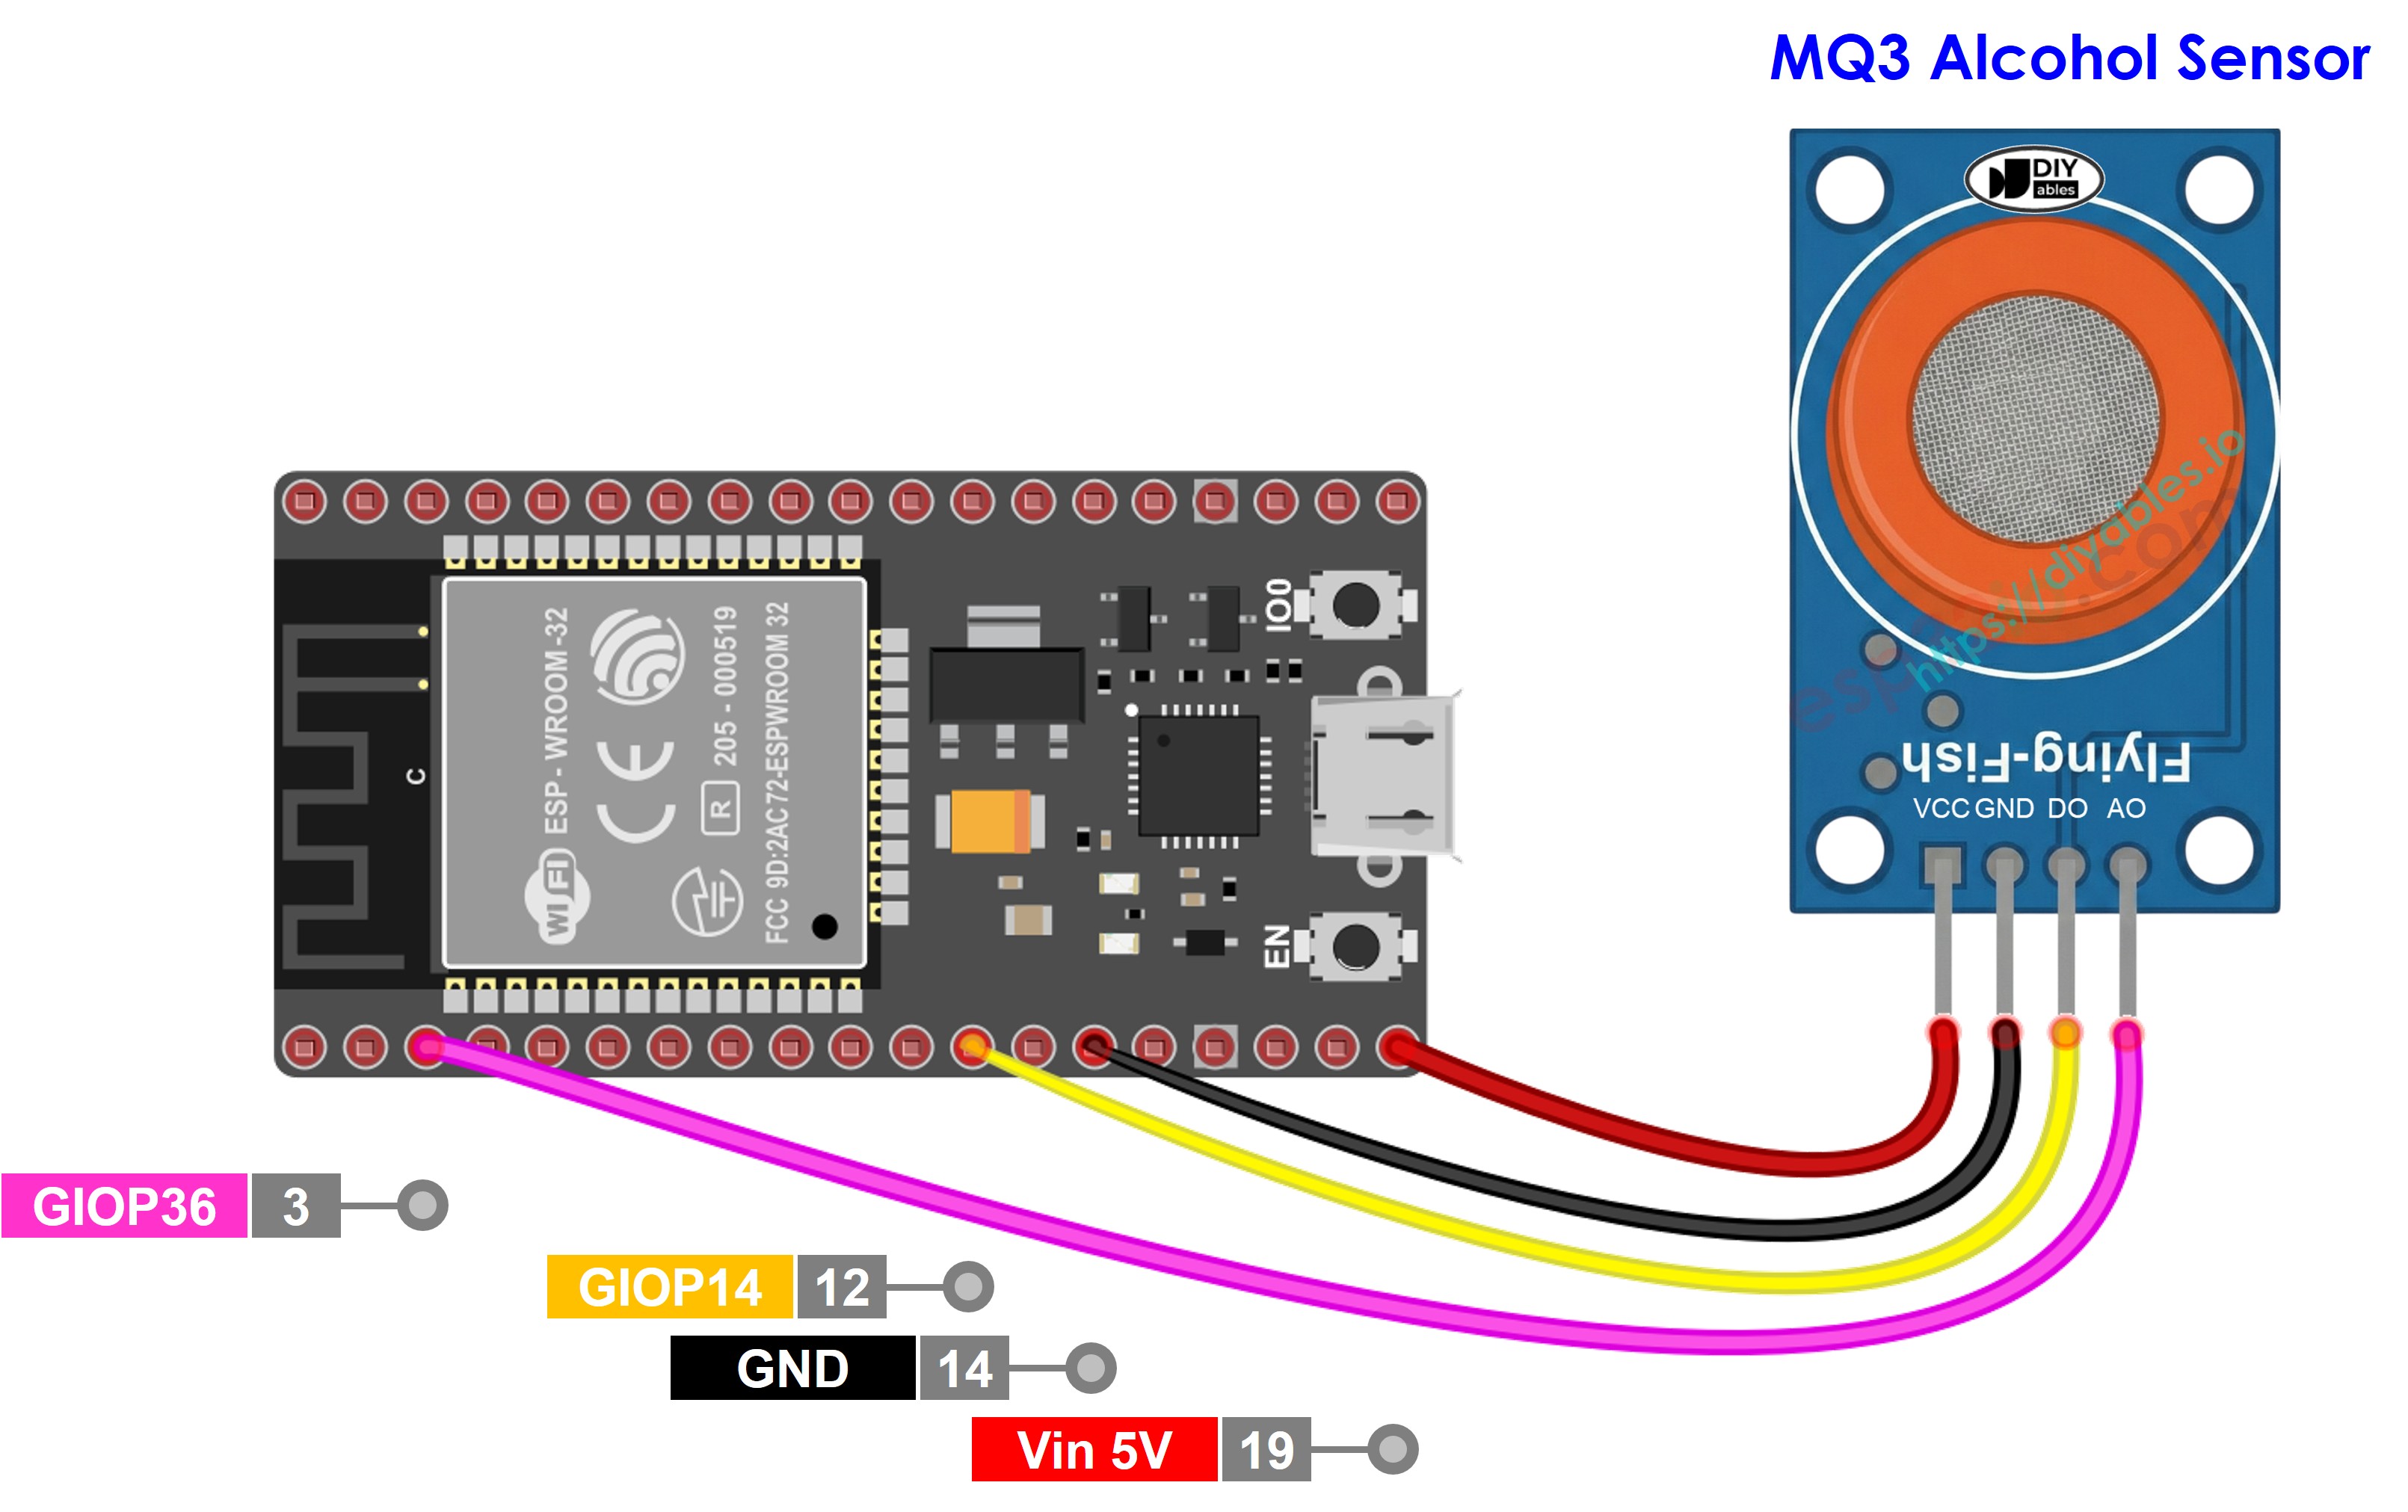
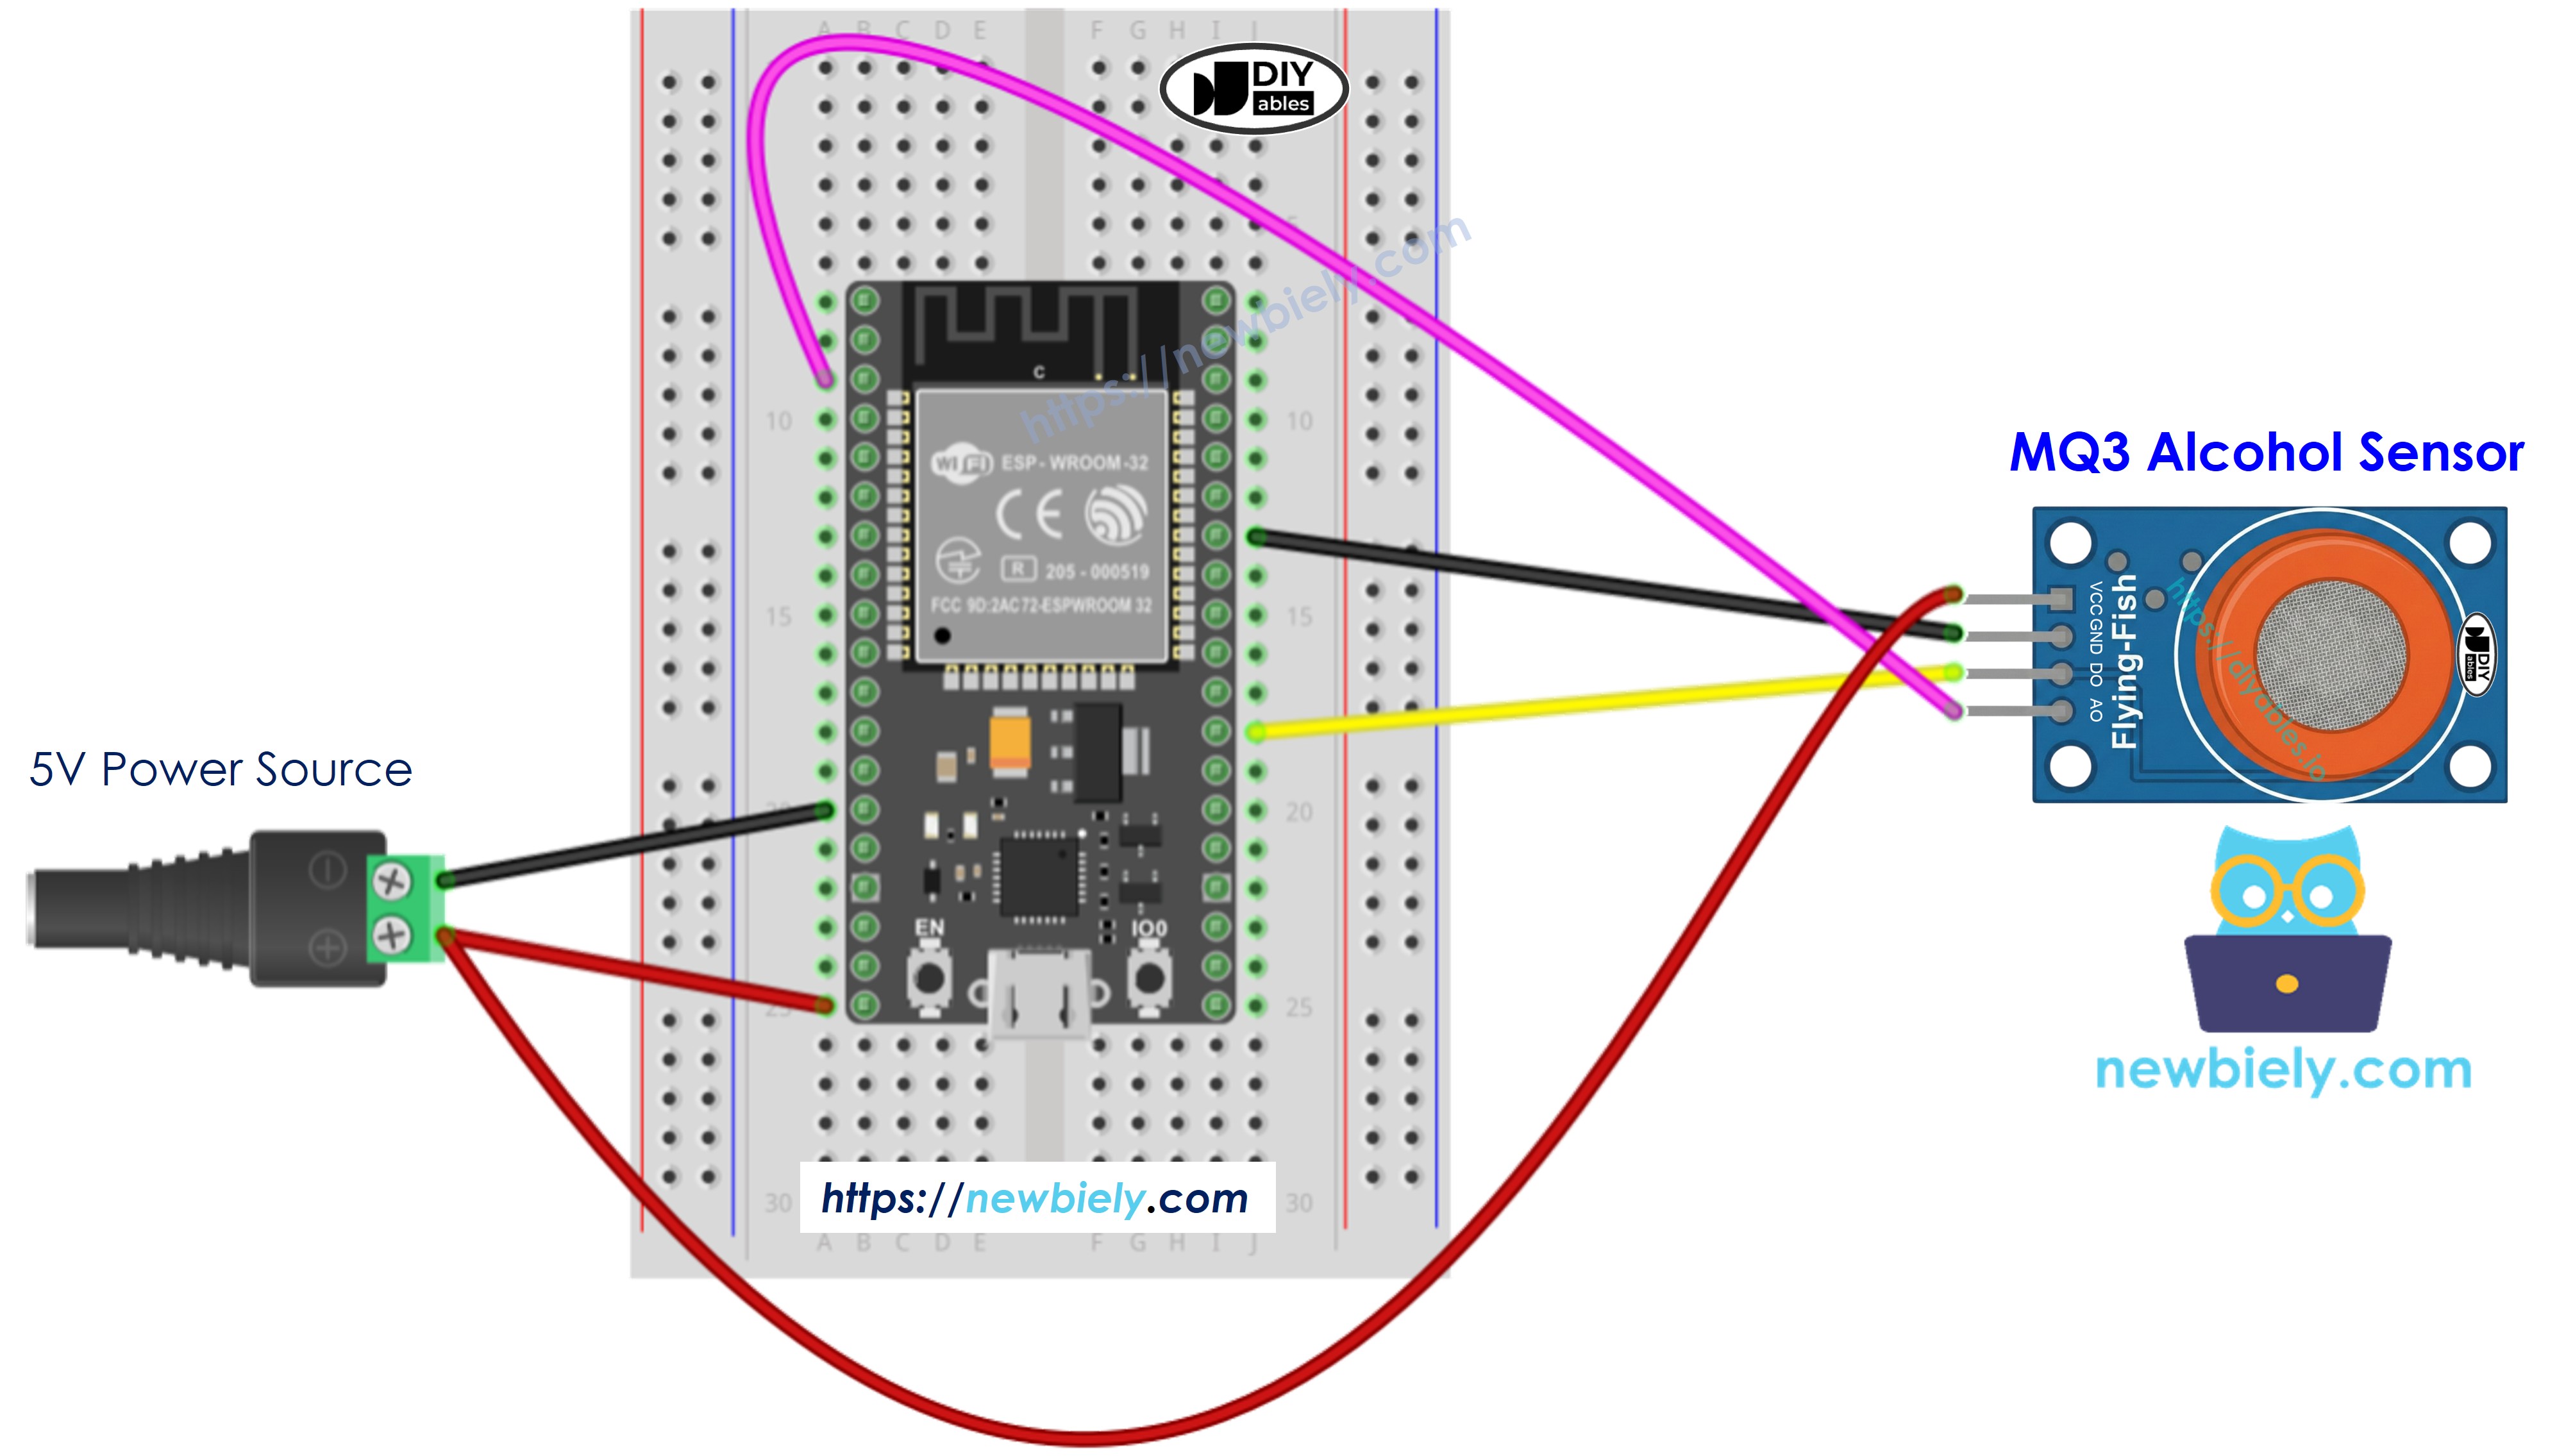
Wiring Diagram
Since the MQ3 alcohol sensor module has two outputs, you can choose to use one or both of them, depending on what you need.
- How to connect ESP32 and MQ3 alcohol sensor using breadboard (powered via USB cable)
This image is created using Fritzing. Click to enlarge image
- How to connect ESP32 and MQ3 alcohol sensor using breadboard (powered via Vin pin)
This image is created using Fritzing. Click to enlarge image
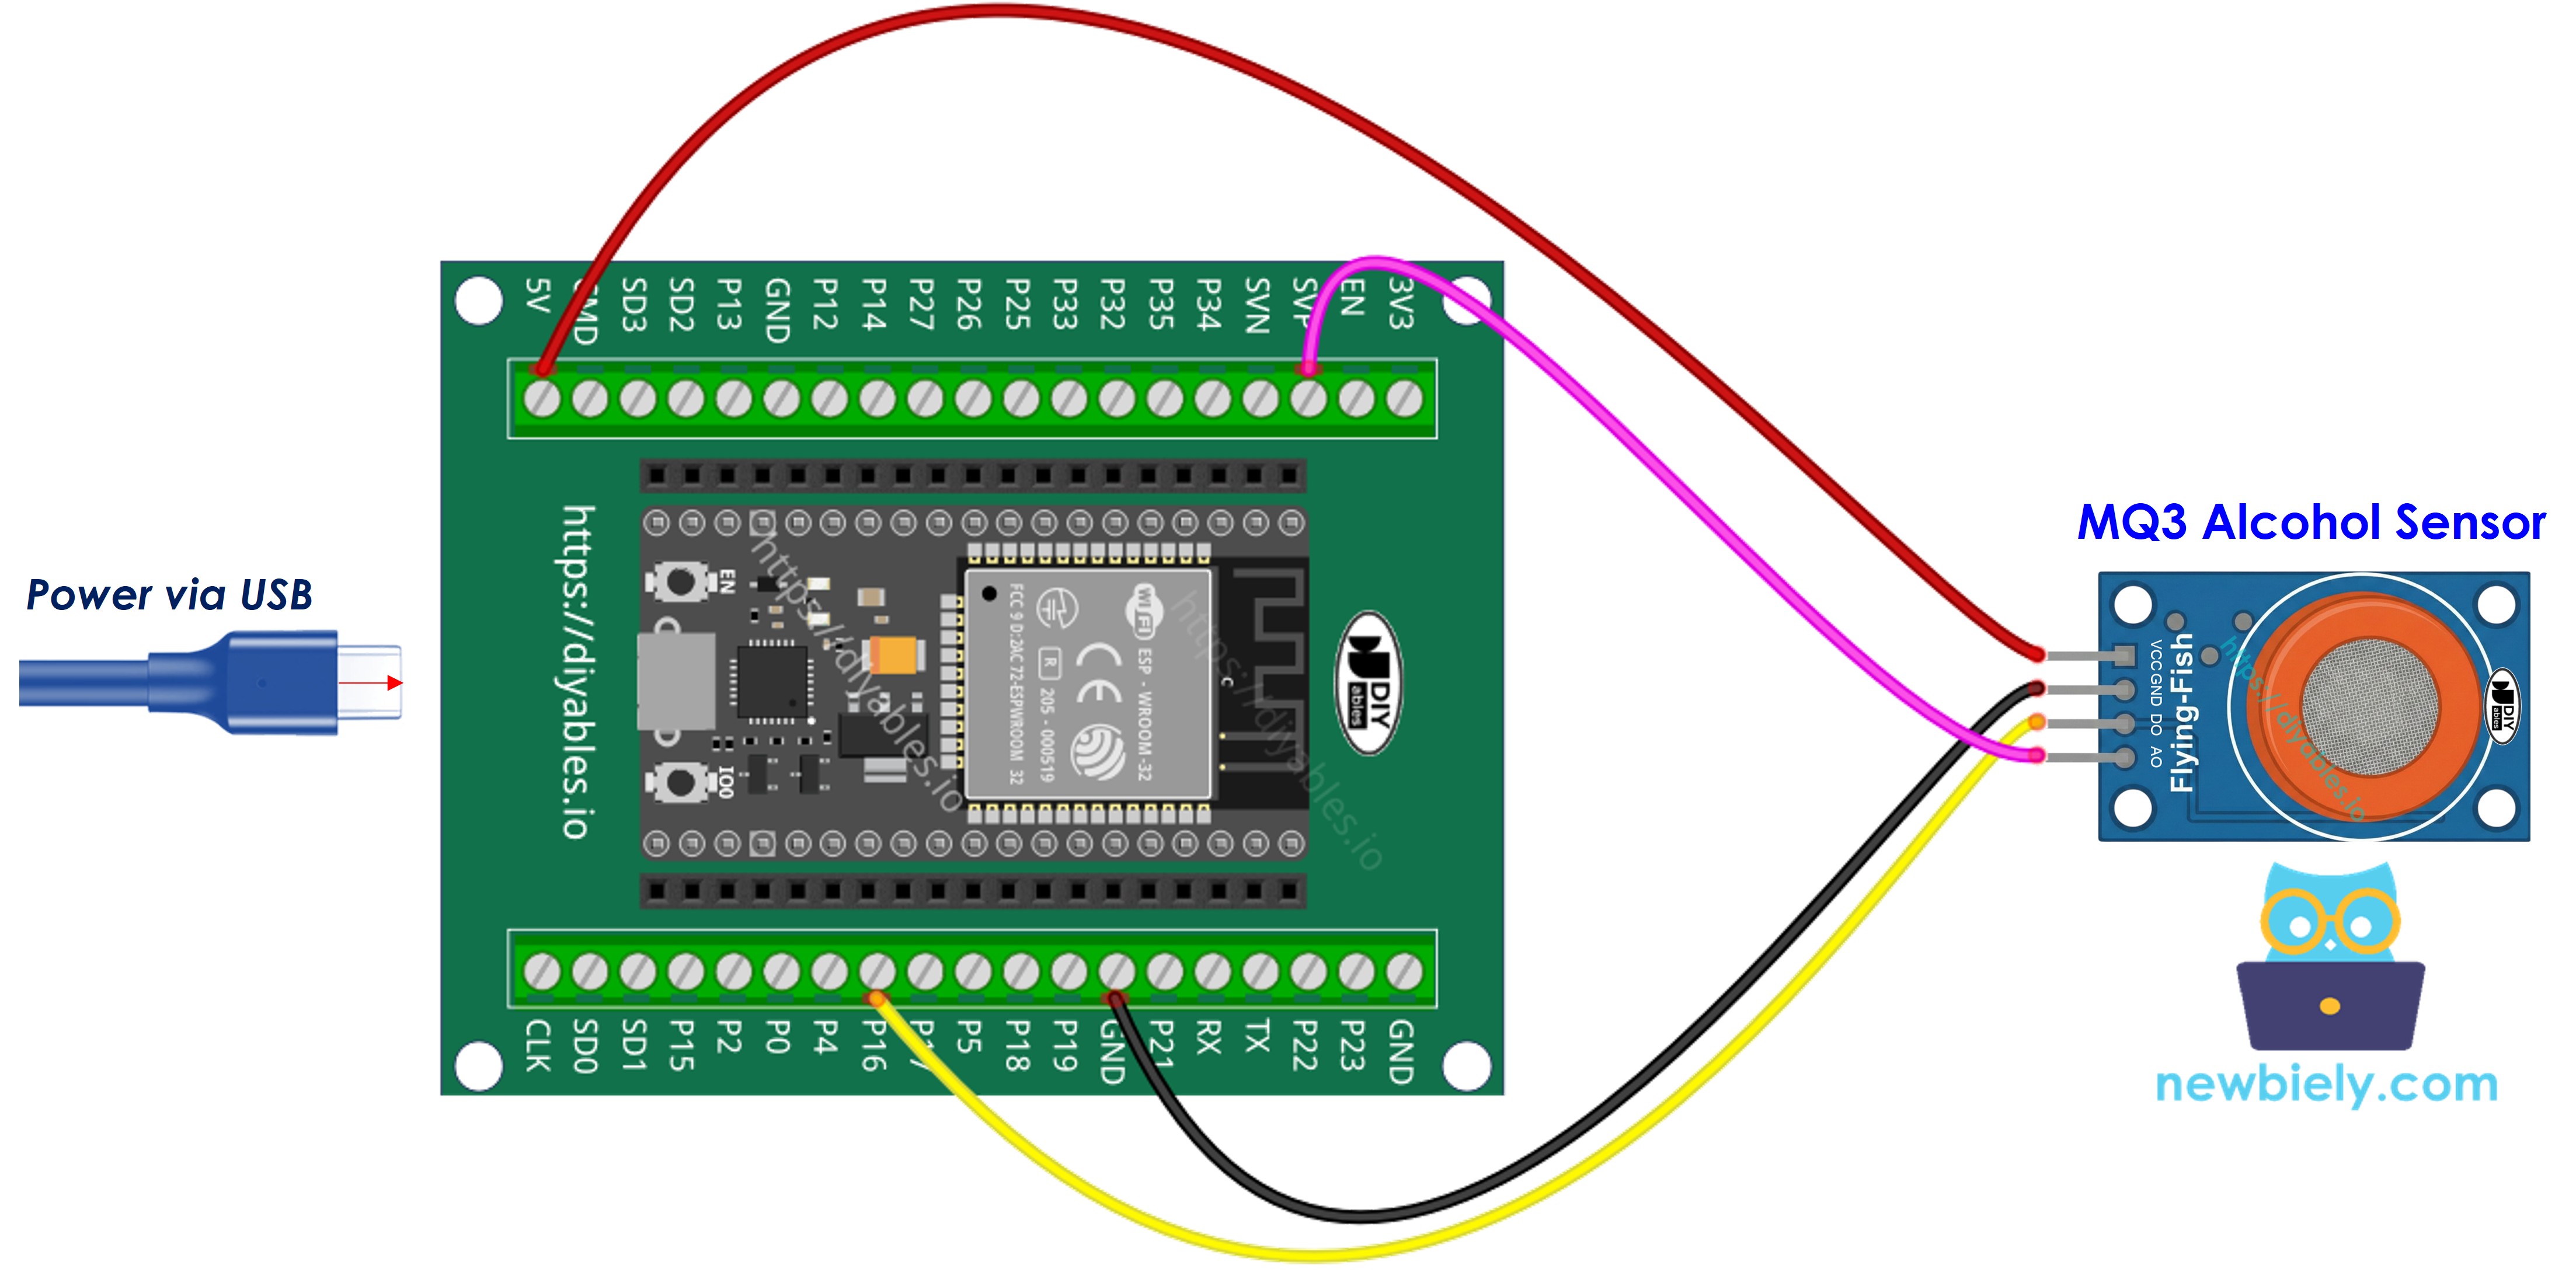
- How to connect ESP32 and MQ3 alcohol sensor using screw terminal block breakout board (powered via USB cable)
- How to connect ESP32 and MQ3 alcohol sensor using screw terminal block breakout board (powered via Vin pin)
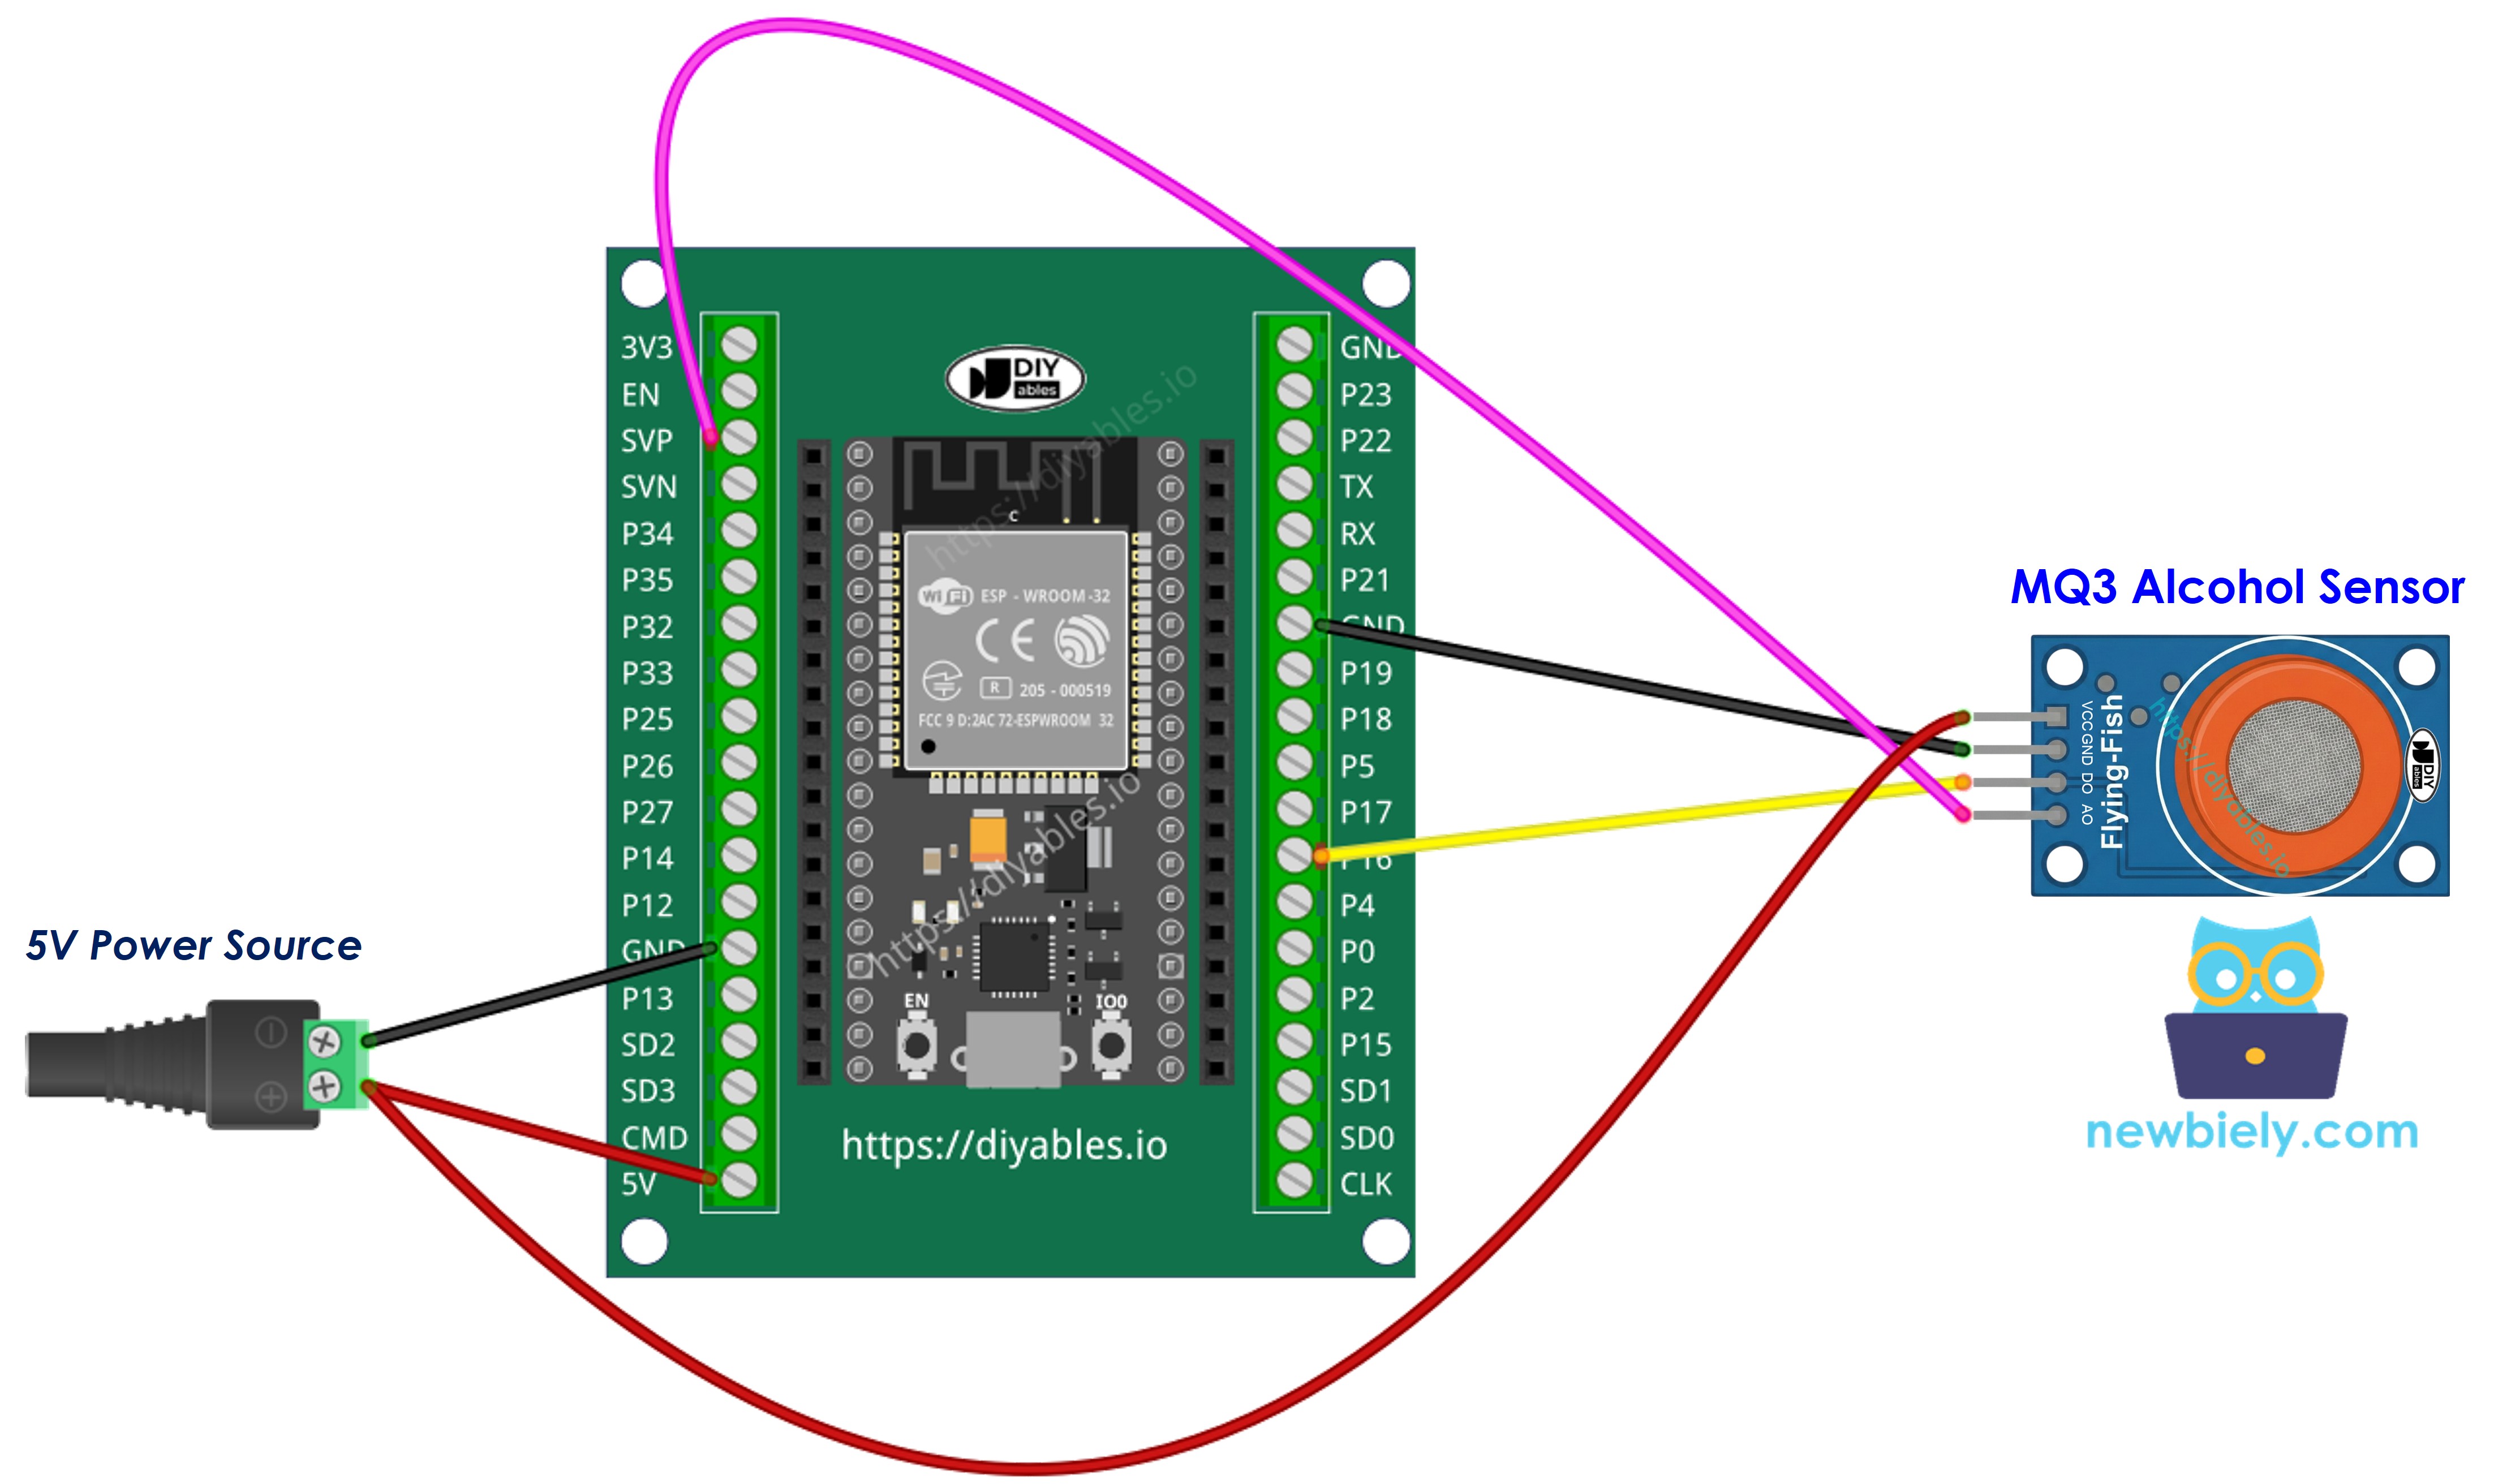
| MQ3 Alcohol Sensor | ESP32 |
|---|---|
| VCC | 3.3V |
| GND | GND |
| DO | GPIO 16 |
| AO | GPIO 36 (ADC0) |
If you're unfamiliar with how to supply power to the ESP32 and other components, you can find guidance in the following tutorial: The best way to Power ESP32 and sensors/displays.
ESP32 Code - Digital Output Reading
Quick Instructions
- If this is the first time you use ESP32, see how to setup environment for ESP32 on Arduino IDE.
- Copy the above code and open with Arduino IDE
- Click Upload button on Arduino IDE to upload code to ESP32
- Place alcohol vapor source near the MQ3 sensor (hand sanitizer or rubbing alcohol on cotton works well)
- See the result on Serial Monitor
Note: If readings don't align with reality (false triggers or missed detections), adjust the module's potentiometer. Clockwise increases sensitivity; counterclockwise decreases it. Fine-tune until accuracy improves.
ESP32 Code - Analog Output Reading
Quick Instructions
- Copy the above code and open with Arduino IDE
- Click Upload button on Arduino IDE to upload code to ESP32
- Introduce alcohol vapor to the sensor (hand sanitizer or isopropyl alcohol)
- Check out the result on the Serial Monitor
With either digital or analog output, you can implement threshold logic to trigger alarms, activate warning lights, or log data for breathalyzer applications.
※ NOTE THAT:
This tutorial uses the analogRead() function to read values from an ADC (Analog-to-Digital Converter) connected to a sensor or component. The ESP32's ADC is suitable for projects that do not require high accuracy. However, for projects needing precise measurements, keep the following in mind:
- The ESP32's ADC is not perfectly accurate and might require calibration for correct results. Each ESP32 board can vary slightly, so calibration is necessary for each individual board.
- Calibration can be challenging, especially for beginners, and might not always yield the exact results you want.
For projects requiring high precision, consider using an external ADC (e.g ADS1115) with the ESP32 or using another Arduino, such as the Arduino Uno R4 WiFi, which has a more reliable ADC. If you still want to calibrate the ESP32's ADC, refer to the ESP32 ADC Calibration Driver.
ESP32 Code - Breathalyzer with Threshold Detection
This example shows how to interpret analog output through calibrated thresholds to estimate intoxication levels.
Quick Instructions
- Important: Calibrate your sensor first using the analog reading example to find proper threshold values for your setup.
- Modify SOBER_THRESHOLD and DRUNK_THRESHOLD constants with your calibrated values.
- Copy the modified code and open with Arduino IDE
- Click Upload button on Arduino IDE to upload code to ESP32
- Test with alcohol vapor (isopropyl alcohol or hand sanitizer vapor)
- Check status messages on Serial Monitor
Disclaimer: This project is for educational purposes only. Never use this device for legal breathalyzer purposes or driving safety assessments.
Video Tutorial
Making video is a time-consuming work. If the video tutorial is necessary for your learning, please let us know by subscribing to our YouTube channel , If the demand for video is high, we will make the video tutorial.