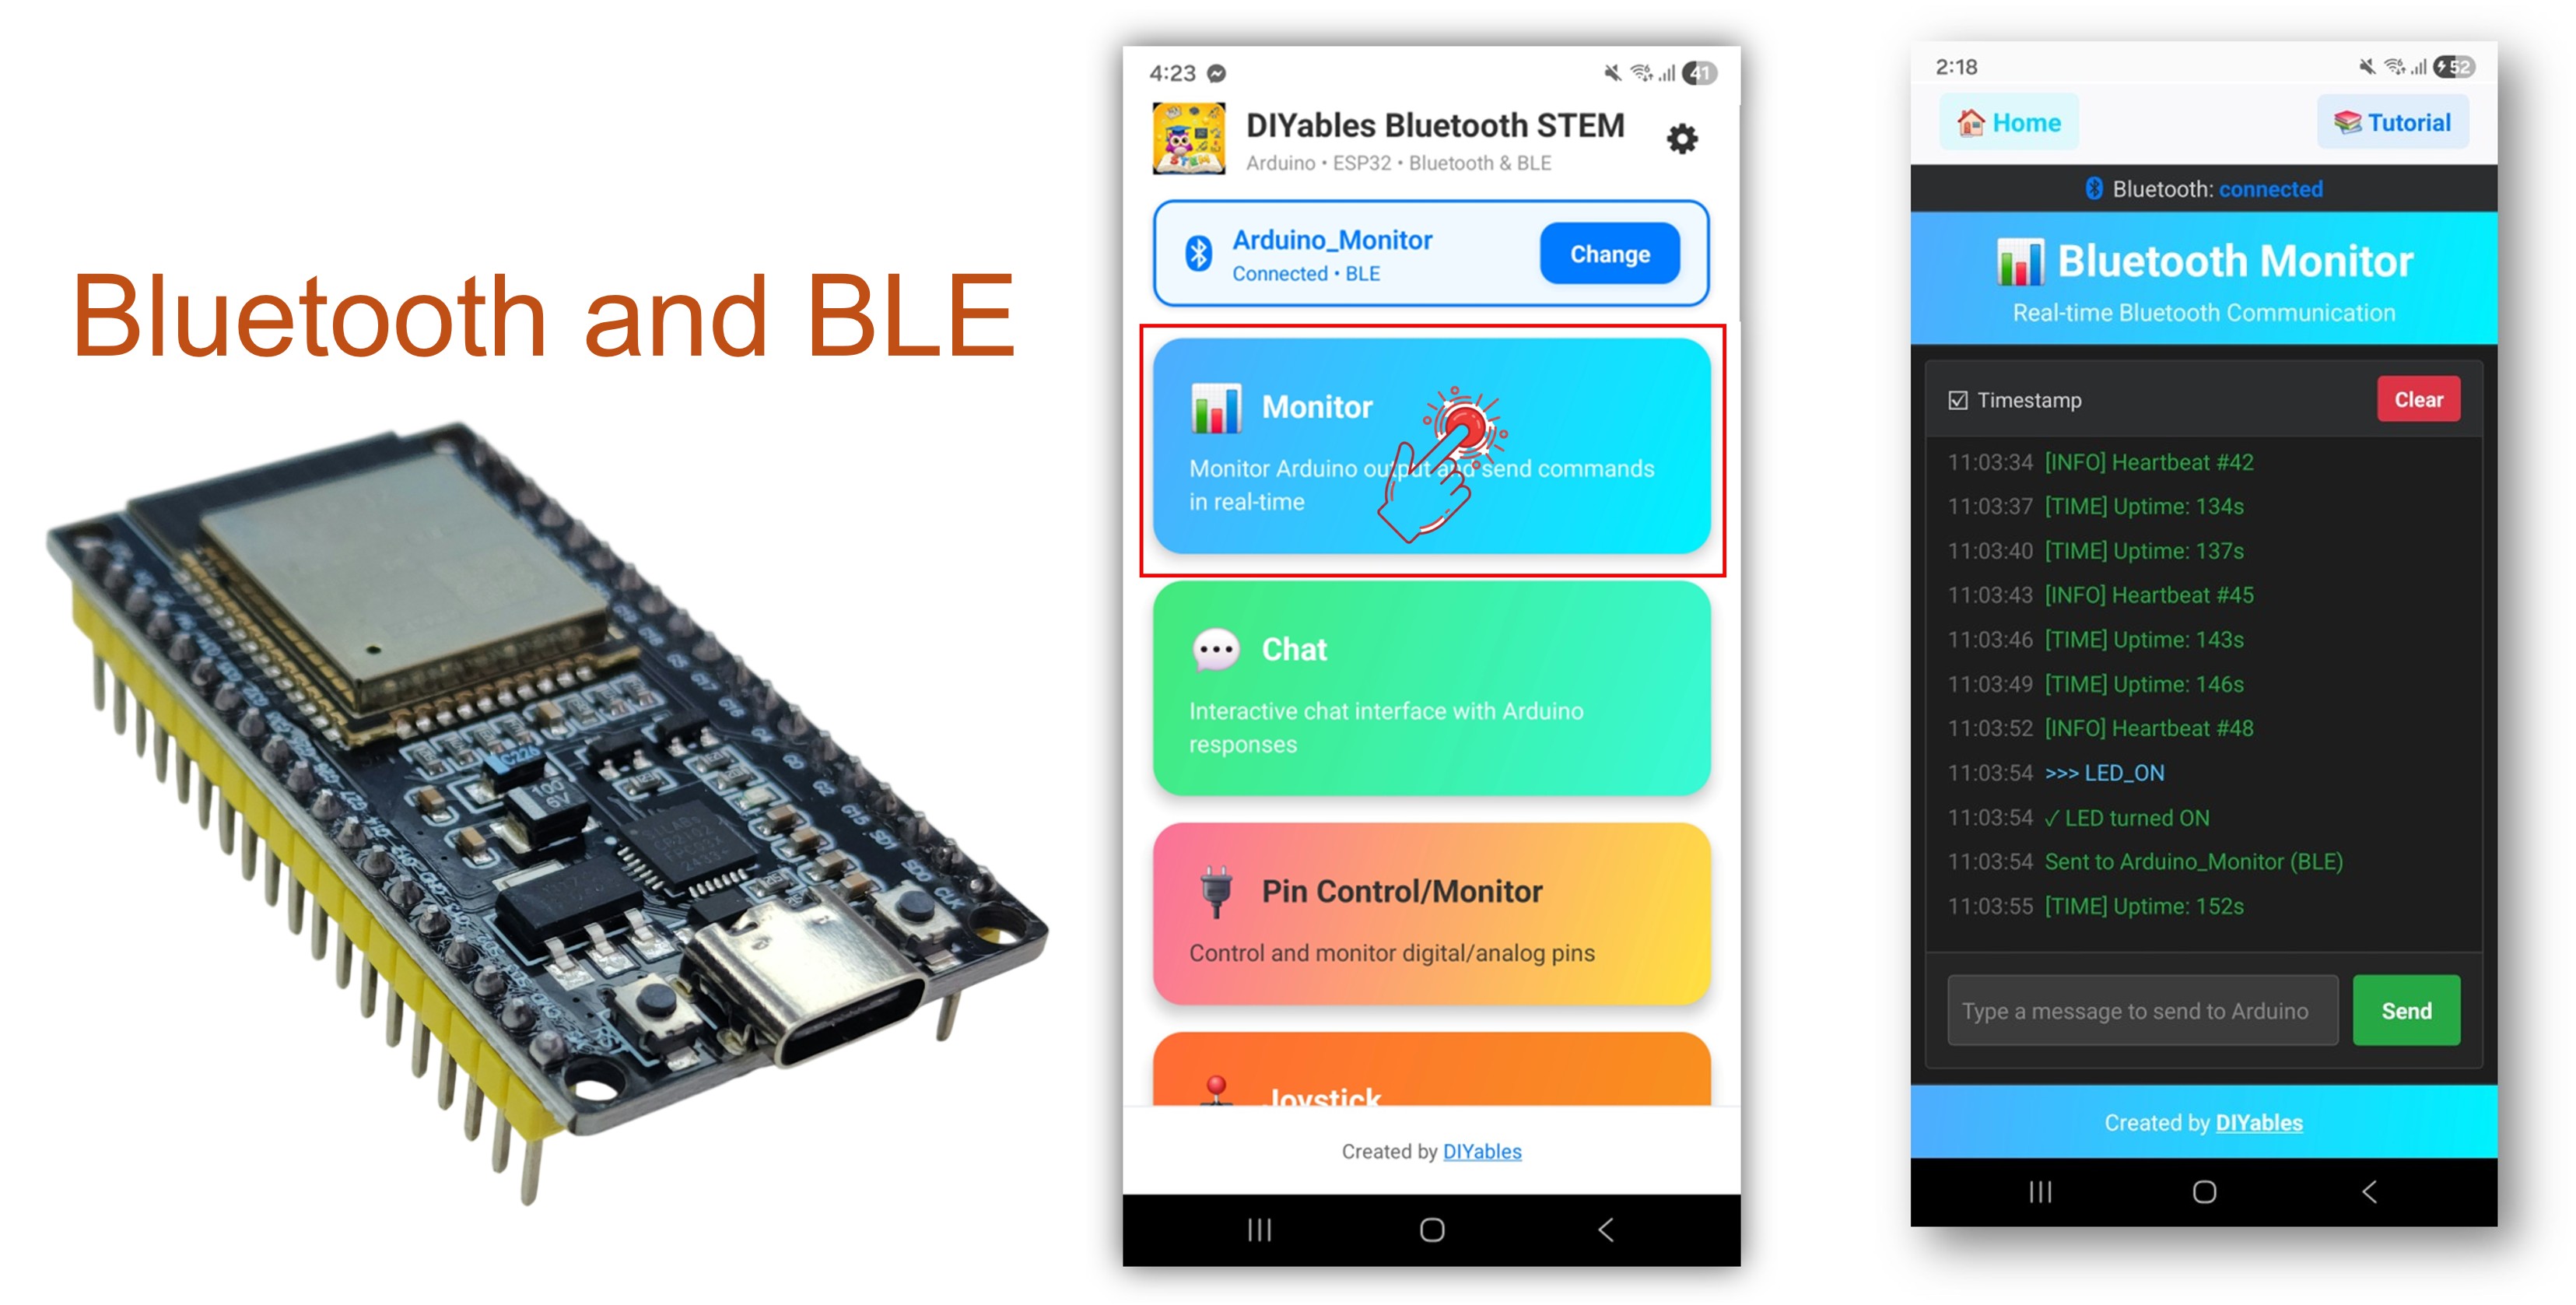
The Bluetooth Monitor example provides a wireless serial monitor interface accessible through the DIYables Bluetooth STEM app. Designed for ESP32 boards with support for both BLE (Bluetooth Low Energy) and Classic Bluetooth connections. Stream real-time status messages to the app, receive and process text commands, display system information, and debug your projects wirelessly — perfect for untethered monitoring, remote debugging, and system status displays.
This example supports two Bluetooth modes:
ESP32 BLE (Bluetooth Low Energy): Works on both Android and iOS
ESP32 Classic Bluetooth: Works on Android only. iOS does not support Classic Bluetooth. Use BLE if you need iOS support.
Features
Real-Time Streaming: Send continuous status messages to the app display
Command Processing: Receive and handle text commands from the app
System Monitoring: Display uptime, free heap, CPU info, and more
LED Control: Built-in LED ON/OFF commands for quick testing
Periodic Updates: Automatic heartbeat and status messages at configurable intervals
BLE & Classic Bluetooth: Choose the Bluetooth mode that suits your project
Cross-Platform: BLE mode works on both Android and iOS; Classic Bluetooth works on Android
Low Power Option: BLE mode consumes less power than Classic Bluetooth
Disclosure: Some of the links in this section are Amazon affiliate links, meaning we may earn a commission at no additional cost to you if you make a purchase through them. Additionally, some links direct you to products from our own brand, DIYables .
Connect the ESP32 board to your computer using a USB cable.
Launch the Arduino IDE on your computer.
Select the appropriate ESP32 board and COM port.
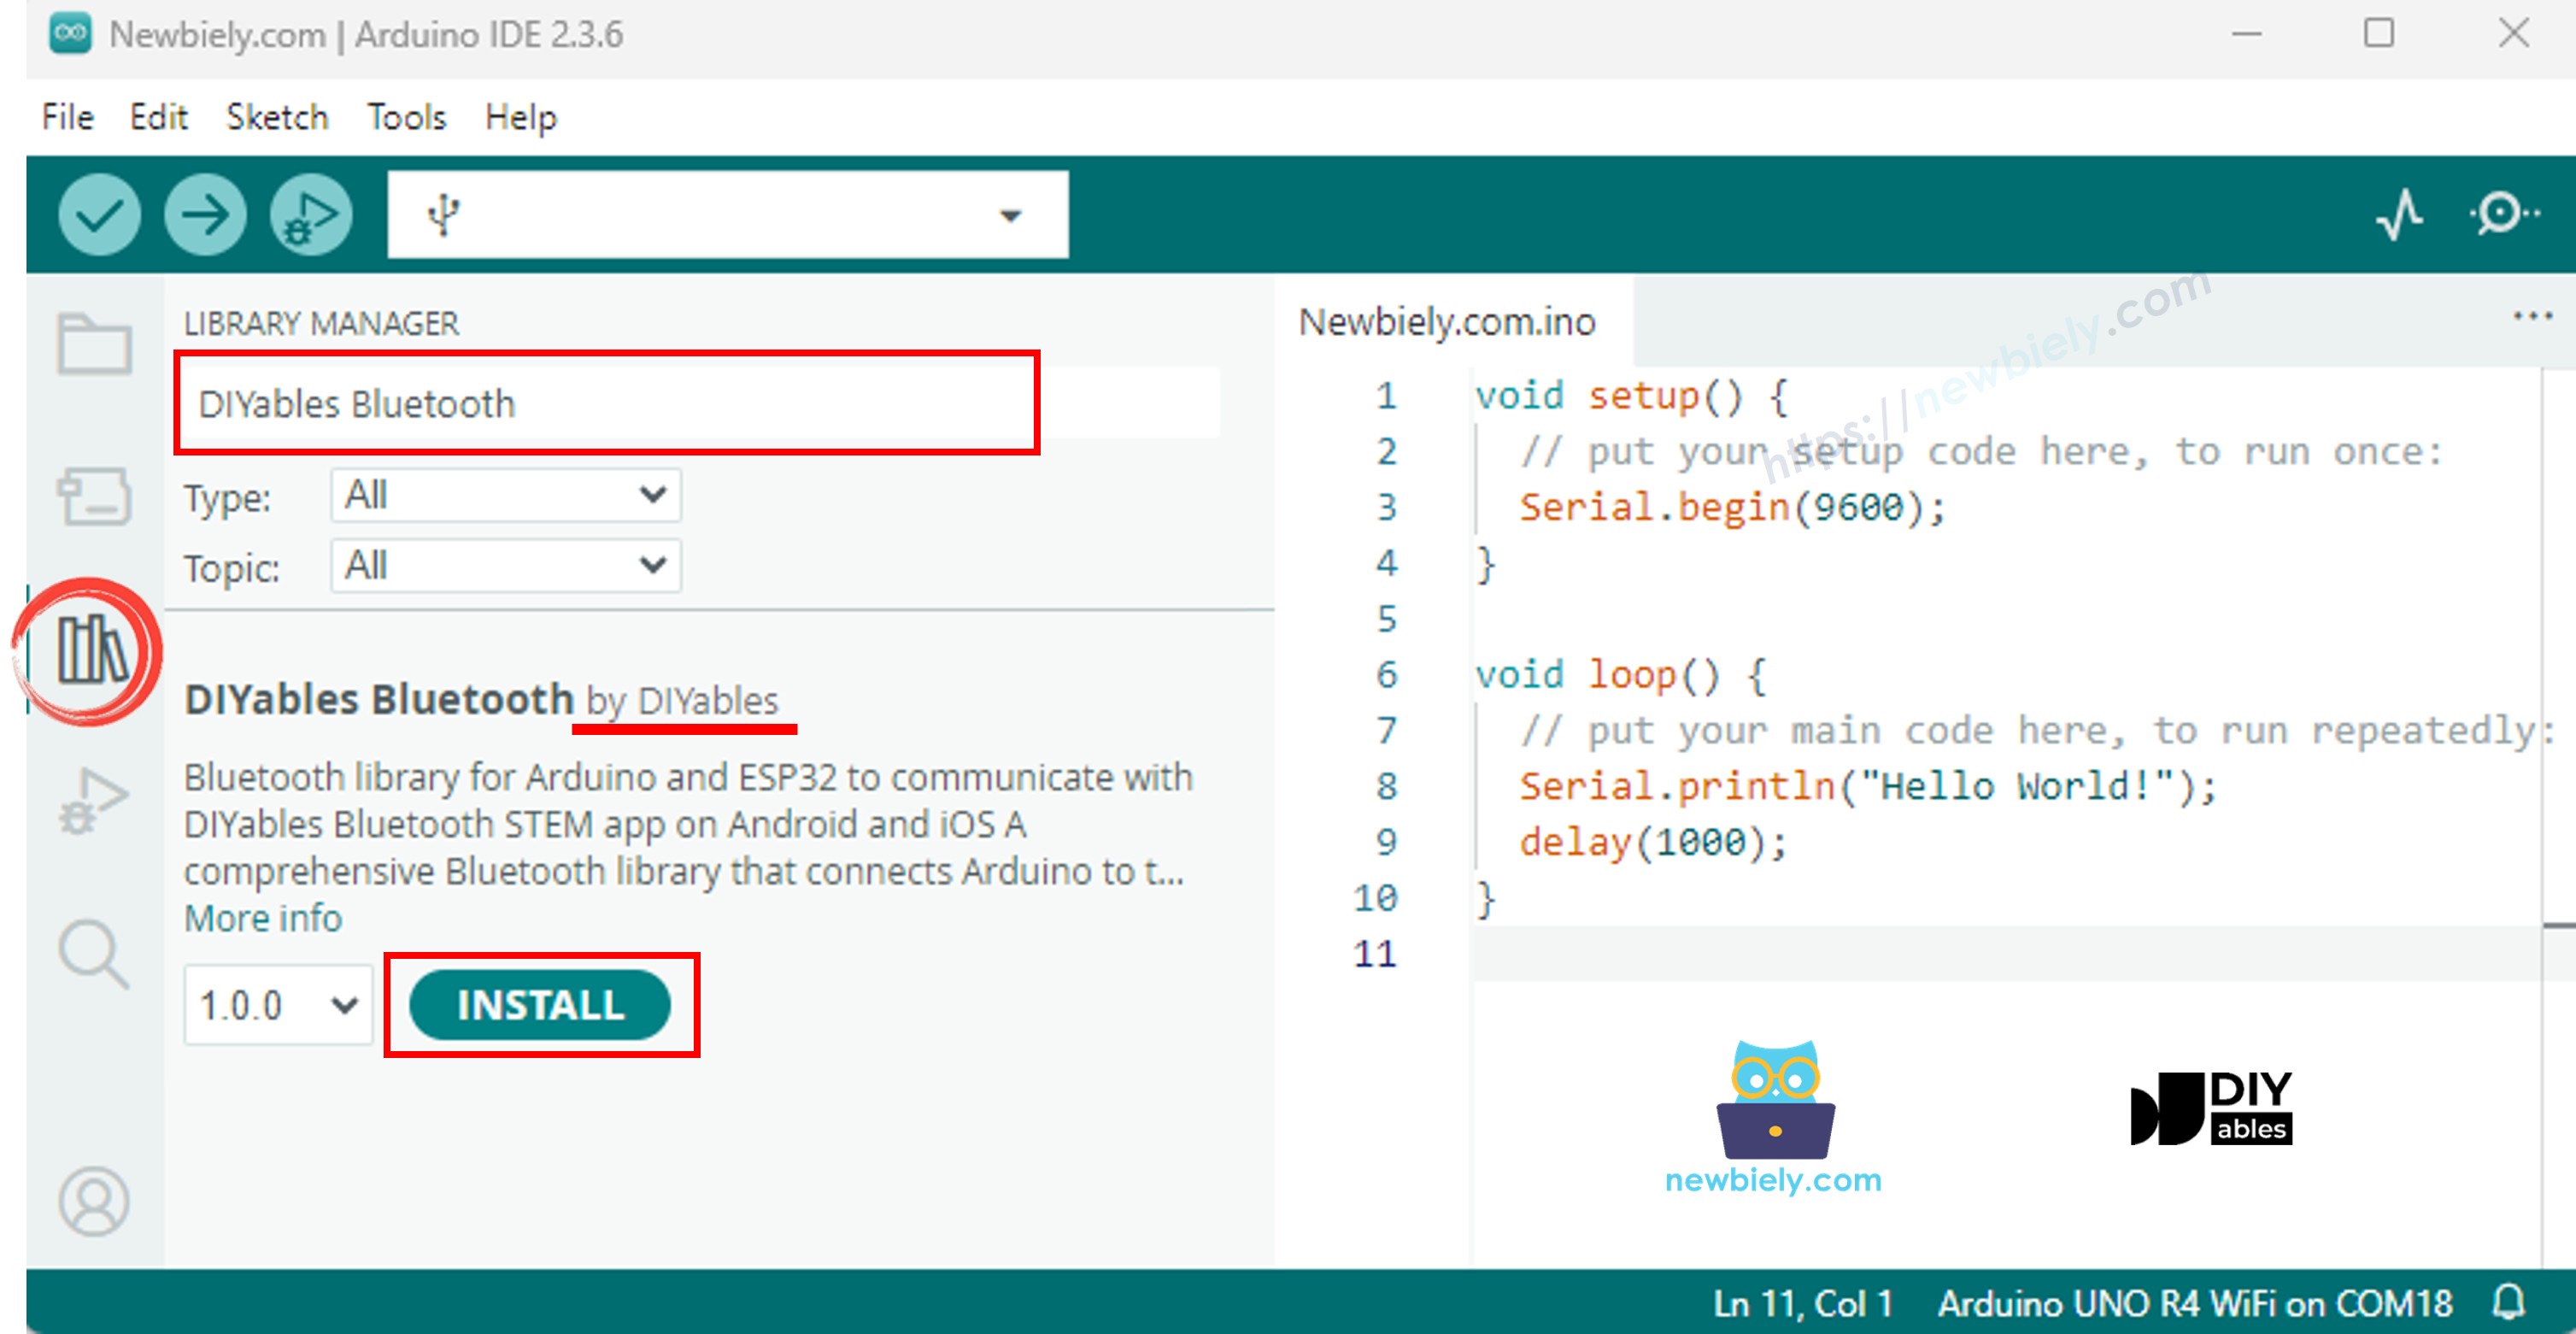
Navigate to the Libraries icon on the left bar of the Arduino IDE.
Search "DIYables Bluetooth", then find the DIYables Bluetooth library by DIYables
Click Install button to install the library.
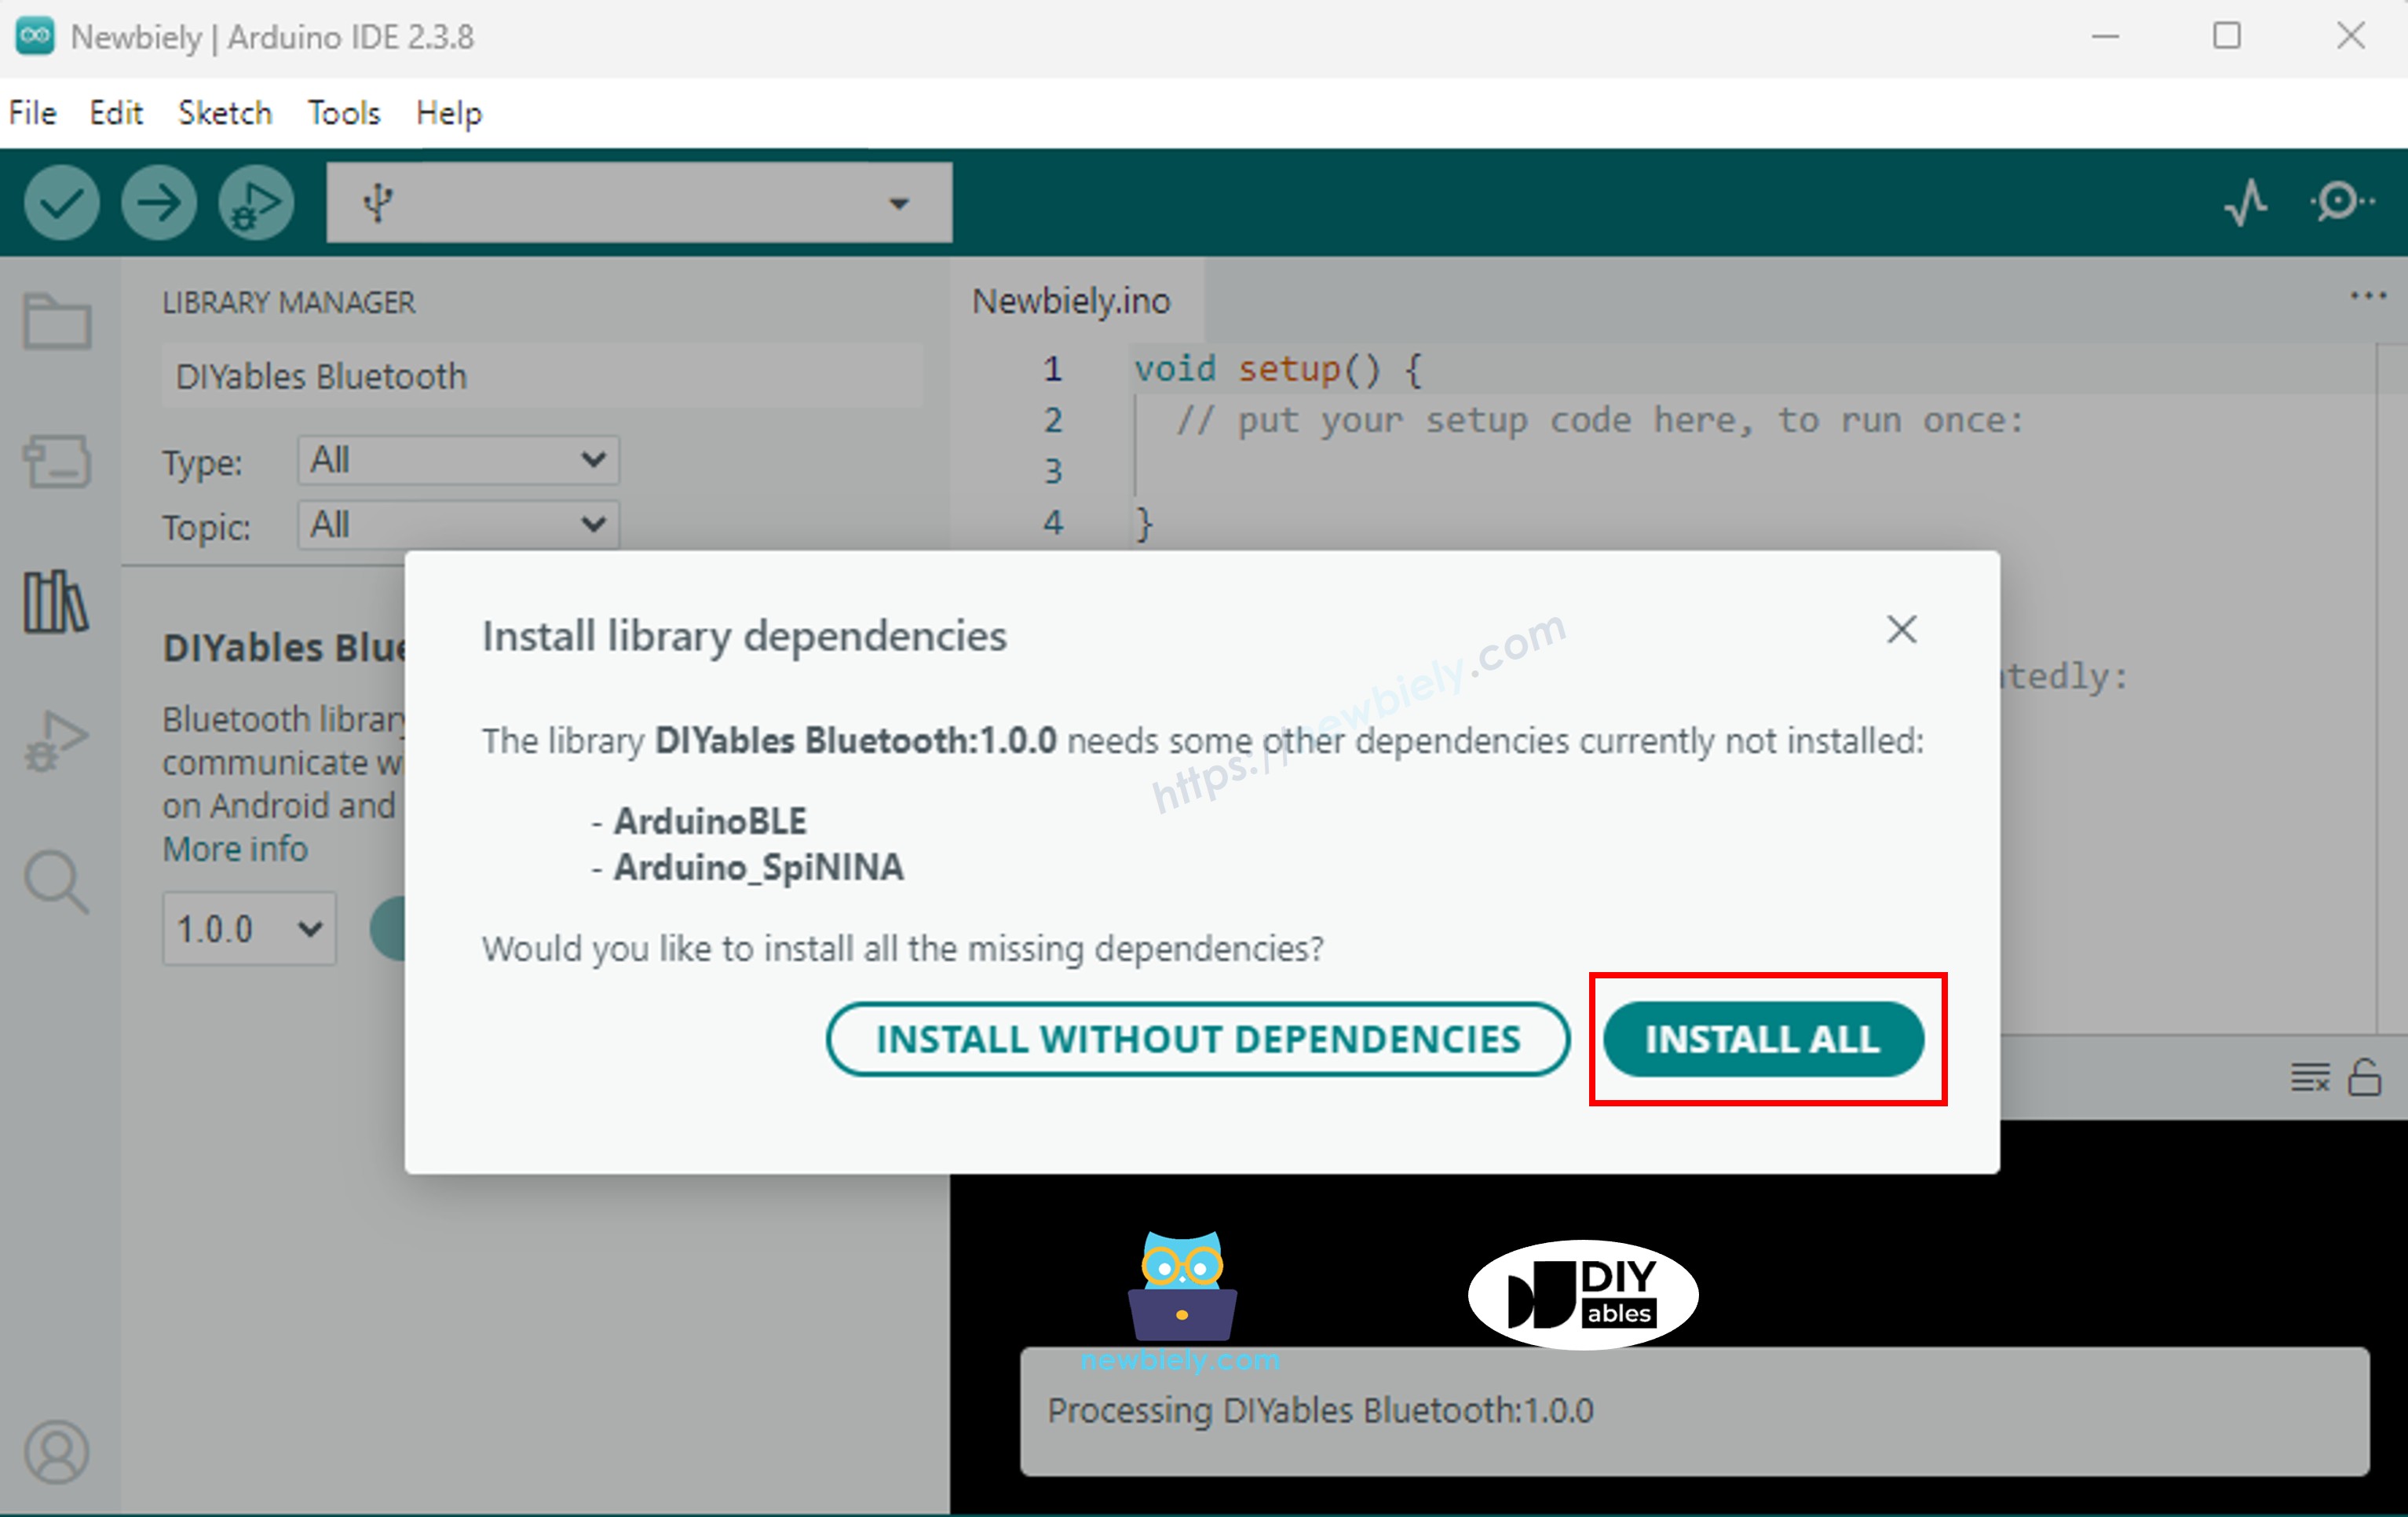
You will be asked for installing some other library dependencies
Click Install All button to install all library dependencies.
Choose one of the two Bluetooth modes below depending on your needs:
ESP32 Classic Bluetooth Code (works with app on Android only)
Note: Classic Bluetooth is NOT supported on iOS. If you need iOS support, use the BLE code below.
On Arduino IDE, Go to File Examples DIYables Bluetooth Esp32Bluetooth_Monitor example, or copy the above code and paste it to the editor of Arduino IDE
/* * DIYables Bluetooth Library - ESP32 Classic Bluetooth Monitor Example * Works with DIYables Bluetooth STEM app on Android * Note: Classic Bluetooth is NOT supported on iOS. Use BLE examples for iOS support. * * This example demonstrates the Bluetooth Monitor feature: * - Send real-time status messages to the mobile app * - Display system information and sensor readings * - Receive and process commands from the app * - Perfect for debugging and system monitoring * * Compatible Boards: * - ESP32 (all variants with Classic Bluetooth) * - ESP32-WROOM-32 * - ESP32-DevKitC * - ESP32-WROVER * * Note: Select "Huge APP (3MB No OTA/1MB SPIFFS)" partition scheme * in Arduino IDE: Tools > Partition Scheme * * Setup: * 1. Upload the sketch to your ESP32 * 2. Open Serial Monitor (115200 baud) to see connection status * 3. Use DIYables Bluetooth App to connect and view monitor output * * Tutorial: https://diyables.io/bluetooth-app * Author: DIYables */#include <DIYables_BluetoothServer.h>#include <DIYables_BluetoothMonitor.h>#include <platforms/DIYables_Esp32Bluetooth.h>// Create Bluetooth instancesDIYables_Esp32Bluetooth bluetooth("ESP32_Monitor");DIYables_BluetoothServer bluetoothServer(bluetooth);// Create Monitor app instanceDIYables_BluetoothMonitor bluetoothMonitor;// Variables for demounsignedlong lastUpdate = 0;constunsignedlong UPDATE_INTERVAL = 3000; // Send update every 3 secondsint messageCount = 0;bool ledState = false;// ESP32 built-in LED (may vary by board)constint LED_PIN = 2;voidsetup() {Serial.begin(115200);delay(1000);Serial.println("DIYables Bluetooth - ESP32 Monitor Example");// Initialize LEDpinMode(LED_PIN, OUTPUT);digitalWrite(LED_PIN, LOW);// Initialize Bluetooth server with platform-specific implementation bluetoothServer.begin();// Add monitor app to server bluetoothServer.addApp(&bluetoothMonitor);// Set up connection event callbacks bluetoothServer.setOnConnected([]() {Serial.println("Bluetooth connected!"); bluetoothMonitor.send("=== ESP32 Monitor Connected ==="); bluetoothMonitor.send("System Ready"); bluetoothMonitor.send("Type HELP for available commands"); bluetoothMonitor.send(""); }); bluetoothServer.setOnDisconnected([]() {Serial.println("Bluetooth disconnected!"); });// Set up message handler for incoming commands bluetoothMonitor.onMonitorMessage([](const String& message) {Serial.print("Received command: ");Serial.println(message); handleCommand(message); });Serial.println("Waiting for Bluetooth connection...");}void handleCommand(const String& cmd) {if (cmd == "HELP") { bluetoothMonitor.send("Available Commands:"); bluetoothMonitor.send(" LED_ON - Turn LED on"); bluetoothMonitor.send(" LED_OFF - Turn LED off"); bluetoothMonitor.send(" STATUS - Show system status"); bluetoothMonitor.send(" HEAP - Show memory info"); bluetoothMonitor.send(" CLEAR - Clear monitor (if supported)"); bluetoothMonitor.send(" HELP - Show this help"); }elseif (cmd == "LED_ON") {digitalWrite(LED_PIN, HIGH); ledState = true; bluetoothMonitor.send("✓ LED turned ON"); }elseif (cmd == "LED_OFF") {digitalWrite(LED_PIN, LOW); ledState = false; bluetoothMonitor.send("✓ LED turned OFF"); }elseif (cmd == "STATUS") { showStatus(); }elseif (cmd == "HEAP") { bluetoothMonitor.send("=== Memory Info ==="); bluetoothMonitor.send("Free Heap: " + String(ESP.getFreeHeap()) + " bytes"); bluetoothMonitor.send("Min Free Heap: " + String(ESP.getMinFreeHeap()) + " bytes"); bluetoothMonitor.send("Heap Size: " + String(ESP.getHeapSize()) + " bytes"); bluetoothMonitor.send("==================="); }elseif (cmd == "CLEAR") { bluetoothMonitor.send(""); }else { bluetoothMonitor.send("✗ Unknown command: " + cmd); bluetoothMonitor.send("Type HELP for available commands"); }}void showStatus() { bluetoothMonitor.send("=== System Status ===");// LED Status bluetoothMonitor.send("LED State: " + String(ledState ? "ON" : "OFF"));// Uptimeunsignedlong uptime = millis() / 1000; bluetoothMonitor.send("Uptime: " + String(uptime / 3600) + "h " + String((uptime % 3600) / 60) + "m " + String(uptime % 60) + "s");// ESP32-specific info bluetoothMonitor.send("Free Heap: " + String(ESP.getFreeHeap()) + " bytes"); bluetoothMonitor.send("CPU Freq: " + String(ESP.getCpuFreqMHz()) + " MHz"); bluetoothMonitor.send("Chip Model: " + String(ESP.getChipModel()));// Messages sent bluetoothMonitor.send("Messages Sent: " + String(messageCount)); bluetoothMonitor.send("====================");}void sendPeriodicUpdate() { messageCount++;// Example of different message typesif (messageCount % 3 == 0) { bluetoothMonitor.send("[INFO] Heartbeat #" + String(messageCount)); } elseif (messageCount % 5 == 0) { bluetoothMonitor.send("[HEAP] Free: " + String(ESP.getFreeHeap()) + " bytes"); }else { bluetoothMonitor.send("[TIME] Uptime: " + String(millis() / 1000) + "s"); }Serial.print("Sent update #");Serial.println(messageCount);}voidloop() {// Handle Bluetooth server communications bluetoothServer.loop();// Send periodic updates (only when connected)if (bluetooth.isConnected() && millis() - lastUpdate >= UPDATE_INTERVAL) { lastUpdate = millis(); sendPeriodicUpdate(); }delay(10);}
Click Upload button on Arduino IDE to upload code to ESP32
Open the Serial Monitor
Check out the result on Serial Monitor. It looks like the below:
Newbiely | Arduino IDE 2.3.8
──
☐
✕
File
Edit
Sketch
Tools
Help
ESP32 Dev Module
Newbiely.ino
···
8Serial.println("Hello World!");
Output
Serial Monitor
Message (Enter to send message to 'ESP32 Dev Module' on 'COM15')
New Line
9600 baud
DIYables Bluetooth - ESP32 Monitor Example
Waiting for Bluetooth connection...
Ln 11, Col 1
ESP32 Dev Module on COM15
2
ESP32 BLE Code (works with app on both Android and iOS)
On Arduino IDE, Go to File Examples DIYables Bluetooth Esp32BLE_Monitor example, or copy the above code and paste it to the editor of Arduino IDE
/* * DIYables Bluetooth Library - ESP32 BLE Monitor Example * Works with DIYables Bluetooth STEM app on Android and iOS * * This example demonstrates the Bluetooth Monitor feature: * - Send real-time status messages to the mobile app * - Display system information and sensor readings * - Receive and process commands from the app * - Perfect for debugging and system monitoring * * Compatible Boards: * - ESP32-WROOM-32 * - ESP32-DevKitC * - ESP32-WROVER * - ESP32-S3 * - ESP32-C3 * - Any ESP32 board supporting BLE * * Note: Select "Huge APP (3MB No OTA/1MB SPIFFS)" partition scheme * in Arduino IDE: Tools > Partition Scheme * * Setup: * 1. Upload the sketch to your ESP32 * 2. Open Serial Monitor (115200 baud) to see connection status * 3. Use DIYables Bluetooth App to connect and view monitor output * * Tutorial: https://diyables.io/bluetooth-app * Author: DIYables */#include <DIYables_BluetoothServer.h>#include <DIYables_BluetoothMonitor.h>#include <platforms/DIYables_Esp32BLE.h>// BLE Configurationconst char* DEVICE_NAME = "ESP32BLE_Monitor";const char* SERVICE_UUID = "19B10000-E8F2-537E-4F6C-D104768A1214";const char* TX_UUID = "19B10001-E8F2-537E-4F6C-D104768A1214";const char* RX_UUID = "19B10002-E8F2-537E-4F6C-D104768A1214";// Create Bluetooth instancesDIYables_Esp32BLE bluetooth(DEVICE_NAME, SERVICE_UUID, TX_UUID, RX_UUID);DIYables_BluetoothServer bluetoothServer(bluetooth);// Create Monitor app instanceDIYables_BluetoothMonitor bluetoothMonitor;// Variables for demounsignedlong lastUpdate = 0;constunsignedlong UPDATE_INTERVAL = 3000;int messageCount = 0;bool ledState = false;voidsetup() {Serial.begin(115200);delay(1000);Serial.println("DIYables Bluetooth - ESP32 BLE Monitor Example");// Initialize built-in LEDpinMode(2, OUTPUT); // ESP32 built-in LED is usually on GPIO 2digitalWrite(2, LOW);// Initialize Bluetooth server with platform-specific implementation bluetoothServer.begin();// Add monitor app to server bluetoothServer.addApp(&bluetoothMonitor);// Set up connection event callbacks bluetoothServer.setOnConnected([]() {Serial.println("Bluetooth connected!"); bluetoothMonitor.send("=== ESP32 BLE Monitor Connected ==="); bluetoothMonitor.send("System Ready"); bluetoothMonitor.send("Type HELP for available commands"); bluetoothMonitor.send(""); }); bluetoothServer.setOnDisconnected([]() {Serial.println("Bluetooth disconnected!"); });// Set up message handler for incoming commands bluetoothMonitor.onMonitorMessage([](const String& message) {Serial.print("Received command: ");Serial.println(message); handleCommand(message); });Serial.println("Waiting for Bluetooth connection...");}void handleCommand(const String& cmd) {if (cmd == "HELP") { bluetoothMonitor.send("Available Commands:"); bluetoothMonitor.send(" LED_ON - Turn LED on"); bluetoothMonitor.send(" LED_OFF - Turn LED off"); bluetoothMonitor.send(" STATUS - Show system status"); bluetoothMonitor.send(" HEAP - Show free heap memory"); bluetoothMonitor.send(" HELP - Show this help"); }elseif (cmd == "LED_ON") {digitalWrite(2, HIGH); ledState = true; bluetoothMonitor.send("LED turned ON"); }elseif (cmd == "LED_OFF") {digitalWrite(2, LOW); ledState = false; bluetoothMonitor.send("LED turned OFF"); }elseif (cmd == "STATUS") { showStatus(); }elseif (cmd == "HEAP") { bluetoothMonitor.send("Free heap: " + String(ESP.getFreeHeap()) + " bytes"); }else { bluetoothMonitor.send("Unknown command: " + cmd); bluetoothMonitor.send("Type HELP for available commands"); }}void showStatus() { bluetoothMonitor.send("=== System Status ==="); bluetoothMonitor.send("LED State: " + String(ledState ? "ON" : "OFF"));unsignedlong uptime = millis() / 1000; bluetoothMonitor.send("Uptime: " + String(uptime / 3600) + "h " + String((uptime % 3600) / 60) + "m " + String(uptime % 60) + "s"); bluetoothMonitor.send("Free Heap: " + String(ESP.getFreeHeap()) + " bytes"); bluetoothMonitor.send("Messages Sent: " + String(messageCount)); bluetoothMonitor.send("====================");}void sendPeriodicUpdate() { messageCount++;if (messageCount % 3 == 0) { bluetoothMonitor.send("[INFO] Heartbeat #" + String(messageCount)); } elseif (messageCount % 5 == 0) { bluetoothMonitor.send("[HEAP] Free: " + String(ESP.getFreeHeap()) + " bytes"); }else { bluetoothMonitor.send("[TIME] Uptime: " + String(millis() / 1000) + "s"); }Serial.print("Sent update #");Serial.println(messageCount);}voidloop() { bluetoothServer.loop();if (bluetooth.isConnected() && millis() - lastUpdate >= UPDATE_INTERVAL) { lastUpdate = millis(); sendPeriodicUpdate(); }delay(10);}
Click Upload button on Arduino IDE to upload code to ESP32
Open the Serial Monitor
Check out the result on Serial Monitor. It looks like the below:
Newbiely | Arduino IDE 2.3.8
──
☐
✕
File
Edit
Sketch
Tools
Help
ESP32 Dev Module
Newbiely.ino
···
8Serial.println("Hello World!");
Output
Serial Monitor
Message (Enter to send message to 'ESP32 Dev Module' on 'COM15')
New Line
9600 baud
DIYables Bluetooth - ESP32 BLE Monitor Example
Waiting for Bluetooth connection...
Ln 11, Col 1
ESP32 Dev Module on COM15
2
Mobile App
Install the DIYables Bluetooth App on your smartphone: Android | iOS
If you are using the ESP32 Classic Bluetooth code, you need to pair the ESP32 with your Android phone before opening the app:
Go to your phone's Settings > Bluetooth
Make sure Bluetooth is turned on
Your phone will scan for available devices
Find and tap "ESP32_Monitor" in the list of available devices
Confirm the pairing request (no PIN required)
Wait until it shows "Paired" under the device name
If you are using the ESP32 BLE code, no pairing is needed. Just proceed to the next step.
Open the DIYables Bluetooth App
When opening the app for the first time, it will ask for permissions. Please grant the following:
Nearby Devices permission (Android 12+) / Bluetooth permission (iOS) - required to scan and connect to Bluetooth devices
Location permission (Android 11 and below only) - required by older Android versions to scan for BLE devices
Make sure Bluetooth is turned on on your phone
On the home screen, tap the Connect button. The app will scan for both BLE and Classic Bluetooth devices.
Find and tap your device in the scan results to connect:
For Classic Bluetooth: tap "ESP32_Monitor"
For BLE: tap "ESP32BLE_Monitor"
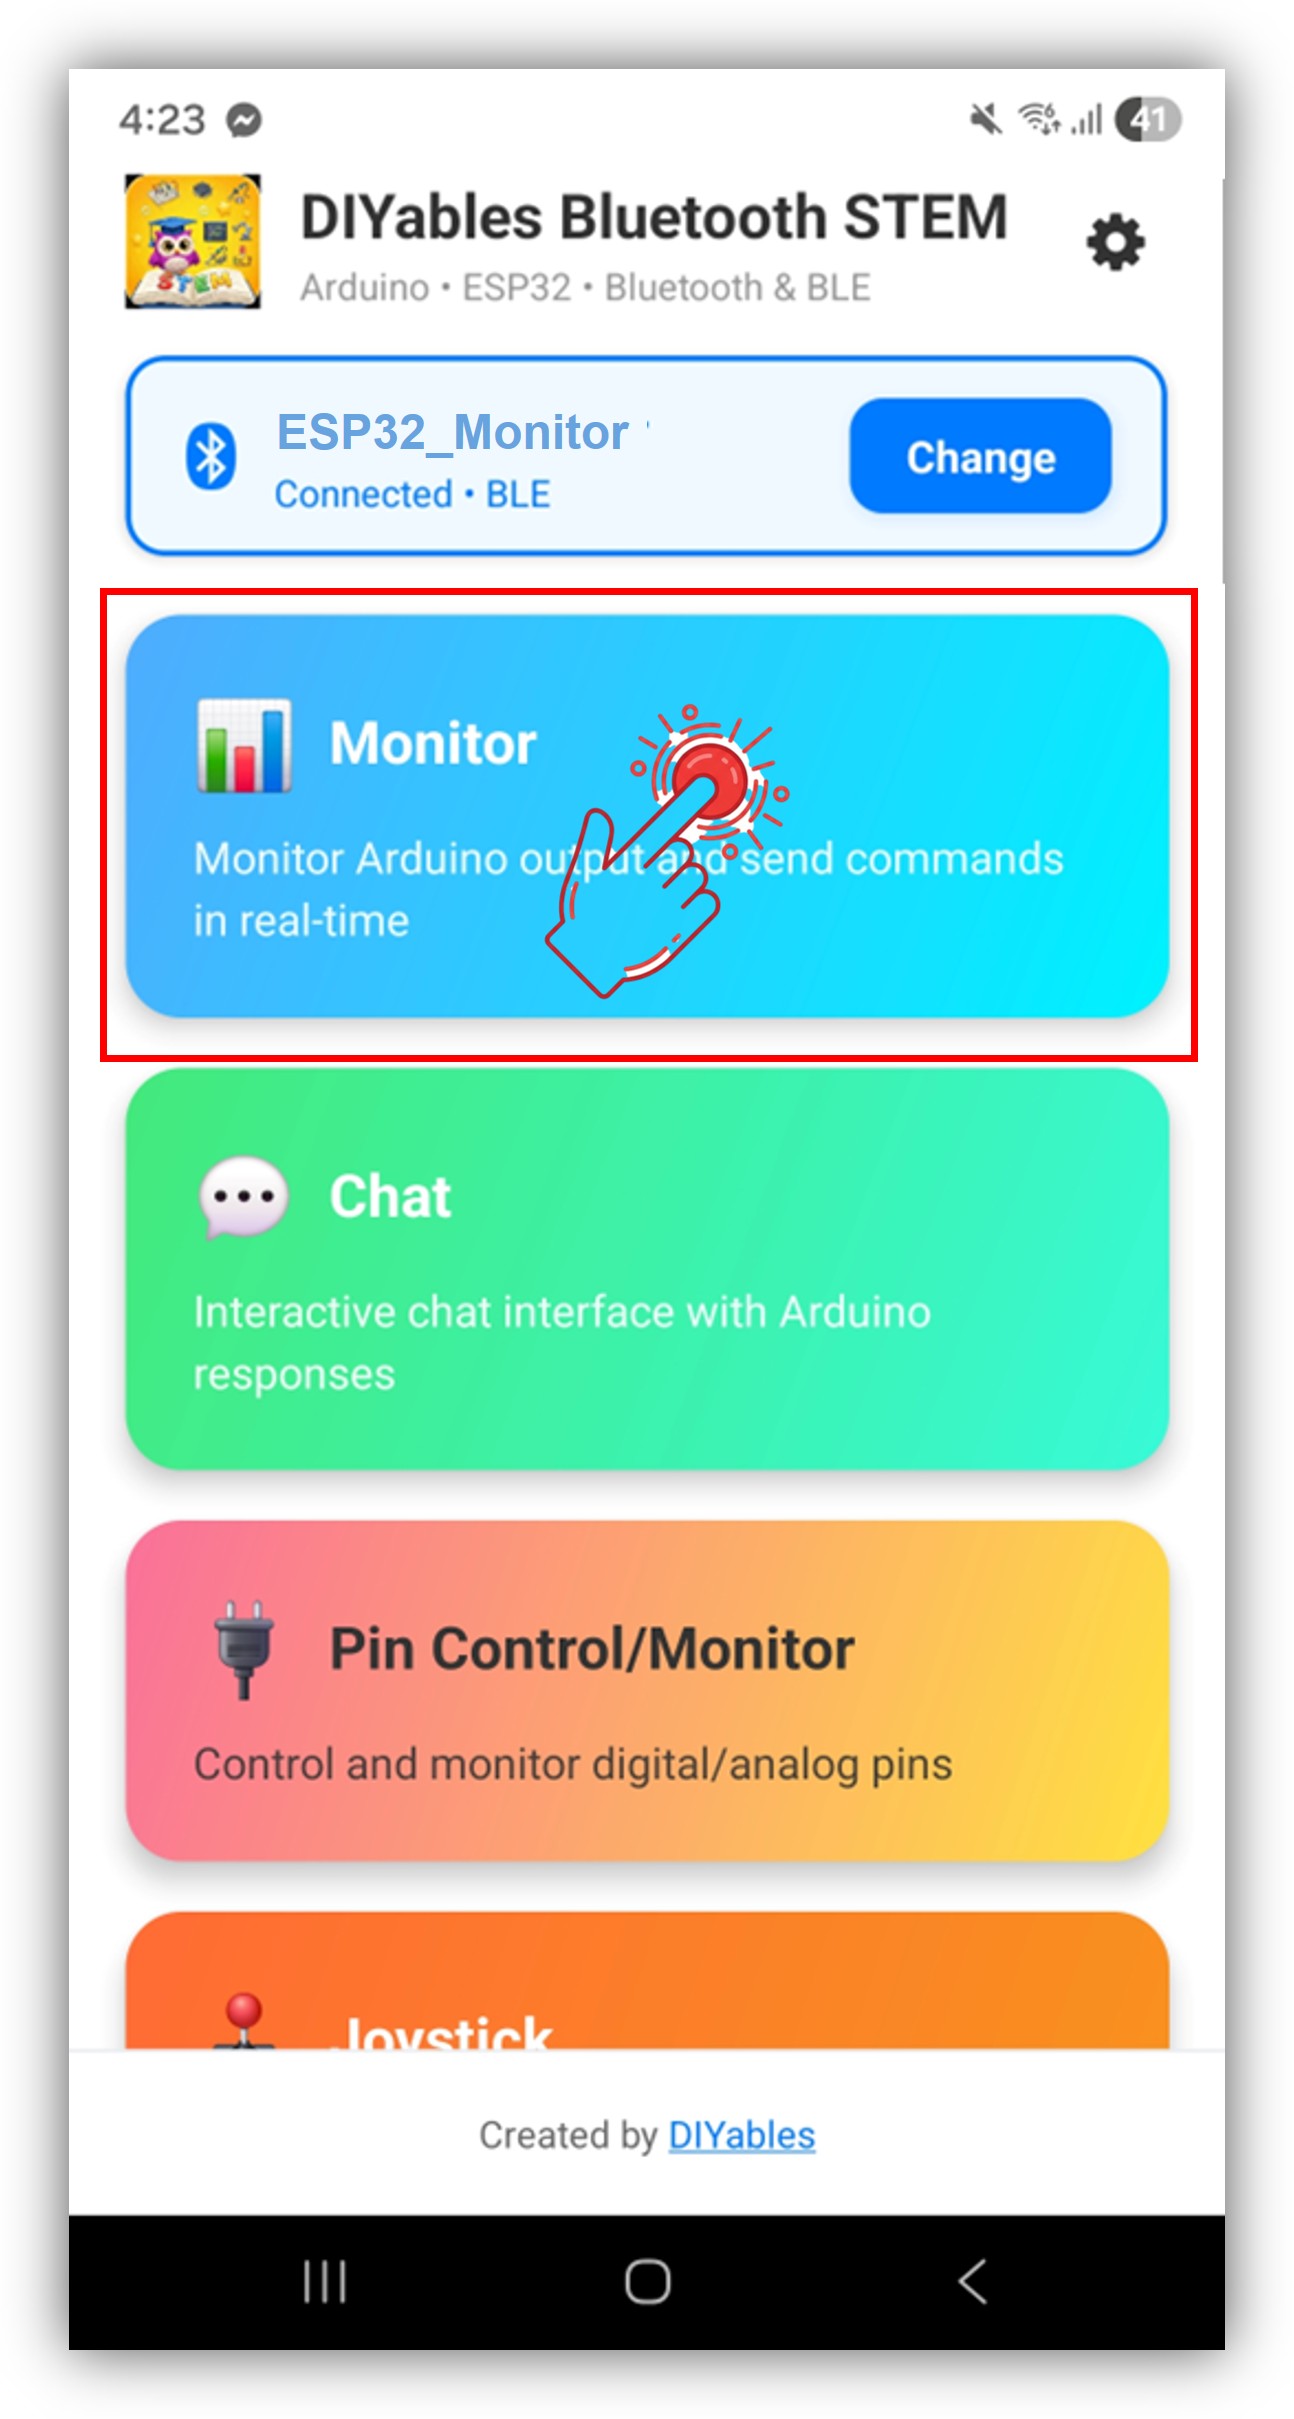
Once connected, the app automatically goes back to the home screen. Select the Monitor app from the app menu.
Note: You can tap the settings icon on the home screen to hide/show apps on the home screen. For more details, see the DIYables Bluetooth App User Manual.
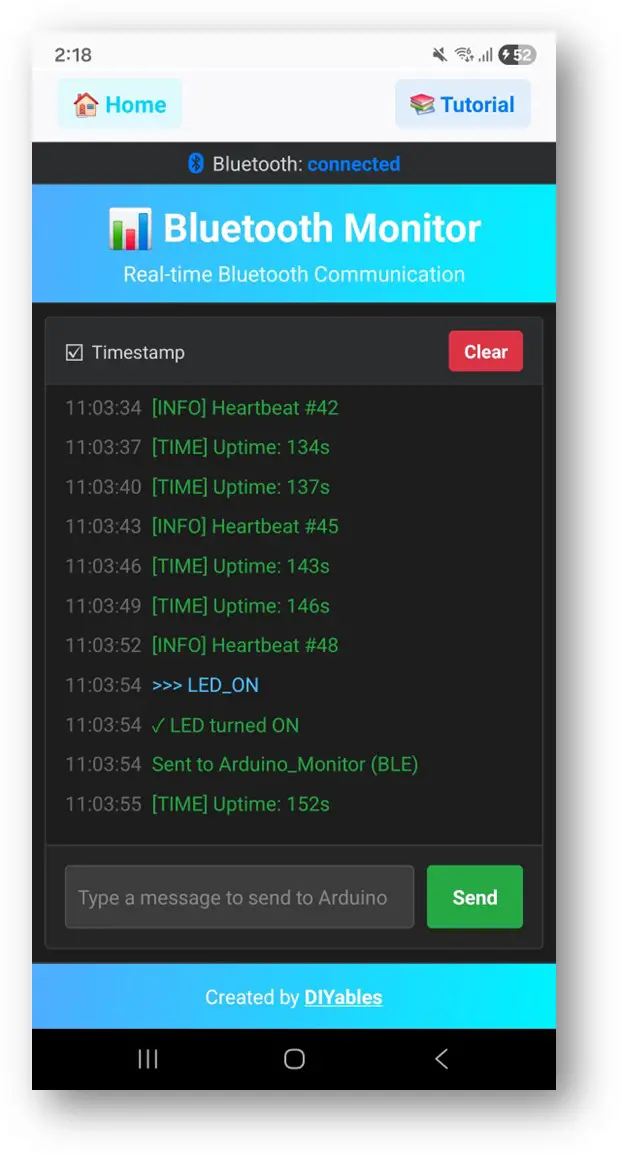
You will see status messages streaming in the monitor display
Type LED_ON in the input field and tap Send — the built-in LED on the ESP32 will turn ON, and the monitor will display a confirmation message
Now look back at the Serial Monitor on Arduino IDE. You will see:
Newbiely | Arduino IDE 2.3.8
──
☐
✕
File
Edit
Sketch
Tools
Help
ESP32 Dev Module
Newbiely.ino
···
8Serial.println("Hello World!");
Output
Serial Monitor
Message (Enter to send message to 'ESP32 Dev Module' on 'COM15')
New Line
9600 baud
Bluetooth connected!
Sent update #1
Sent update #2
Received command: HELP
Received command: STATUS
Ln 11, Col 1
ESP32 Dev Module on COM15
2
Type commands in the app (HELP, STATUS, LED_ON, LED_OFF, HEAP) and watch the responses
Creative Customization - Adapt the Code to Your Project
Send Messages to App
Use the send() method to stream text messages to the monitor display:
You can add as many custom commands as you need by adding more elseif blocks. For example, add RELAY_ON / RELAY_OFF to control a relay, or READ to trigger a sensor reading — any word you type in the app becomes a command.
Handle Connection Events
You can detect when the app connects or disconnects from the ESP32:
bluetoothServer.setOnConnected([]() {Serial.println("Bluetooth connected!"); bluetoothMonitor.send("=== ESP32 Monitor Connected ==="); bluetoothMonitor.send("System Ready"); bluetoothMonitor.send("Type HELP for available commands");});bluetoothServer.setOnDisconnected([]() {Serial.println("Bluetooth disconnected!");});if (bluetoothServer.isConnected()) { bluetoothMonitor.send("Status update");}
How to Use the Monitor
App Interface Controls
The monitor interface in the DIYables Bluetooth App provides:
Message Display: Scrollable list of received messages with auto-scroll
Text Input: Type commands at the bottom
Send Button: Tap to send the typed command to ESP32
Built-in Commands
The example code includes these built-in commands:
HELP ? Shows all available commands
LED_ON ? Turns the built-in LED on
LED_OFF ? Turns the built-in LED off
STATUS ? Shows system status (LED state, uptime, heap, messages sent)
Please feel free to share the link of this tutorial. However, Please do not use our content on any other websites. We invested a lot of effort and time to create the content, please respect our work!